Telia Smart Connect is also available as an app on both the App Store and Google Play. This means that you can access your switchboard on your mobile devices with just a few taps, making it even more convenient to have full control.


Visual Administrator
With the Visual Administrator (IVR), you get complete control of all calls to the main company number. You can drag and drop opening hours, menu selection, queues, SMS and voice prompting elements to create the optimal call flow for your company:
- Get a visual overview of the company main number call flow.
- You can easily administrate with the drag and drop interface.
- You get complete control of the company main numbers, opening hours, and menu selection from one interface.
How to Get Started with Visual Administrator
- Navigate to the Administrator page from the main menu
- Then select “Telephony Setup”
- Select “Visual admin” tab.
- Press the button “Click to open Visual Admin”.
- If you haven’t set up a call flow, you can create a new IVR by dragging and dropping the elements you need.
- If you already have created call flows, you will get the option to choose what IVR you want to edit. You can later change what IVR to edit by clicking “Show menu” and then click “List main numbers”. Here all your IVRs are listed, as well as all previous versions of each IVR. Each time you save your IVR you can revert to a previous version at any time.
The Visual Administrator is available for the company administrators and users with role access. Read more in the Role Administration user guide here.
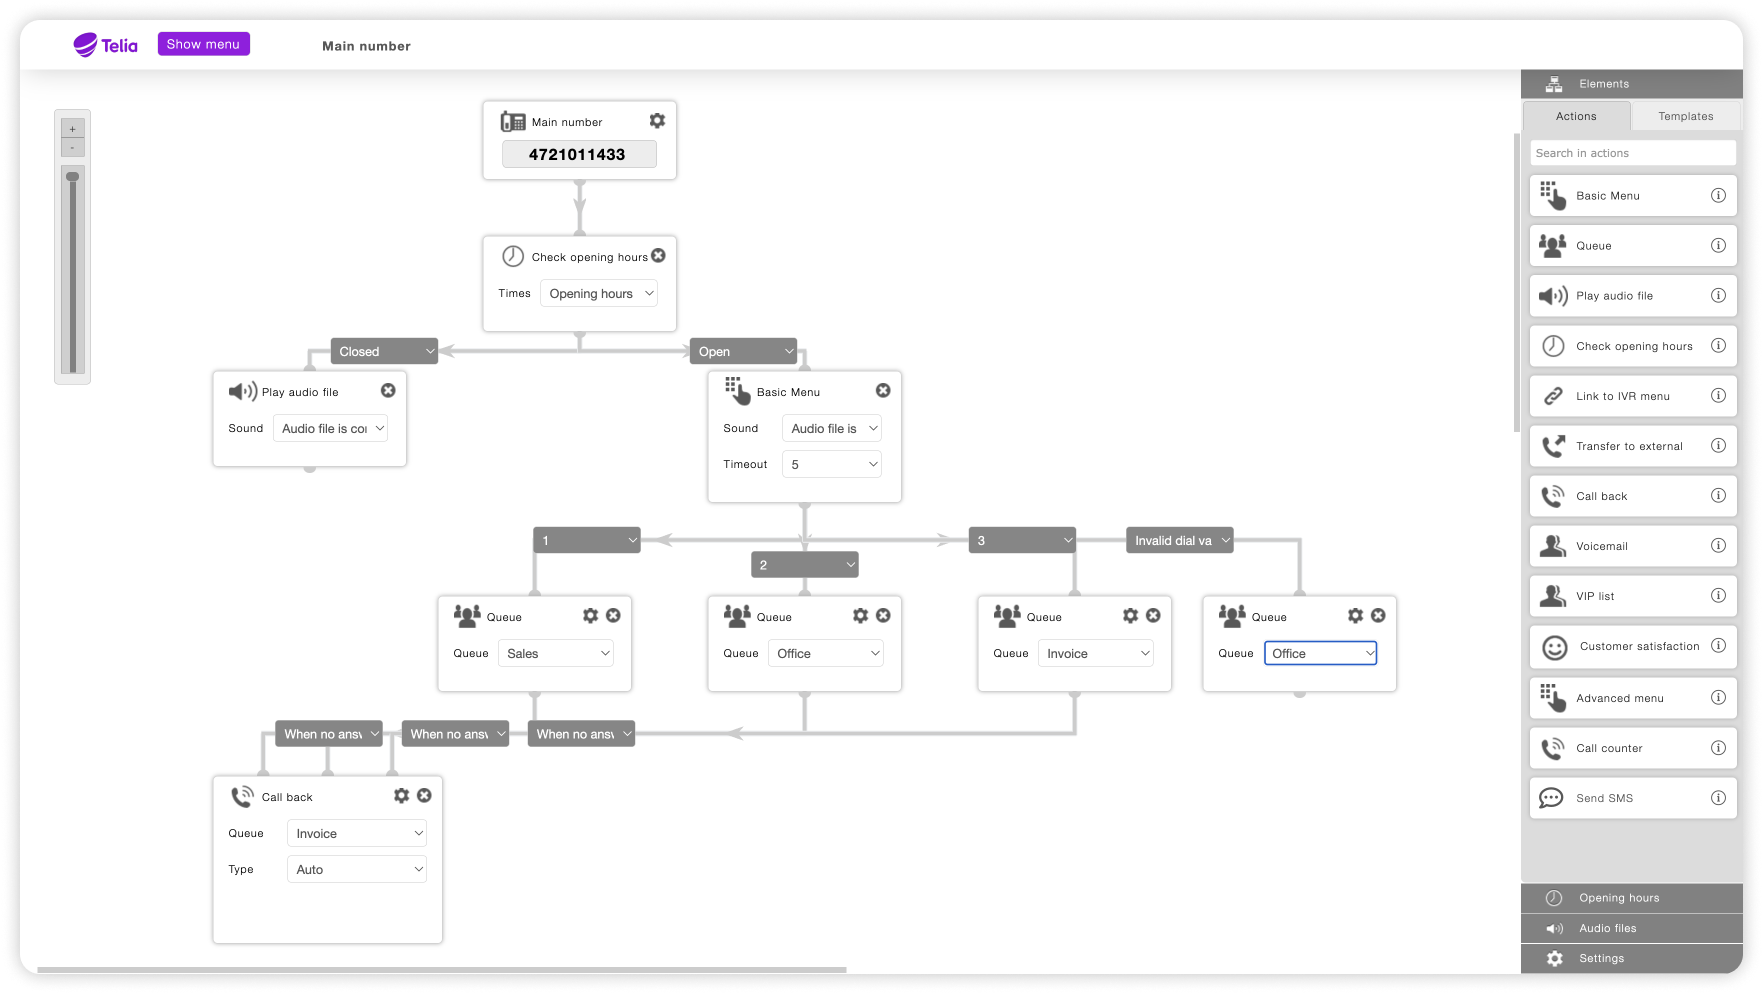
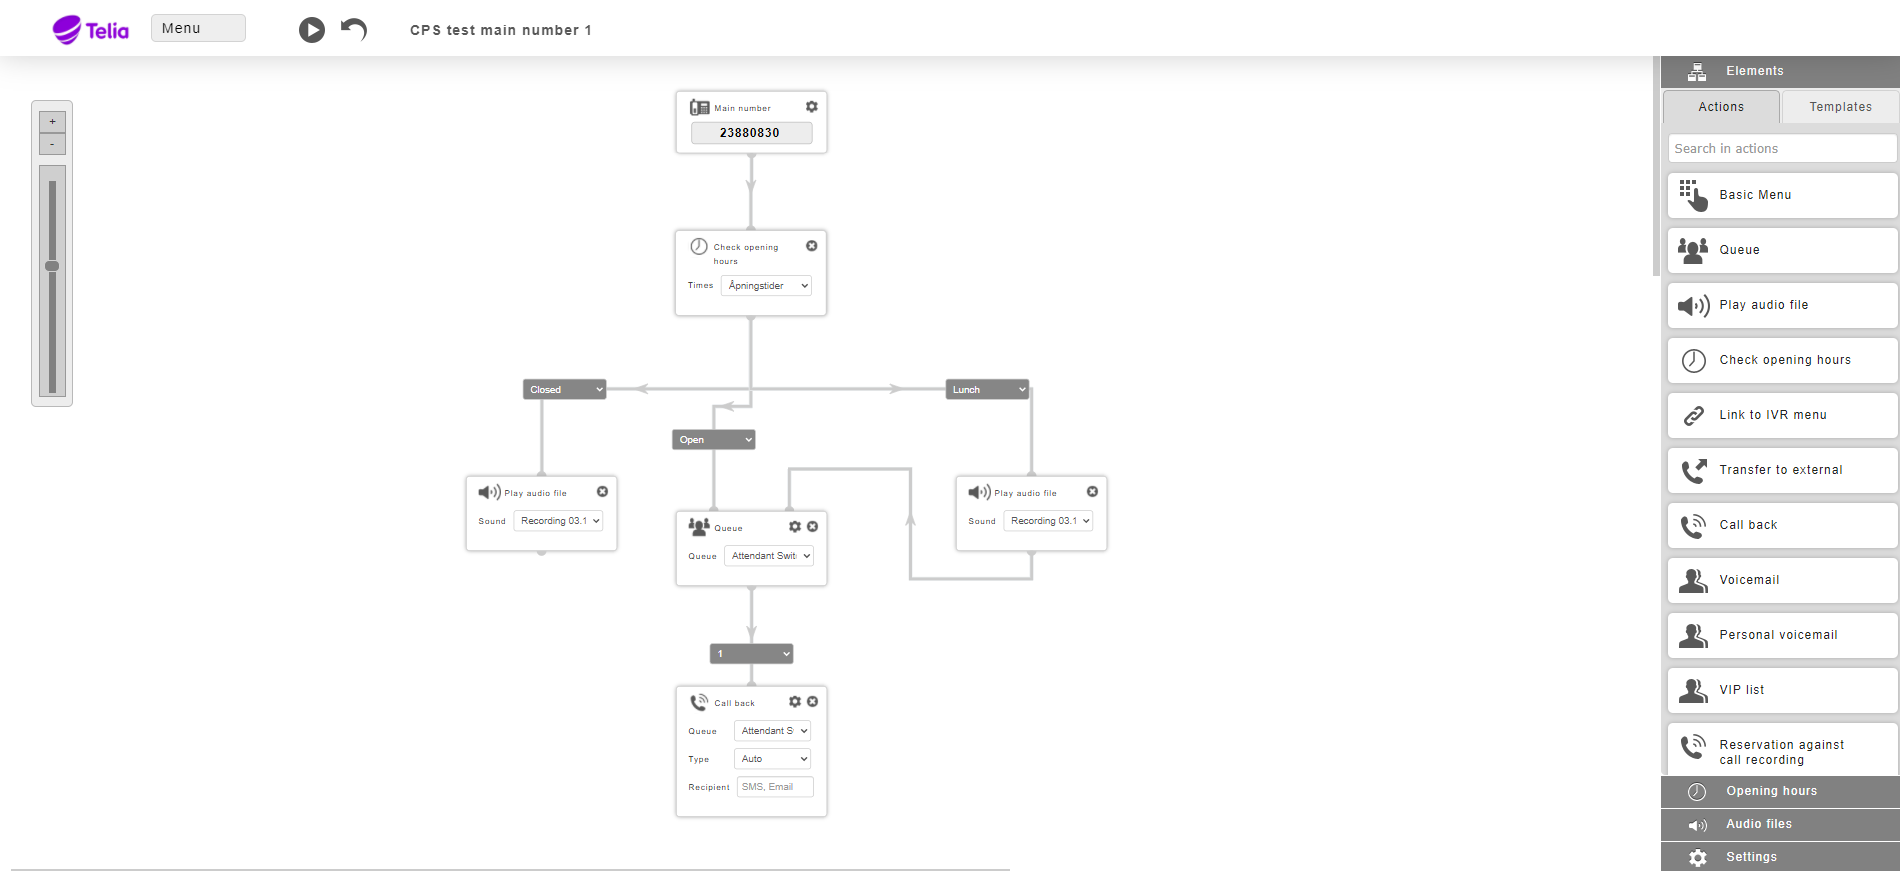
Example call flow
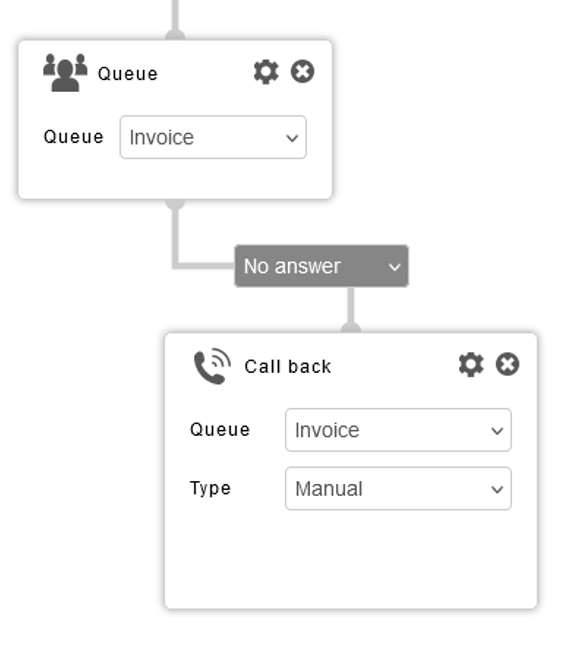
The example in the image here shows a very standard call-flow. The call is connected trough the main number, and opening hours are checked.
→ If open; an audio file is played, stating the menu options and the caller can press 1, 2 or 3, and is routed accordingly. If none of the members in the queue answers the call, the call is re-directed to an automatic callback-function.
→ If closed; an audio file is played, and the call is hung up.
Different functions and elements in Visual Administrator
Elements:
- Basic menu: Play back an announcement and let the caller dial a selection between 0-9 and route the call accordingly.
- Queue: Connect main numbers to queues and distribute calls to a group of members. This has advanced setting for each element in the call flow. Read more about queues
- Dialed conference: Control which dialed conference to be triggered when calling the main number. Triggering dialed conference will start a call with all the conference’s members
- Play audio file: Choose this element and place it in the flow where you would like an audio file to be played. For example after the element “Check opening hours” and before the element “queue”, or when closed.
- Check opening hours: Lets you define what should happen with the call to different times a day trough out the week.
- Link to IVR menu: Route the call to another IVR.
- Transfer to external: Transfer the call to an external number. Can be both fixed and mobile numbers. Remember country prefix.
- Call back: With the call back-function the caller can be given an option to be called back instead of waiting and holding the line. Both automatic and manual callback are supported. With manual callback an SMS or email is sent to the queue member with the caller contact information (phone number or email address). If automatic call back is selected the next available queue member automatically calls the caller back.
- Voicemail: Let the caller record a voice message when calling the company main number to be sent to an e-mail address.
- VIP list: This enables routing of calls based on the callers number, for example to play back a message or place them in a priority queue.
- Reservation against call recording: If you wish for calls from a specific queue not to be recorded, you can use this element before the call proceeds to the queue.
- Customer satisfaction: To use your NPS survey, this element must be placed in the desired IVR, and the call must go through the customer satisfaction element before it gets to a queue for the survey to work. Read more about customer satisfaction here.
- Advanced menu: Create routing destination based on number list, for example zip code routing.
- Call counter: Call counter can be used for statistics, to for example count how many calls you get outside of the IVR’s opening hours.
- Send SMS: Send the caller an SMS, for example with information on how to book an appointment, or other.
Basic Information
- The company IVRs are available via the menu. Here you will find a list of all your IVRs, as well as all previous versions of each IVR. Each time you save your IVR you can revert to a previous version at any time.
- Each main number can be assigned to an IVR, via Menu and Main numbers.
- When you have an open IVR, it is possible to do a test run of the IVR by pressing the “Play”(x). Input the number to be dialed up and the date/time that you want to use to test the IVR.
- Functions that are used for building the IVR are under the “Elements” on the right side. You can drag and drop the elements and connect them in the IVR to create the call flow you need.
- Some functions have advanced settings independent of each element in the call flow. Click on the element in the call flow and press the “Settings”(X) icon to access the settings on the right side.
Elements and Functions in Visual Admin
- Opening hours: This enables you to administrate the company opening hours. There are several possibilities like “Open”, “Closed”, “Lunch” and other exceptions.
- Audio files / Voice prompts Record and setup of sound files that can be used in IVR to playback a message in several of the elements.
- Queues: Connect main numbers to queues and distribute calls to a group of members. This has an advanced setting for each element in the call flow.
- VIP list: This enables routing of calls based on callers a-number, for example, to playback a message or place them in a priority queue.
- Basic menu: Playback an announcement and let the caller make a selection and route the call accordingly here
- Advanced menu: Create routing destination based on number list, for example, zip code routing.
- Callback: Give the caller the option to not wait in a queue, but get a manual or an automatic callback
- Voice mail: Let the caller record a voice message when calling the company main number to be sent to an e-mail address.
- SMS message: Send the caller information by SMS, for example with information about where to find the information they are waiting for.
- Call counter: The call counter can be used for statistics.
- Transfer to number: Transfer the call out of the IVR to an external number.
- Link to IVR: Transfer the call over to another IVR inside the same company
Basic Menu
With the Basic menu function, the caller can press a number to continue the call flow based on the reason for calling. You can upload an announcement that informs the caller about the options. For example “Press 1 for support, 2 for sales” etc. Each menu selection will then fork out in a new call flow for that selection, normally ending up in a queue for support or sales. For the “Basic menu” the options are 0-9 and invalid, and a no-dial value.
Example of a basic call flow using Basic Menu element:
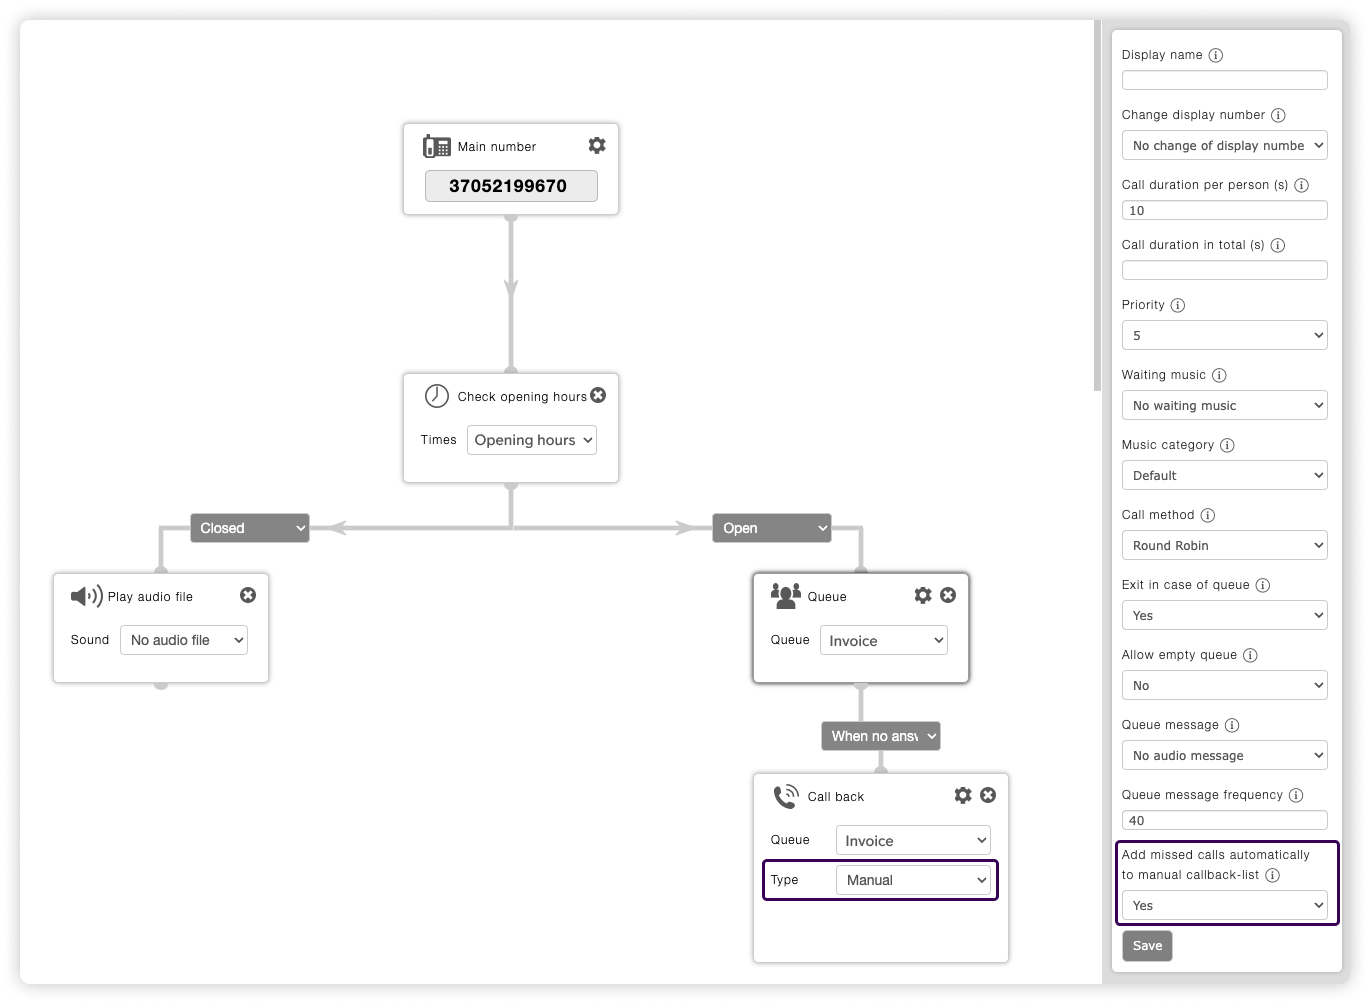
Callback
With the “Callback” function the caller can be given an option to be called back instead of waiting and holding the line. Both automatic and manual callbacks are supported. With manual callback, an SMS or email is sent to the queue member with the caller contact information (phone number or email address). If an automatic call back is selected the next available queue member automatically calls the caller back.
Following fields are available for the “Callback” element:
- SMS/E-mail: Mandatory for manual callbacks, where the information is sent with information of the caller.
- Mandatory to input call back number: Yes/No selection, that can force the caller to enter the number to be called back on. For example, if the caller called from a fixed line, it is possible to enter a mobile number to be called back on.
- Confirmation message: A confirmation message can be activated to play immediately after the caller has entered the callback number. If the callback is disabled, the announcement is played immediately before the caller enters the callback number.
- Invalid number message: This message will be played if the caller adds an invalid callback number.
- Info message: This message will be played if the caller gets the callback option, i.e. this is only used if a mandatory callback number is enabled.
- Callback presentation number: The presentation number that will be used when enabling automatic callback.
- Opening hours: Add opening hours to define when the call back should be enabled. This could for example be closed during lunch hours, or after work hours.
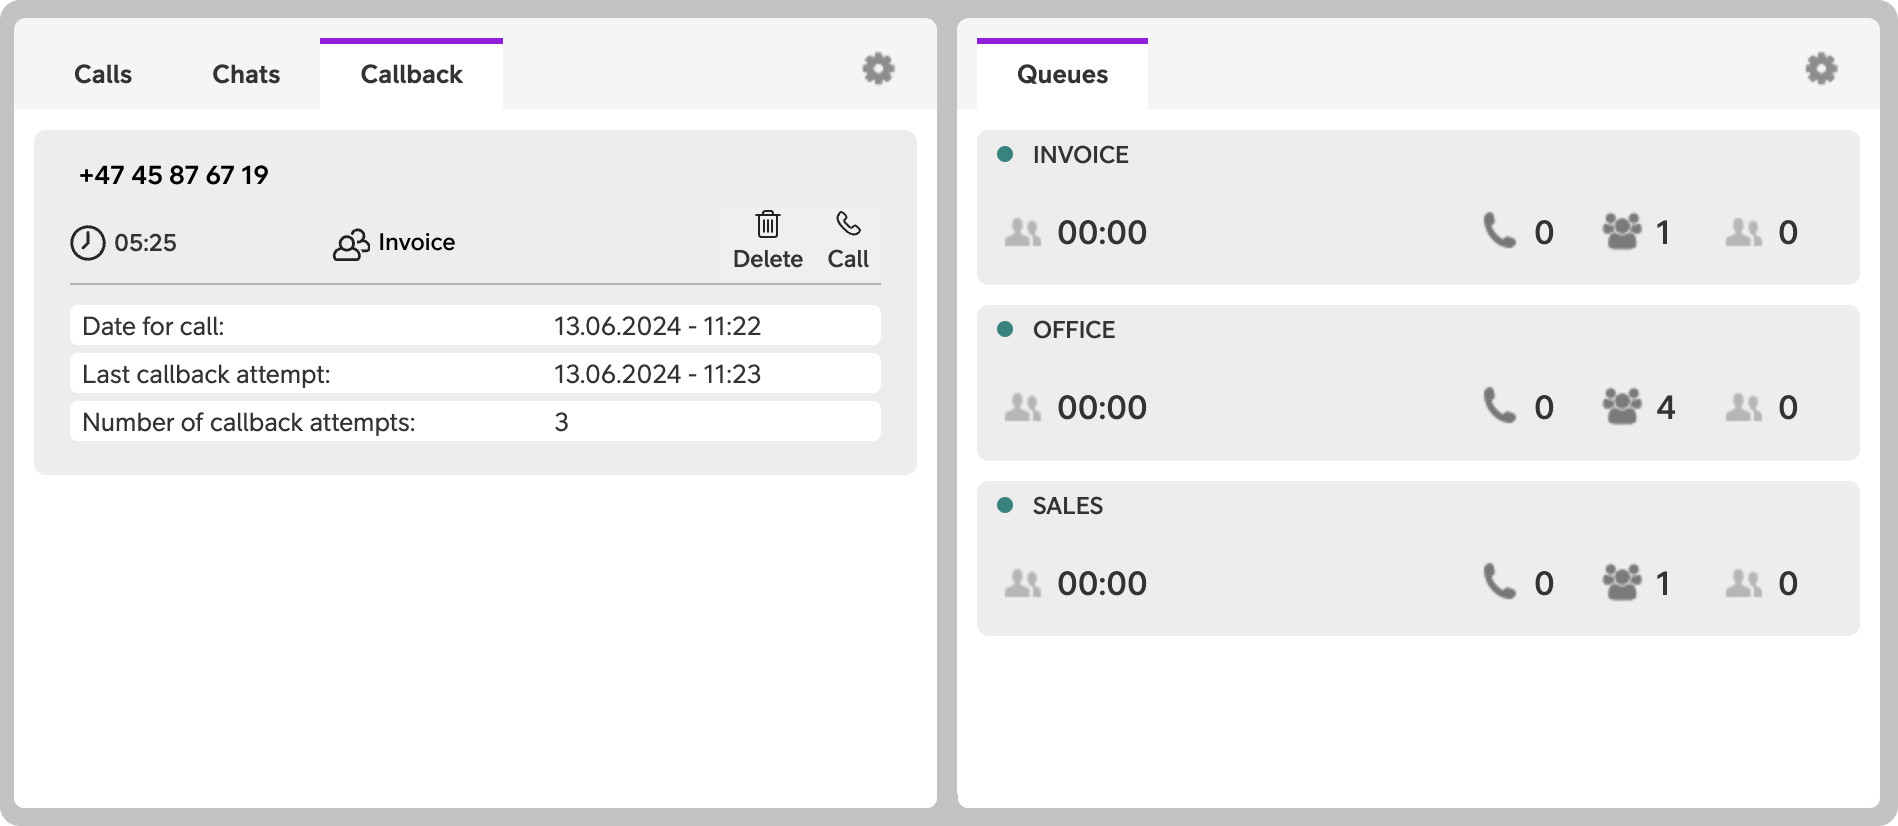
Manual callback (Switchboard)
Callback is located in the switchboard-view. When clicking on the callback tab, the agent will see a list of all callbacks from the agent’s queues.
When the relevant callback is minimized, key information such as who called (if this can be retrieved), the caller’s number, which queue they called through, how long they have been waiting for a callback, as well as buttons to call the person back, and to manually delete the callback from the list.
When expanding the relevant callback by clicking on it, information about when the callback was initiated will be shown. If an agent has tried to call back, the last attempted callback, and the number of attempted callbacks will also be displayed. Hovering over the relevant information will show which agent(s) attempted to call back.
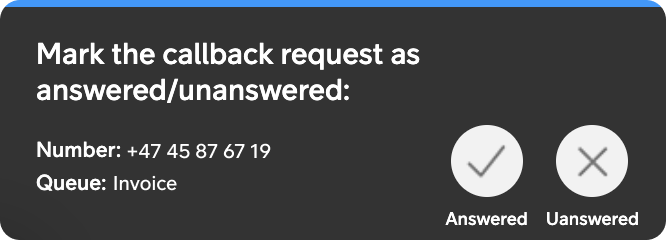
Callback pop-up
After a callback has been initiated, a popup will appear, and the agent must mark the callback as either answered or unanswered. The popup will not disappear until one of the two buttons has been clicked.
→ If the call is marked as answered, the callback will be removed from the list.
→ If the call is marked as unanswered, the callback will remain in the list.
User Guides
Here you can find user guides connected to the feature topic. If you can’t find what you are looking for here you might find it in our main user guide archive.
User Guides