Telia Smart Connect is also available as an app on both the App Store and Google Play. This means that you can access your switchboard on your mobile devices with just a few taps, making it even more convenient to have full control.


Visual Administrator
With the Visual Administrator (IVR), you get complete control of all calls to the main company number. You can drag and drop opening hours, menu selection, queues, SMS and voice prompting elements to create the optimal call flow for your company:
- Get a visual overview of the company main number call flow.
- You can easily administrate with the drag and drop interface.
- You get complete control of the company main numbers, opening hours, and menu selection from one interface.
How to Get Started with Visual Administrator
- Navigate to the Administrator page from the main menu
- Then select “Telephony Setup”
- Select “Visual admin” tab.
- Press the button “Open”.
- If you haven’t set up a call flow, you can create a new IVR by dragging and dropping the elements you need.
- If you already have created call flows, you will get the option to choose what IVR you want to edit. You can later change what IVR to edit by clicking “Show menu” and then click “List main numbers”. Here all your IVRs are listed, as well as all previous versions of each IVR. Each time you save your IVR you can revert to a previous version at any time.
The Visual Administrator is available for the company administrators and users with role access. Read more in the Role Administration user guide here.
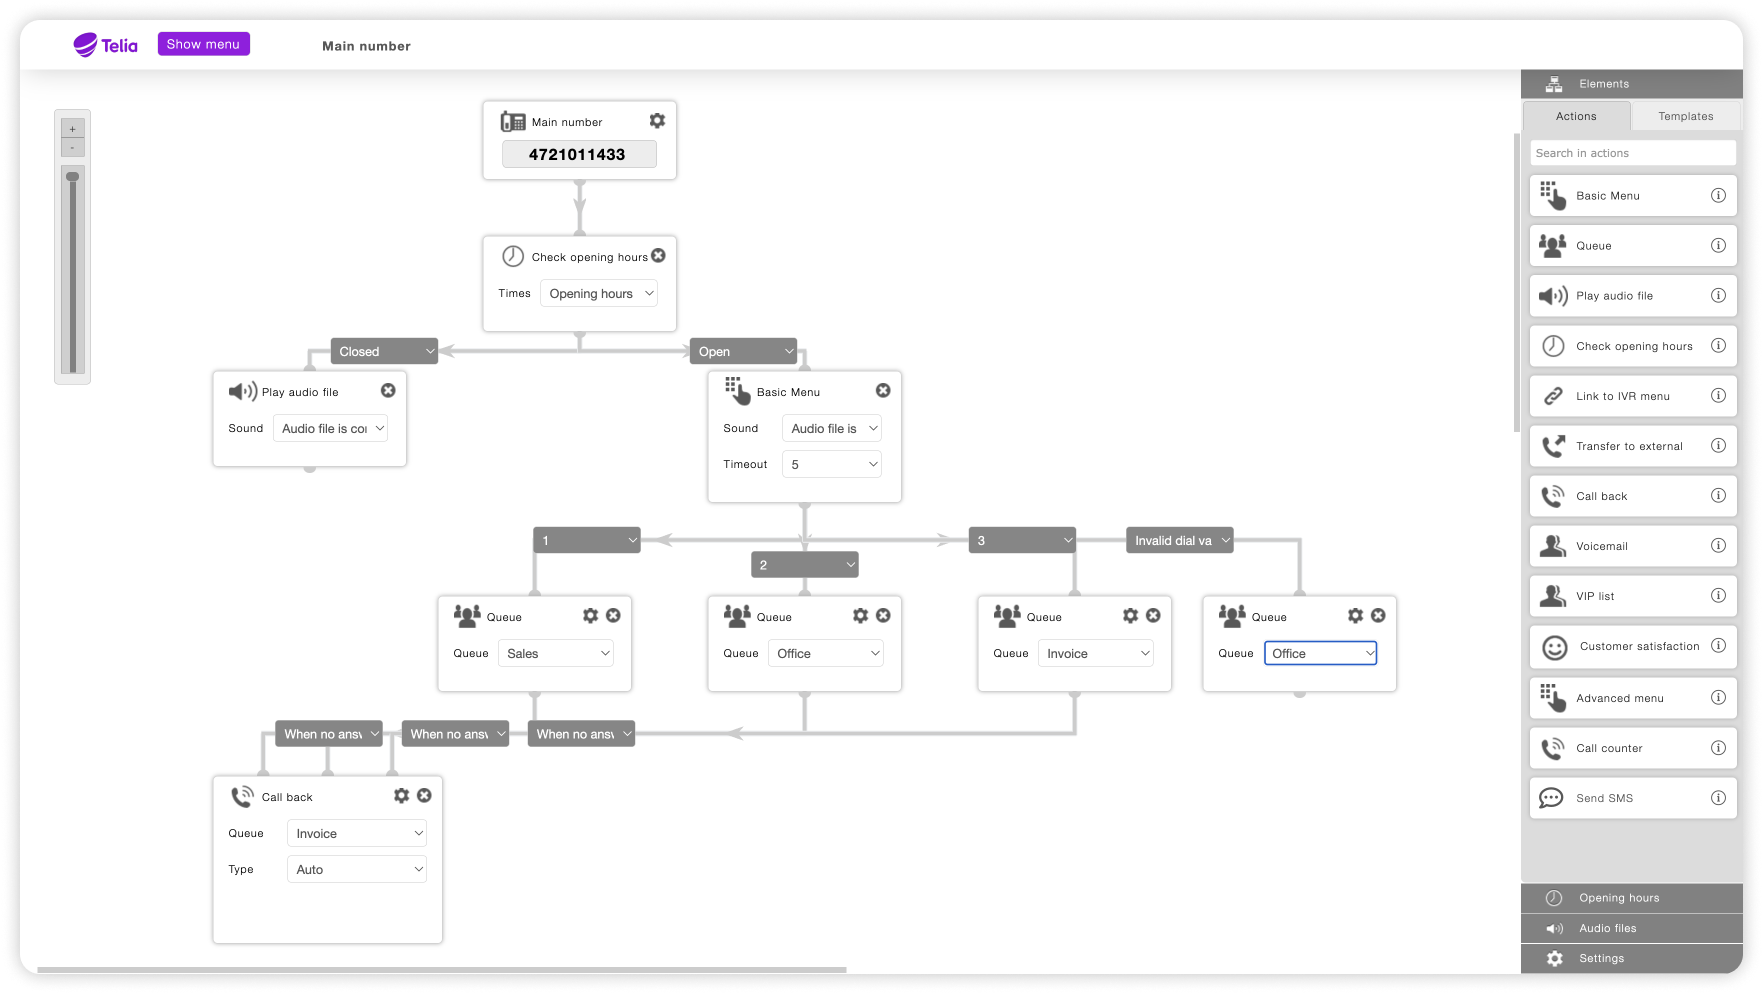
Example call flow
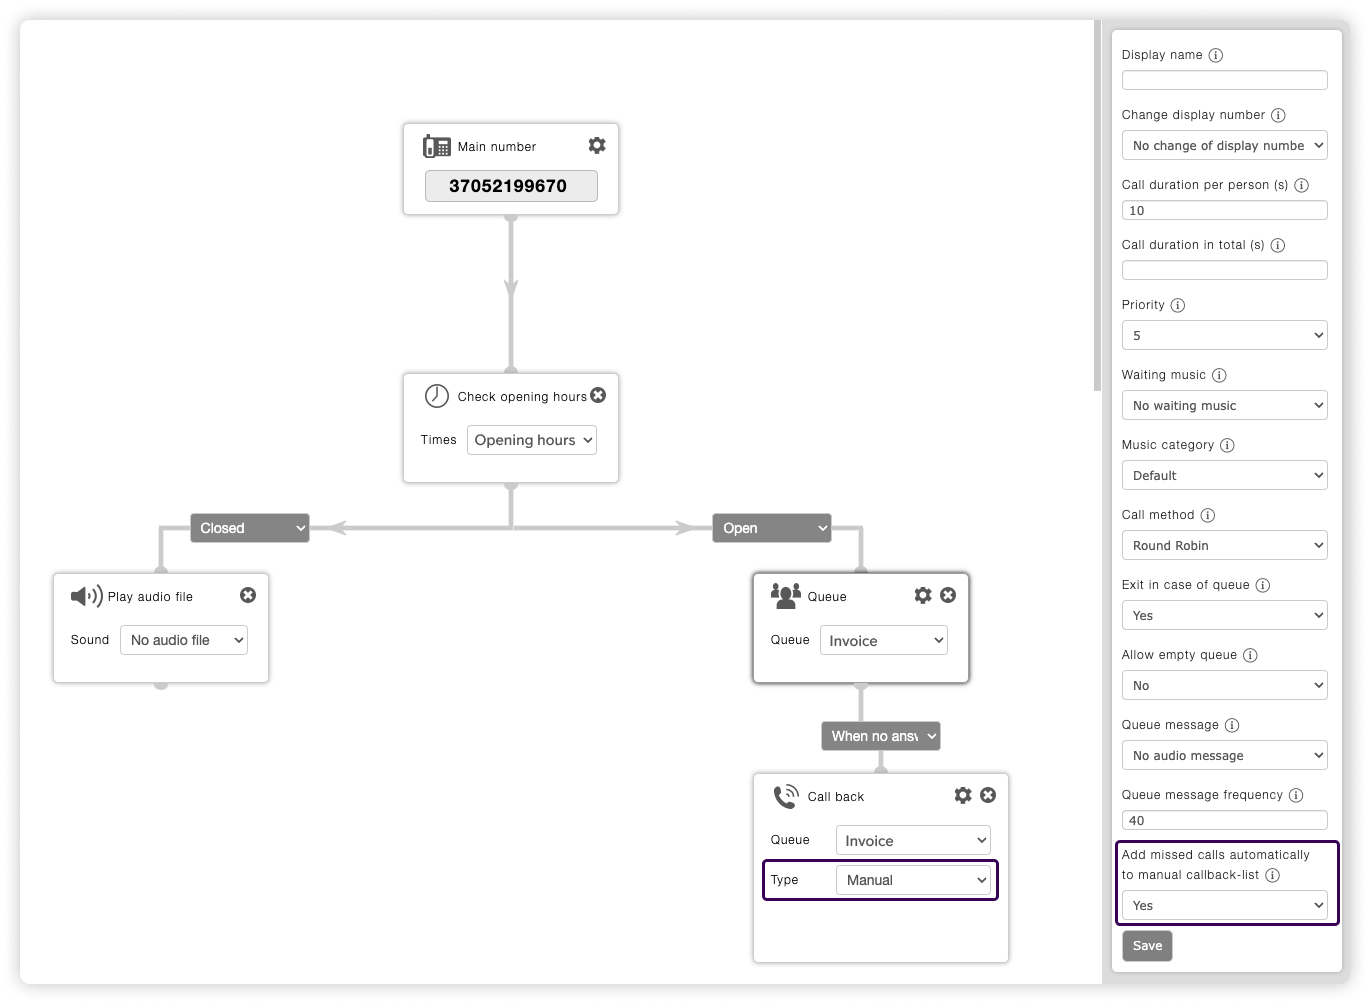
The example in the image here shows a very standard call-flow. The call is connected trough the main number, and opening hours are checked.
→ If open; an audio file is played, stating the menu options and the caller can press 1, 2 or 3, and is routed accordingly. If none of the members in the queue answers the call, the call is re-directed to an automatic callback-function.
→ If closed; an audio file is played, and the call is hung up.
Different functions and elements in Visual Administrator
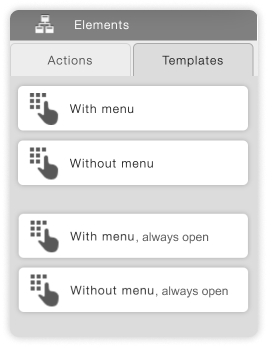
Elements:
- Basic menu: Add basic menu to the company’s main number so that callers can choose the correct department or person themselves. From the function, you can choose which audio file should be played and set a timeout if no keys are pressed. Elements linked to the basic menu element can be given their own key choice between 0 and 9, and you can define where the call is routed if the caller does not press anything or presses an invalid key choice.
- Queue: Control which queue groups are to be connected to the main number and make advanced choices for the queue groups. Read more about queues in the Queue Administration user guide here.
- Dialed conference: Control which dialed conference to be triggered when calling the main number. Triggering dialed conference will start a call with all the conference’s members. Read more about Dialed conference in the Phone Conference user guide here.
- Play audio file: Choose this element and place it in the flow where you would like an audio file to be played. For example after the element “Check opening hours” and before the element “queue”, or when closed. Listen to the selected audio file by clicking “play”.
- Check opening hours: Define what opening hours should be used in this IVR and control the call pattern. You can change opening hours, and create new ones by clicking “Opening hours” in the bottom right corner.
- Link to IVR menu: Route the call to another IVR.
- Transfer to external: Transfer the call to an external number. Can be both fixed and mobile numbers. Remember country prefix.
- Call back: With the call back-function the caller can be given an option to be called back instead of waiting and holding the line. Both automatic and manual callback are supported. With manual callback an SMS or email is sent to the queue member with the caller contact information (phone number or email address). If automatic call back is selected the next available queue member automatically calls the caller back.
- Voicemail: Let the caller record a voice message when calling the company main number to be sent to an e-mail address. Click on the settings-icon (gear) to choose expiry for the voicemail.
- VIP list: This enables routing of calls based on the callers number, for example to play back a message or place them in a priority queue.
- Reservation against call recording: If you wish for calls from a specific queue not to be recorded, you can use this element before the call proceeds to the queue.
- Customer satisfaction: To use your NPS survey, this element must be placed in the desired IVR, and the call must go through the customer satisfaction element before it gets to a queue for the survey to work. Read more about the Customer Satisfaction module in the user guide here.
- Advanced menu: Create routing destination based on number list, for example zip code routing.
- Call counter: Call counter can be used for statistics, to for example count how many calls you get outside of the IVR’s opening hours.
- Send SMS: Send the caller an SMS, for example with information on how to book an appointment, or other.
Opening hours
When clicking on opening hours, all existing opening hours will be listed, and the option to create new opening hours.
Read more about opening hours here.
Audio files
When clicking on audio files, you can either click on “Edit” which lets you edit existing audio files, upload new audio files, or delete old ones. All audio files will be listed.
Read more about audio files here.
Settings
Settings connected to different elements. When clicking the “settings” icon on an element, this will open, and advanced settings to elements can be changed.
Connecting a main number to your IVR
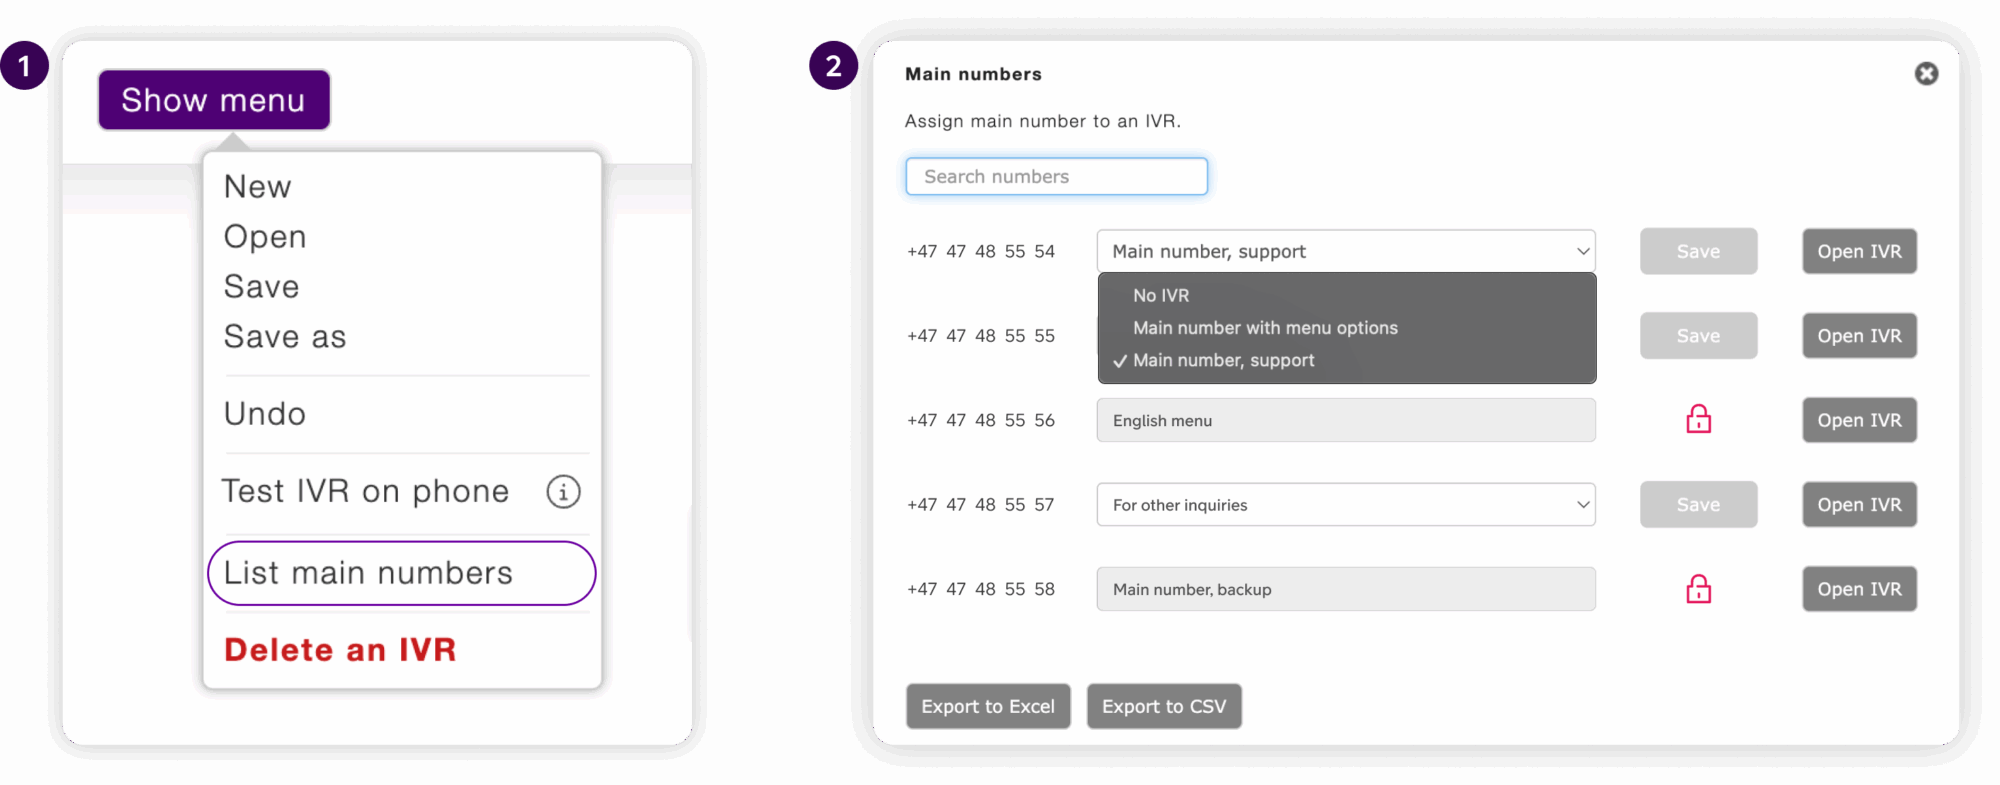
To connect a main number to your IVR, enter the Visual Administrator and click on the menu in the top left corner, then click “List main numbers”. You will now see a list of all your company’s main numbers. By clicking the drop-down menu next to each main number, you will be able to connect them to different IVR’s. Different main numbers can be connected to the same IVR. Remember to click save.
You are also able to open IVR’s directly from the main number list, by clicking “Open IVR”.
Deleting an IVR, or older versions of the IVR
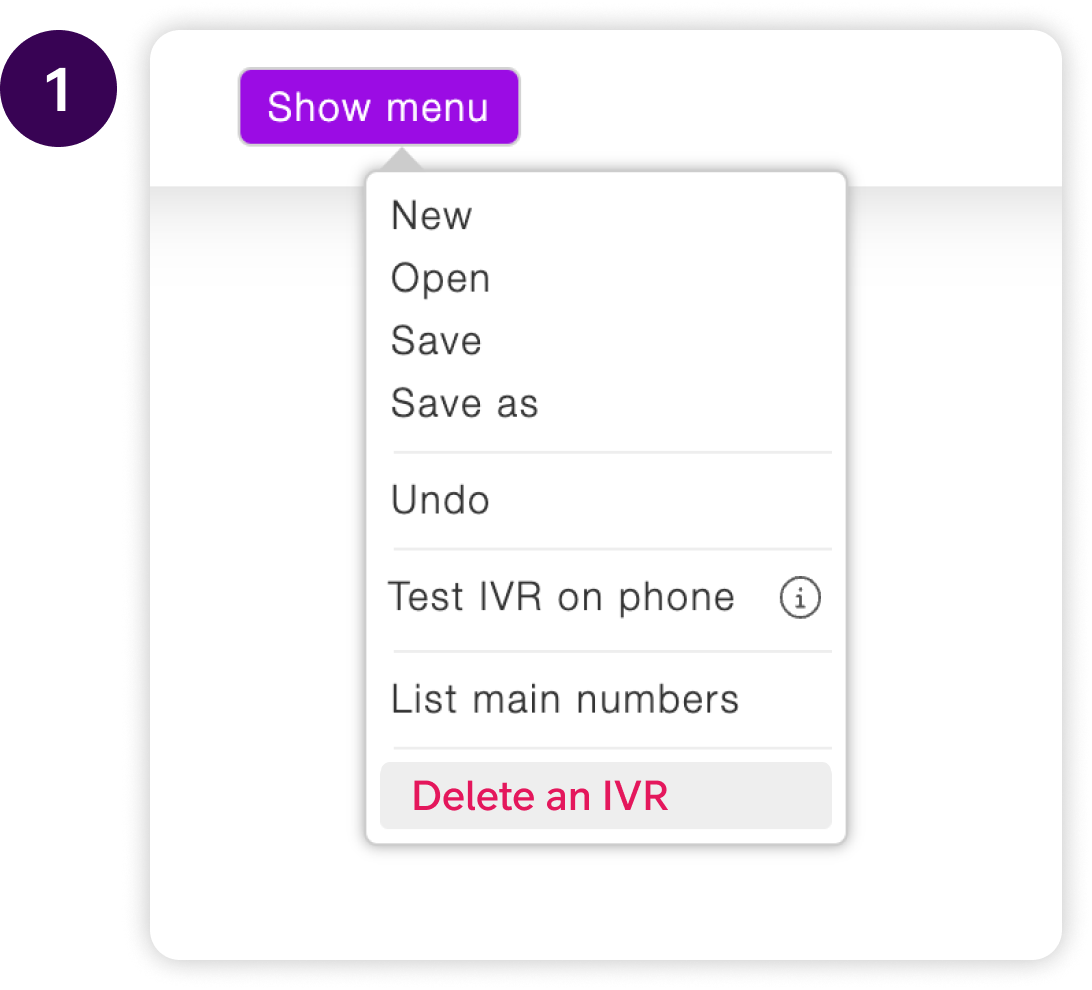
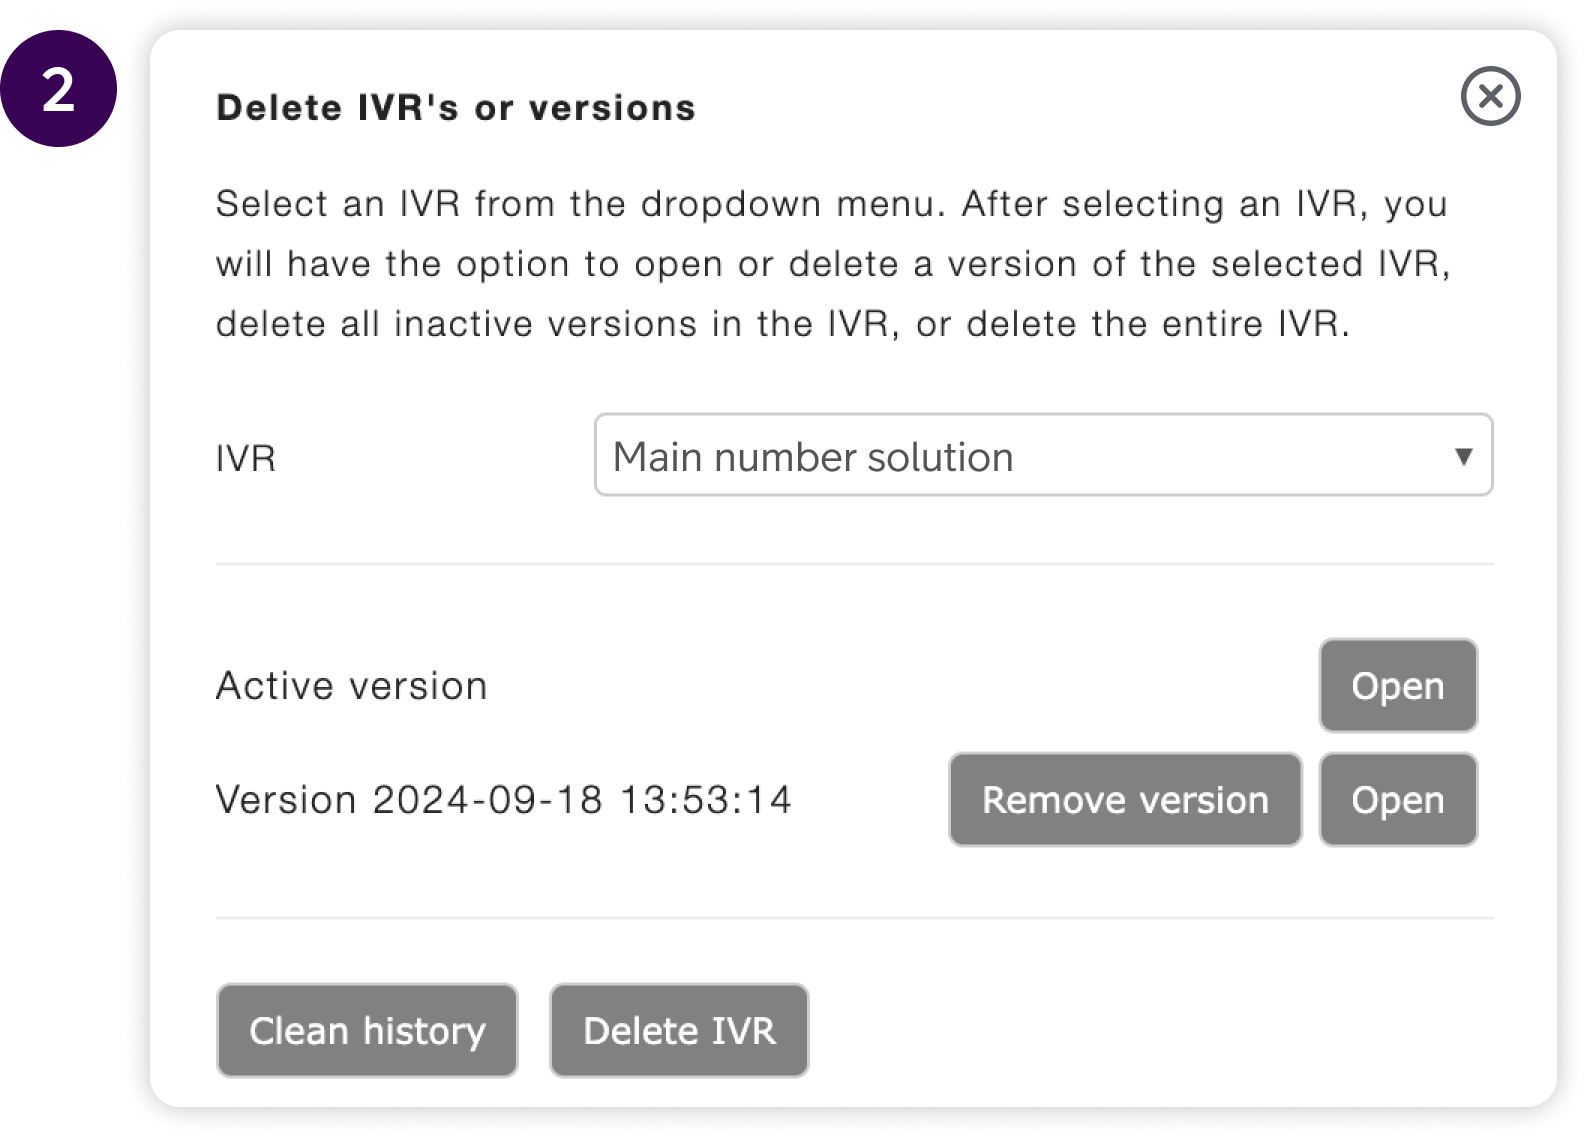
To delete an IVR, you click on the menu in the top left corner, then click “Delete an IVR”, and choose the IVR from the drop-down menu. You can either delete the entire IVR and all associated versions, delete older versions of the IVR by cleaning the history, or just delete one older version of the IVR.
After clicking the “delete” button, the user will get a pop-up asking them to confirm that they want to delete the IVR. When deleted, the IVR cannot be restored.
Callback
With the “Callback” function the caller can be given an option to be called back instead of waiting and holding the line. Both automatic and manual callbacks are supported. With manual callback, an SMS or email is sent to the queue member with the caller contact information (phone number or email address). If an automatic call back is selected the next available queue member automatically calls the caller back.
Following fields are available for the “Callback” element:
- SMS/E-mail: Mandatory for manual callbacks, where the information is sent with information of the caller.
- Mandatory to input call back number: Yes/No selection, that can force the caller to enter the number to be called back on. For example, if the caller called from a fixed line, it is possible to enter a mobile number to be called back on.
- Confirmation message: A confirmation message can be activated to play immediately after the caller has entered the callback number. If the callback is disabled, the announcement is played immediately before the caller enters the callback number.
- Invalid number message: This message will be played if the caller adds an invalid callback number.
- Info message: This message will be played if the caller gets the callback option, i.e. this is only used if a mandatory callback number is enabled.
- Callback presentation number: The presentation number that will be used when enabling automatic callback.
- Opening hours: Add opening hours to define when the call back should be enabled. This could for example be closed during lunch hours, or after work hours.
Manual callback (Switchboard)
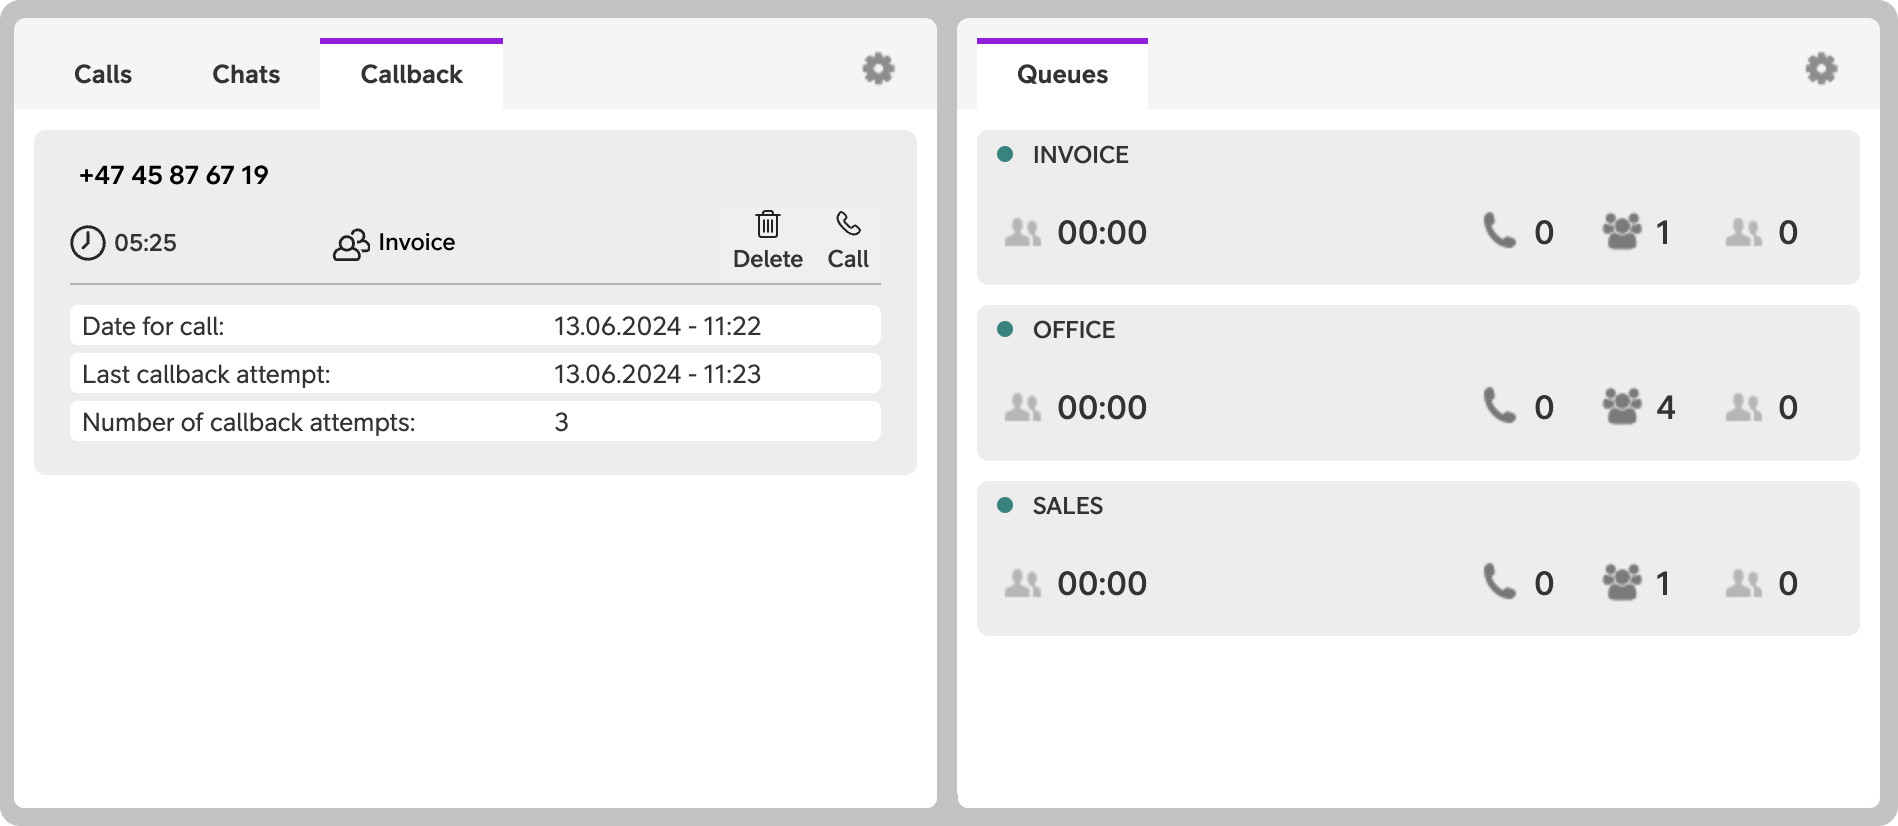
The callback feature is located in the switchboard view. When the agent clicks on the callback tab, they will see a list of all callbacks from their queues.
When a relevant callback is minimized, key information is displayed, such as the caller’s name (if retrievable), the caller’s number, the queue they called through, how long they have been waiting for a callback, as well as buttons to call the person back and to manually delete the callback from the list.
When expanding a relevant callback by clicking on it, additional information will be shown, including when the callback was initiated. If an agent has attempted to call back, the last attempted callback and the number of attempts will also be displayed.
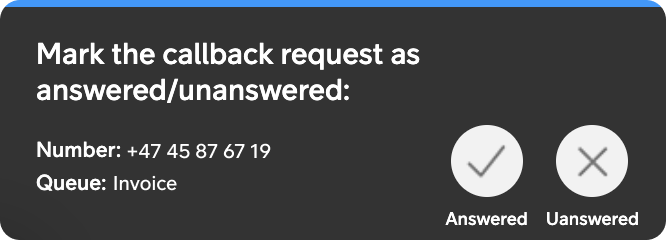
Callback pop-up
After a callback has been initiated, a popup will appear, and the agent must mark the callback as either answered or unanswered. The popup will not disappear until one of the two buttons has been clicked.
→ If the call is marked as answered, the callback will be removed from the list.
→ If the call is marked as unanswered, the callback will remain in the list.
Voicemail
Administrators can set up voicemail in the Visual Administrator by following these steps:
Enter the Visual Administrator:
- Navigate to the Administrator page from the main menu
- Then select “Telephony Setup”
- Select “Visual admin” tab.
- Press the button “Open”.
- Select the IVR you wish to edit (If you later want to change what IVR to edit, click Main Menu > List of main numbers).
Set up Queue element:
For a call to continue its journey after the Queue element, to then end up in the Voicemail, the queue settings need to be set up. There’s three things that dictates the calls’ continued journey:
- Click the cog wheel on the Queue element.
- In the right hand menu, enter a number in the Call duration in total field. E.g. 120 seconds.
- In the right hand menu, select Yes or No in the dropdown for Exit in case of queue. You decide what works best you.
- If set to Yes, and if all queue agents are busy, calls are immediately forwarded to the next element in the call flow.
- If set to no No, and if all queue agents are busy, calls will continue to ring for the amount of seconds defined in the Call duration in total field, and then continue to the next element in the call flow.
- In the right hand menu, select Yes or No in the dropdown for Allow empty queue.
- If set to Yes, and if no queue agents are logged in, calls will continue to ring for the amount of seconds defined in the Call duration in total field, and then continue to the next element in the call flow.
- If set to no No, and if no queue agents are logged in, calls are immediately forwarded to the next element in the call flow.
Set up Voicemail element:
To finalise the set up, the Voicemail element needs to be added and set up correctly:
- In the right hand menu, click and drag the element Voicemail to the call flow.
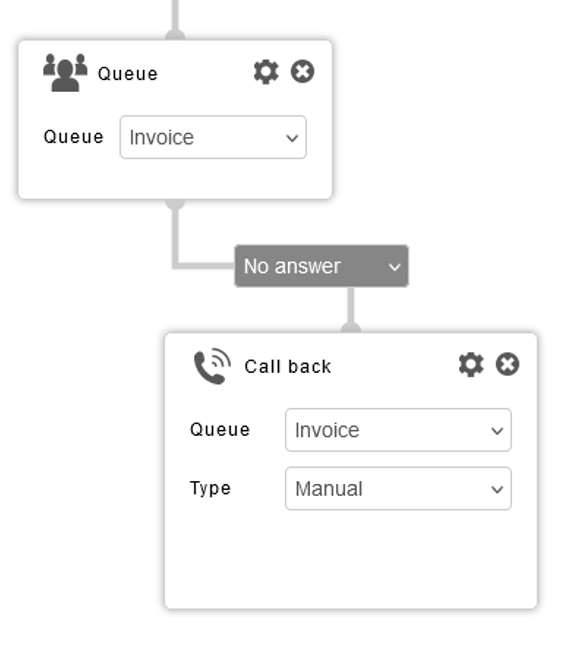
- Place the Voicemail element after the Queue element.
- Connect the Voicemail element and the Queue element.
- Make sure the connector is set to When no answer.
- Click the first dropdown menu on the Voicemail element and select the correct Queue.
- Click the second dropdown menu on the Voicemail element and select the Audio file you wish to be played. (Read more about Audio files in the user guide here: Audio files – User guide).
- Enter the email address you wish Voicemail notifications to be sent to.
- Click Show menu.
- Click Save to implement the changes.
FAQ
Q: How do I create or edit the company’s call flow?
A:
-
Click the main menu ☰.
-
Select Administration > Telephony Setup.
-
Open the Visual Admin tab.
-
Press the button “Click to open Visual Admin”.
-
You can now drag and drop elements to create or adjust your IVR flow.
If you already have IVRs saved, you can choose to edit them, or restore a previous version.
Q: How do I connect elements in the IVR?
A: To connect IVR elements, simply click and hold on an element and drag the arrow from it to the next step in the flow. You can rearrange or delete elements as needed using the icons provided.
Q: What elements can I add in the IVR?
A: You can build your call flow using many different types of elements, including:
-
Opening hours
-
Queues
-
Basic menu
-
Callback (manual or automatic)
-
Transfer to external
-
Play audio file
-
Link to IVR menu
-
Dialed conference
-
VIP list
-
Send SMS
-
Call counter
-
Voicemail
-
Advanced menu
- Reservation against call recording
- Customer satisfaction
Each element is placed using drag and drop, and some include settings you can customize by clicking the gear icon.
Q: How do I set up a basic press-button menu in the call flow?
A:
-
Add a Basic menu element to the flow.
-
Upload an announcement (e.g. “Press 1 for support, 2 for sales”).
-
Define what happens when the caller presses 1–9. Each selection leads to a new path in the flow (like a queue or audio message).
You can also define behaviors for no input or invalid input.
Q: How does the callback option work in the IVR?
A:
You can add a Callback element to allow callers to request a callback instead of waiting. This can be:
-
Manual: An SMS or email is sent to the queue member with the caller contact information.
-
Automatic: Automatically triggers a return call from the next available agent
You can also configure:
-
Whether the caller must enter their number
-
Confirmation messages
-
Opening hours for when callbacks are allowed
Q: Can I test the call flow I’ve created?
A: Yes, follow these steps.
- In the top left in the menu bar, click Show Menu.
- Click Test IVR on phone.
- Enter the phone number, date and time you want to test – for example, if you want to simulate calls during different opening hours.
- Click Run.
Q: What is the Call Counter used for?
A: The Call Counter element helps you track how many calls go through a certain part of your IVR. It’s useful for analytics and optimizing your flow.
User Guides
Here you can find user guides connected to the feature topic. If you can’t find what you are looking for here you might find it in our main user guide archive.
User Guides