Telia Smart Connect is also available as an app on both the App Store and Google Play. This means that you can access your switchboard on your mobile devices with just a few taps, making it even more convenient to have full control.


Opening Hours
Opening Hours let you control how calls are handled at different times of the day or week, ensuring callers are always directed the right way.
- Easily set the default opening hours.
- Add exceptions for vacations or holidays.
- Play an audio messages when the company is closed, on lunch or on holiday.
How to get started with opening hours
- Enter the main menu ☰
- Click “Administration”
- Click “Telephony Setup”
- Click “Opening hours”
To access the Administrator module you need to have administrator access.
Manage opening hours
You can manage your opening hours by editing the schedule, creating exceptions, or copying times. The options below explain how to set up and adjust your hours step by step.
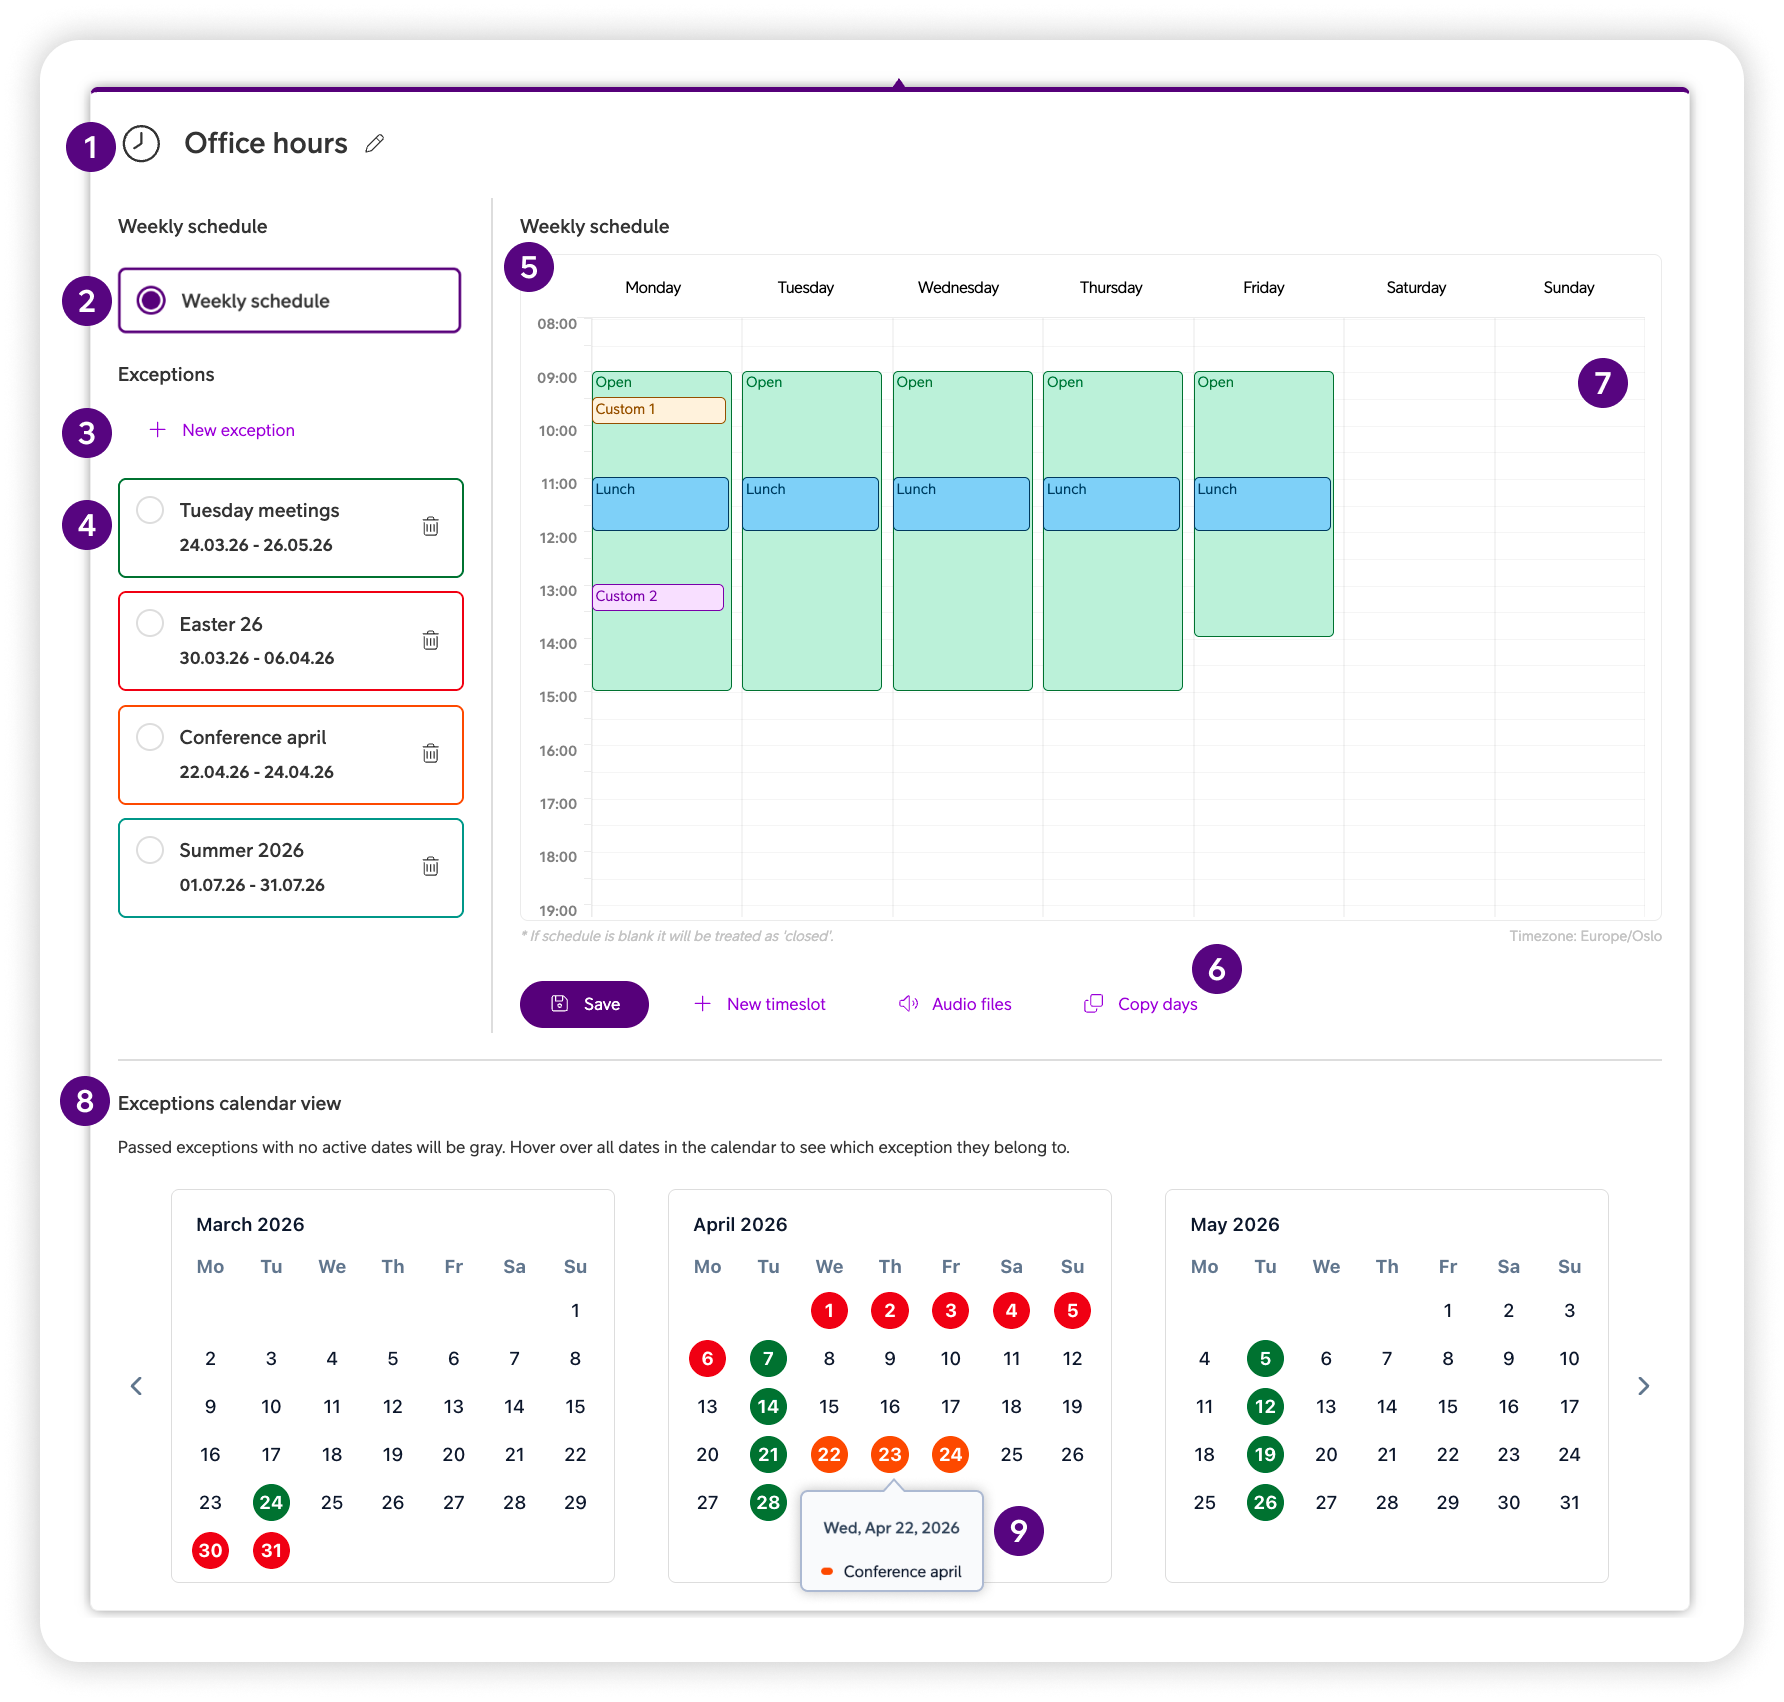
1
Rename opening hours
Click the pen icon or the current opening hours name to edit it. Type the new name and click outside the field to save.
2
Ordinary opening hours
Ordinary opening hours are selected by default. If you make changes but haven’t saved them yet, an (i) icon will appear to remind you.
3
Create new exception
Click “+ New exception”, give it a name, choose dates, and click “Create”. You can later add or remove dates for the exception as needed.
4
Edit exceptions
All exceptions are listed in the panel. Click on one to view or edit it. To delete, use the trash icon and confirm the action.
5
Visual overview of opening hours
The opening hours are displayed in a calendar-style view, similar to an email calendar. You can scroll through the schedule and click on any time slot to add new hours or edit existing ones.
6
Action buttons
Use the buttons below the calendar to save changes, add new times, attach audio files, or copy hours to other days. More details about these functions are explained in the Pop-ups section below.
7
Create new time slot
You can click on any empty area on the calendar to create a new time slot.
8
Exceptions calendar
A visual representation of all exceptions added to the selected opening hour.
Each active exception is assigned a colour, which can be seen as the border around the exception in the list, and marked in the calendar view.
If hovering over a specific date, the exception the date is added to can be seen.
All inactive exceptions will be gray in the list, and in the calendar.
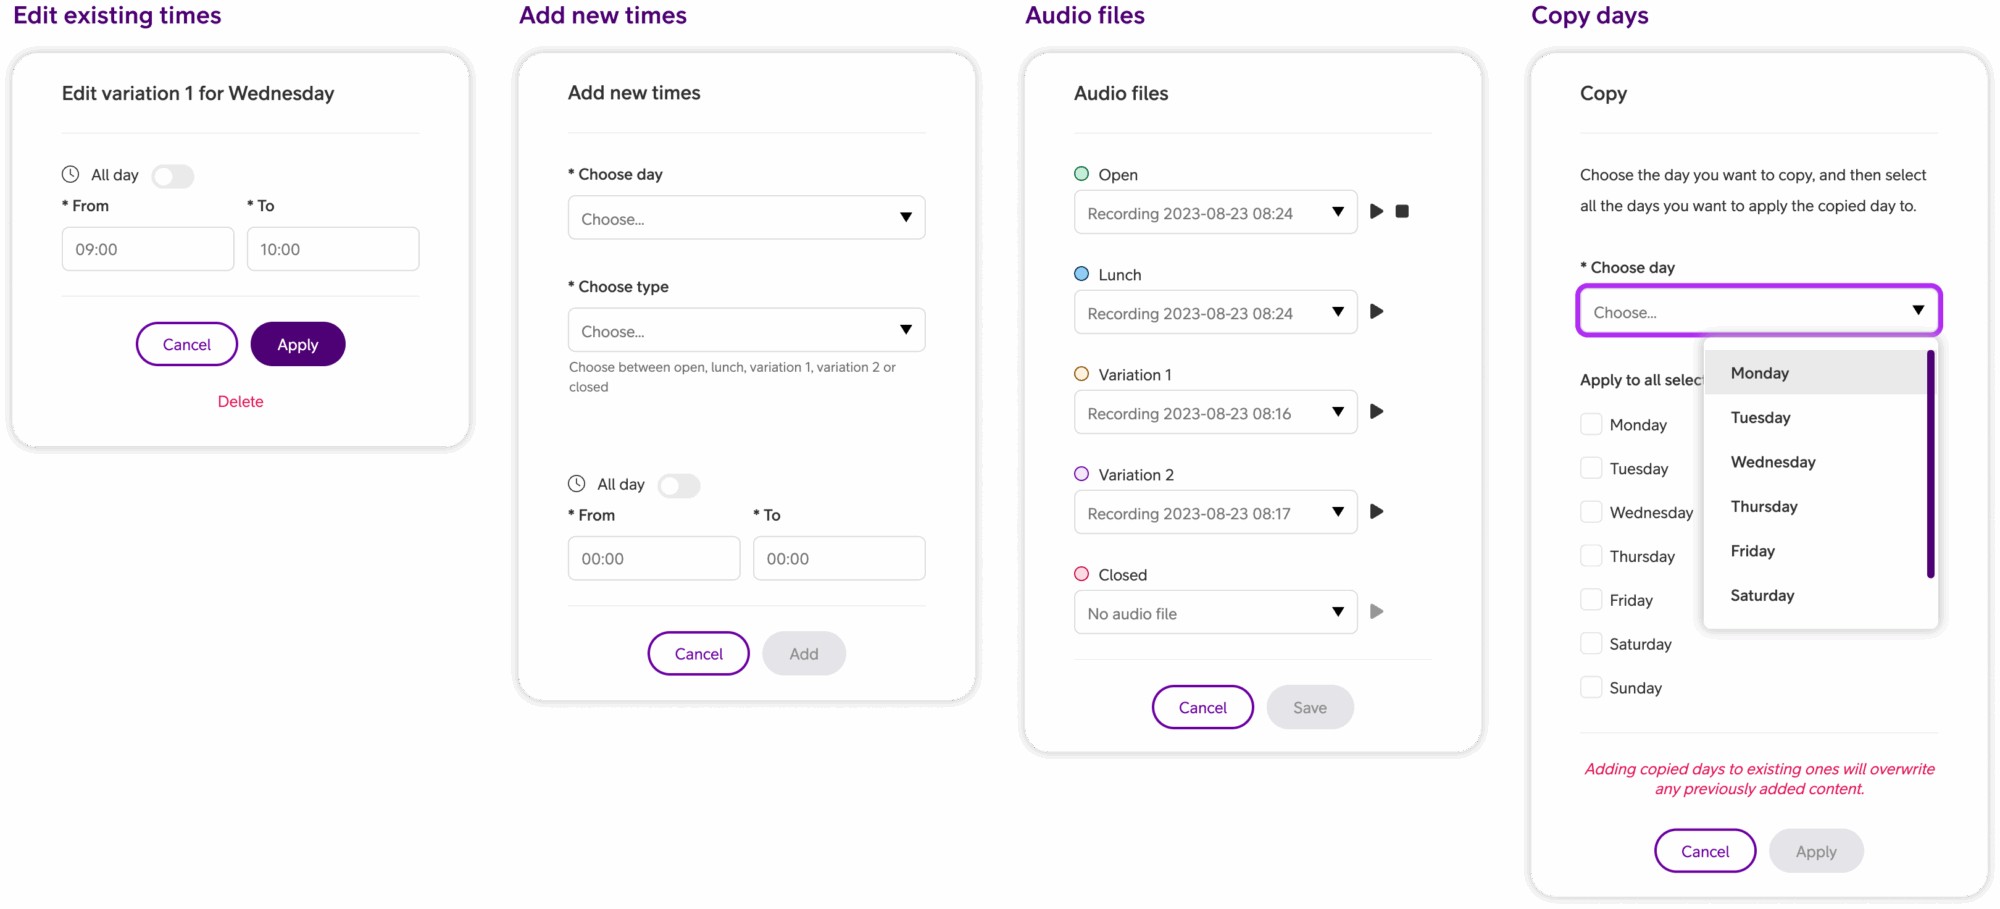
Pop-ups
These pop-ups open when you use the action buttons below the calendar. Each one gives you more detailed options for managing your opening hours.
Edit times
Change any times you’ve already added to the schedule. Select the entry, adjust the hours, and save your changes.
Add times
Create new entries by choosing a day, type (e.g., open, lunch, closed etc.), and setting the start and end times.
Audio files
Attach audio files to an opening hour. You can play them before saving to confirm the correct file is added.
Copy days
Duplicate a full day’s schedule and apply it to other days. For example, set Monday once and copy it across the week.
Note: Copying will overwrite any existing times on the selected days.
Exceptions
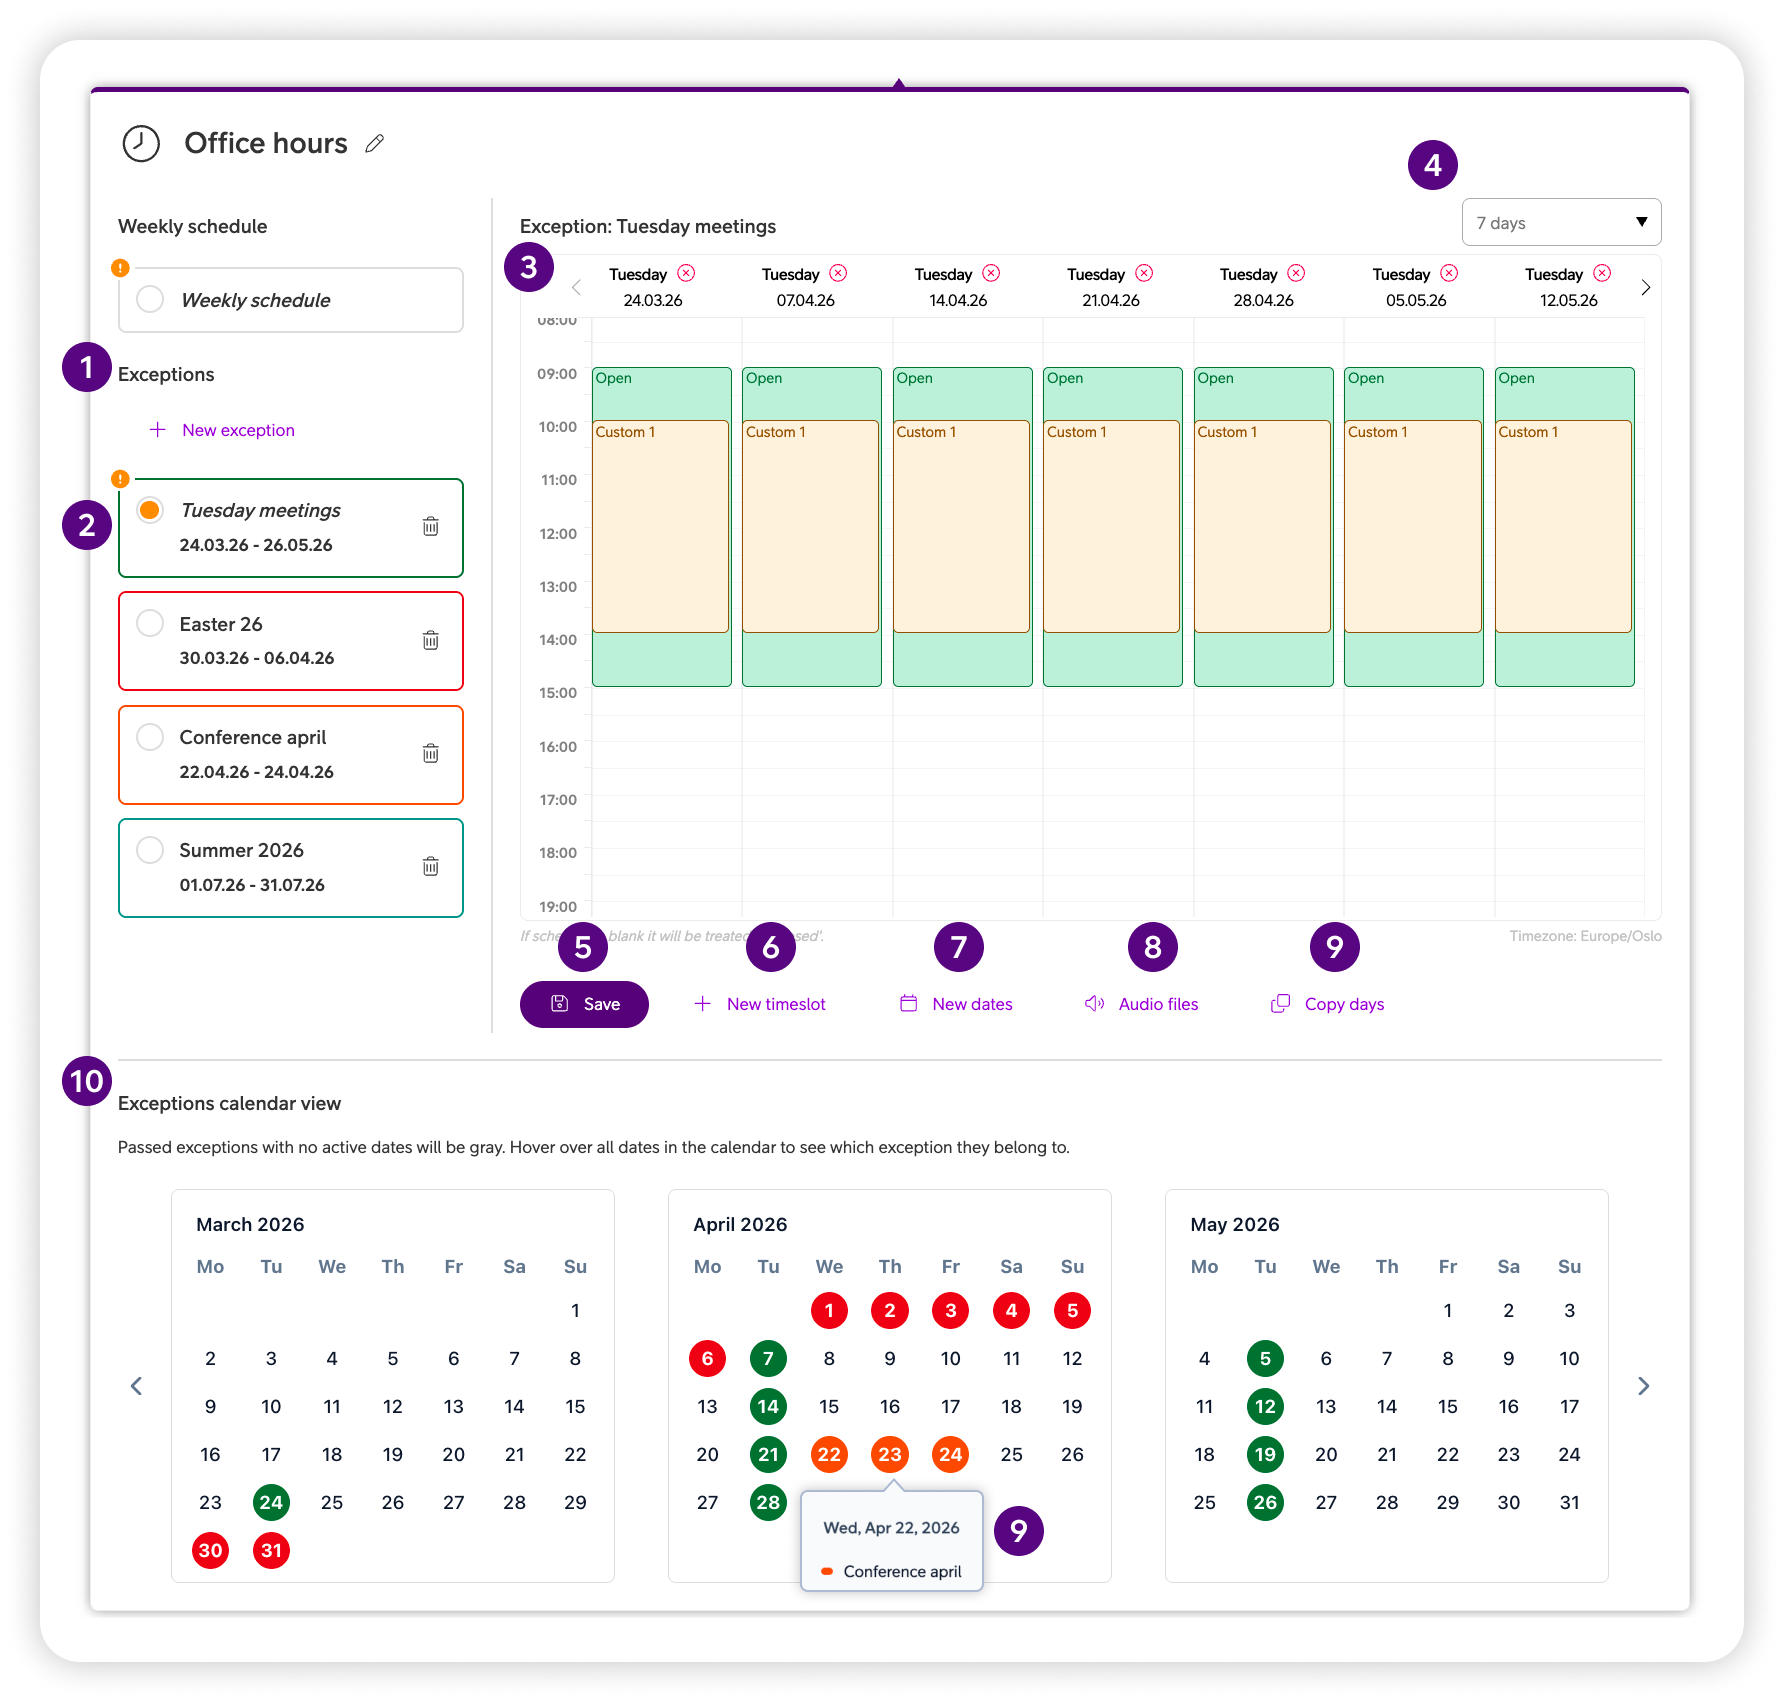
Exceptions let you set up temporary changes to your ordinary opening hours, for example during holidays, vacations, or special events.
You can access exceptions by:
-
Entering the main menu ☰
-
Clicking Administration
-
Clicking Telephony Setup
-
Clicking Opening hours
-
Clicking + New exception or selecting the exception you want to edit
1
Exceptions list
View all existing exceptions or click “+ New exception” to create one.
2
Selected exception
When you choose an exception, it appears in the calendar view on the right. If there are unsaved changes, an info icon will show, and the exception will be highlighted with a purple border.
3
Delete dates
To remove specific dates from an exception, click the (X) icon next to the date.
4
Calendar view
Choose whether to display 7 or 10 days at a time in the calendar view.
5
Save exception
Save changes to the selected exception. If you switch to another exception without saving, a yellow border will appear to warn you about unsaved changes.
6
Add times
Click the button “+ New times” to add a new time slot to the exception.
7
Add dates
Click the button “New dates” to add additional dates to the exception period.
8
Audio files
Click the button “Audio files” to attach audio files to the exception. You can play them before saving.
9
Copy days
Click the button “Copy days” to copy a full day’s schedule within the exception and apply it to other days.
10
Exceptions calendar
A visual representation of all exceptions added to the selected opening hour.
Each active exception is assigned a colour, which can be seen as the border around the exception in the list, and marked in the calendar view.
If hovering over a specific date, the exception the date is added to can be seen.
All inactive exceptions will be gray in the list, and in the calendar.
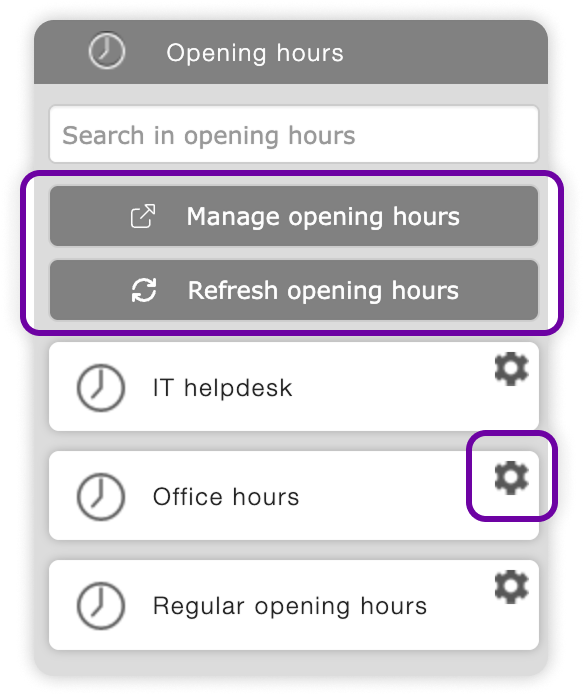
Managing opening hours through IVR
When existing opening hours are removed from the Visual Administrator, they will no longer be editable via the IVR; however, they can still be added in the IVR.
Selecting “Manage opening hours” will open the new Opening Hours module in a separate tab.
Selecting “Refresh opening hours” will update the Visual Administrator with any changes made in the new module.
Clicking the settings button for a specific opening hour will open that entry in the new module in a separate tab.
FAQ
Q: What are opening hours used for?
A: Opening hours make sure callers are routed correctly depending on the time of day. You can use them to:
-
Control how calls are handled during open and closed hours
-
Show your presence status to colleagues
-
Trigger announcements or queue logic
Q: How do I access the opening hours settings?
A:
-
Enter the main menu ☰
-
Click Administration
-
Click Telephony Setup
-
Click Opening hours
-
Click + New opening hours to create, or select an existing one to edit
-
Add the Opening hours element to your call flow in Visual Admin by dragging it into the flow
-
Use the dropdown menu on the element to select the opening hours category you want to apply
Q: How do I set up vacation or summer opening hours?
A:
-
Enter the main menu ☰
-
Click Administration
-
Click Telephony Setup
-
Click Opening hours
-
Select an existing opening hours category or create a new one
-
Click + New exception
-
Give it a name (e.g., “Summer hours”)
-
Select the From and To dates for the period
-
Define your custom hours by editing the fields for each day
-
Click Save exception
Your exception will automatically apply during the selected dates. You can plan multiple future exceptions for holidays, events, or seasonal hours.
Q: How can I make exceptions to opening hours for a specific date(s)?
A:
Yes. Exceptions can be set for single days or date ranges.
-
Go to Opening hours
-
Select the category you want to edit
-
Click + New exception
-
Assign name and select date(s)
- Define custom hours and type (open, closed, lunch, Custom 1, Custom 2)
- Note: If schedule is blank it will be treated as closed.
-
Click Save exception
This will override the default schedule during the chosen period.
Q: How do I play a message when we are closed?
A:
-
Enter the main menu ☰
-
Click Administration
-
Click Telephony Setup
-
Click Opening hours
-
Select the opening hours category (or the specific exception) you want to configure
-
Click Audio files (below the calendar)
-
In the pop-up, on the Closed row, choose an existing recording or upload a new one, preview it, then Save
Result: That recording will play automatically during closed periods for any call flow that uses this opening hours category.
Tip: You can set different recordings for Open, Lunch, or Variation as needed, using the same Audio files pop-up.
User Guides
Here you can find user guides connected to the feature topic. If you can’t find what you are looking for here you might find it in our main user guide archive.
User Guides