Telia Smart Connect is also available as an app on both the App Store and Google Play. This means that you can access your switchboard on your mobile devices with just a few taps, making it even more convenient to have full control.


Queue Administration
Queues help your company to ensure that the incoming calls are answered by forwarding the calls in a queue to a group of employees/agents who can answer these calls. There are several methods used for the queue to route incoming calls to available agents
- The incoming calls to the company’s main number can be forwarded to several employees through various distribution methods
- Arrange for transfer to a group or individual employees using the web or the mobile app
- Keep track of the queue status and manage the queues by using the webpage or the mobile app
- Configure SLAs and set up SLA notifications to team leaders
How to get started with queue administration
- Enter the main menu ☰
- Click “Administration”
- Click the tab “Queues”
Requirement: You need to be an administrator to access these settings, that allows you to create new queues, change queue settings and add/remove queue members. Regular users may only log in and out of queues.
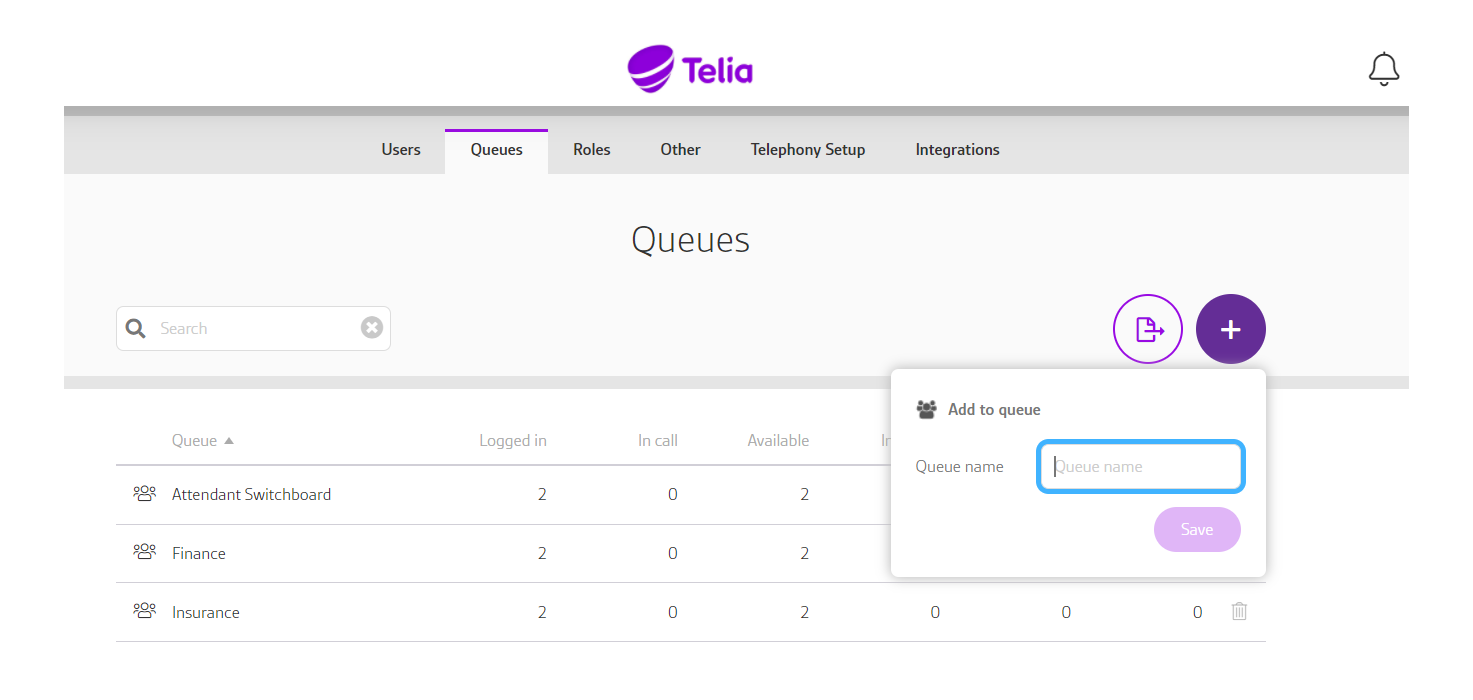
Managing queues
Queues help the company manage calls to the main number by assigning calls to agents logged into the queues. Define which calls should be assigned to which agent by setting different priorities for different agents.
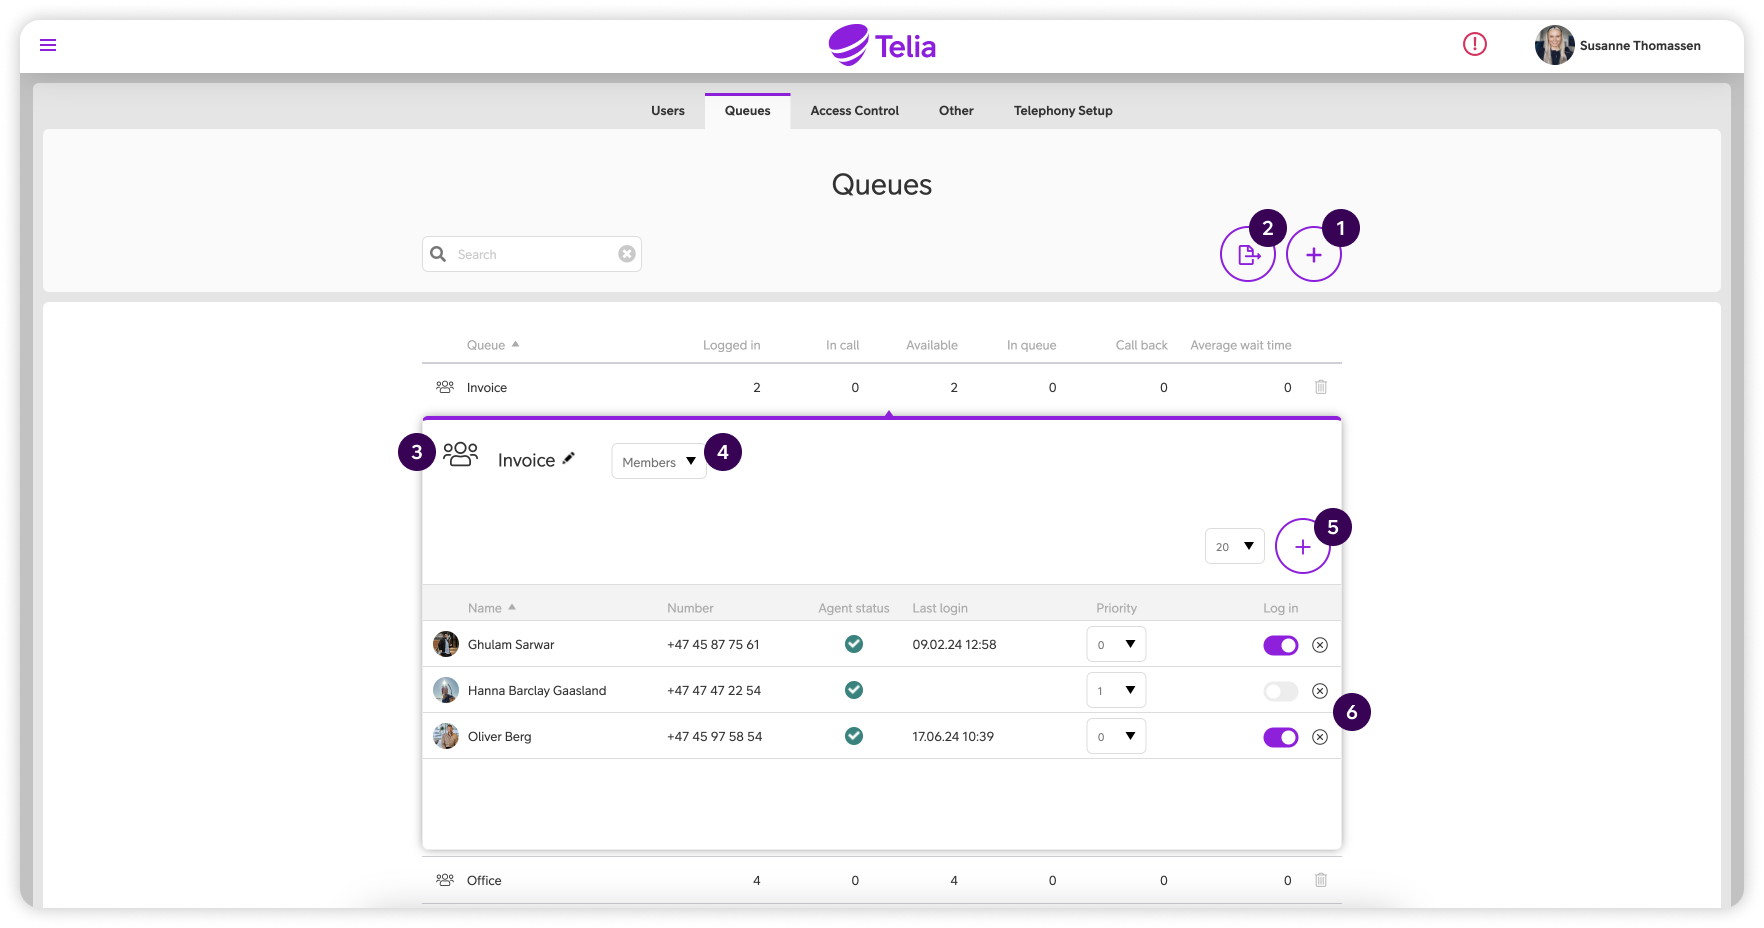
- Create new queues by clicking the plus sign in the top right, and give it a name.
- To export queues, click the “Export”-button.
- To edit the name of a queue, press the “Edit” icon next to the queue name.
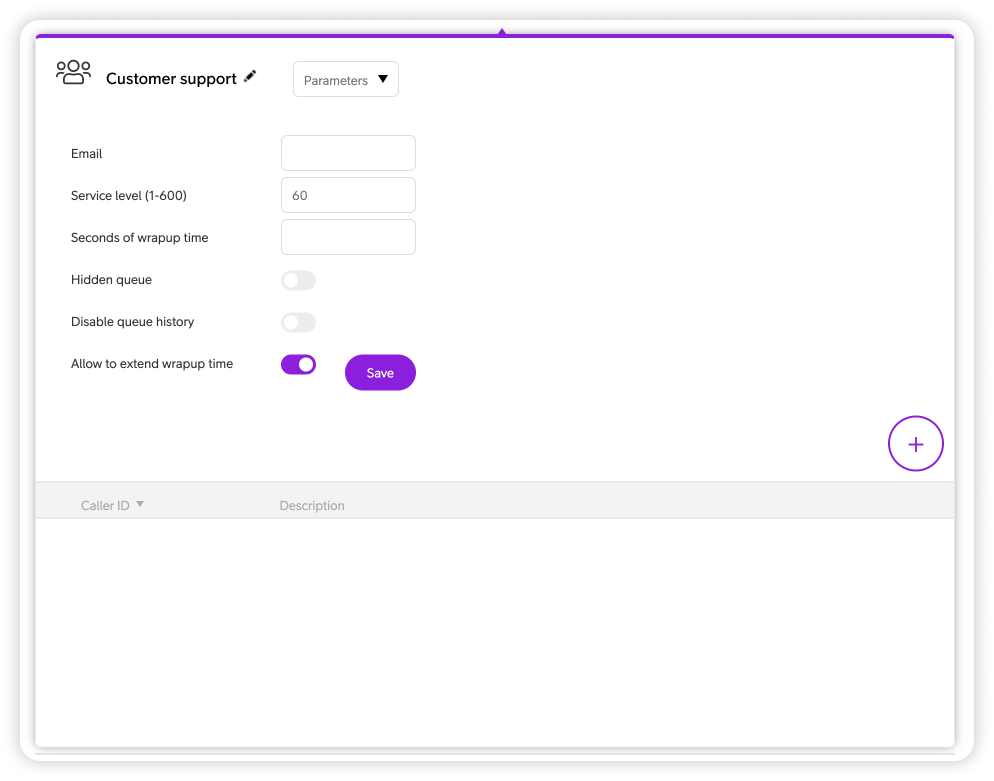
- To change a the settings for a queue, click on the drop-down menu, and choose “Parameters”. You can change the following settings:
-
- Service level: The number of seconds waiting time in queue. The color of the call will change from green to red in the incoming-calls view when the service level time is reached. This limit is also used in Statistics, Dashboard and Wallboard.
- Wrap-up time: The number of seconds of pause between queue calls.
- Hidden queue: If needed, you can prevent the queue from being displayed in the switchboard.
- Disable queue history: so that earlier calls in to this queue cannot be seen in the switchboard.
- Allow to extend wrap-up time: Allows users to prolong the wrap-up time.
5. To add a member to a queue, click the plus sign that appears after selecting the queue.
6. To log agents in queue on/off queues, click on the toggle on the agent you want to log on/off. To delete a user, click the x-button on the agent you want to delete. To change priority on agents, click the drop-down menu on each agent.
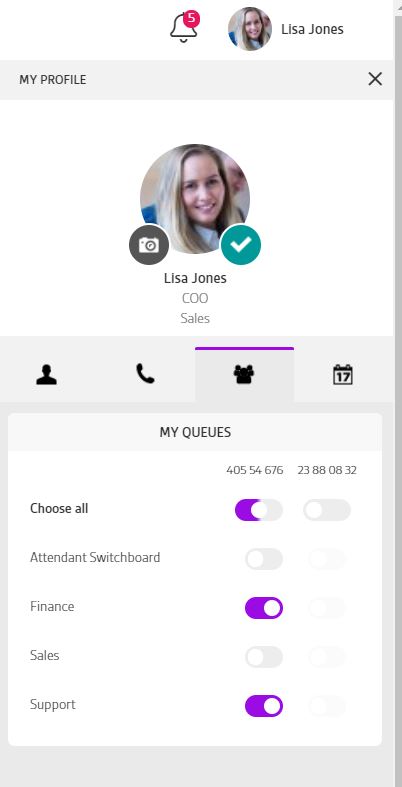
How to log yourself in and out of queues
As a user, you can easily log in, and out of the queues you are a member of. This can be done from the desktop (under My Profile) and the mobile app.
How to log in and out of queues on Desktop:
- Click on “My profile” in the top right corner
- Click on “Queues”
- Use the toggle to log in our out of queues.
How to log in and out of queues on Mobile:
- Click the main menu ☰ in the upper left corner.
- Click “Queues”
- Click the queue you would like to edit.
- Use the toggle to log in our out of queues.
How to log queue members in and out of queues
You can log users in or out of queues if you are an administrator or a user with the access right called “Log other users in and out of queue”, which is controlled via the “Role administration” by an administrator.
How to log other users in or out of queues:
- Enter the main menu ☰.
- Click “Administration”.
- Click the tab “Queues”.
- Click on the queue you want to log members in and out of.
- Toggle switch to log members in and out.
Queue settings in the IVR (visual main number call flow)
Queues are an essential part of the IVR visual main number call flow. Using drag and drop, the same queue can have different settings depending on where it is used in the call flow.
How to get started with queue settings:
- Click the main menu in the upper left corner ☰.
- Click Administration.
- Select the Telephony Setup tab.
- Click Visual Admin tab.
- Press the button Click to open Visual Admin.
- Click the cog wheel of the queue element you wish to edit. This will open the queue settings. Or if you haven’t added the queue element, add it through drag-and-drop from the right-hand menu, and then click the cog wheel.
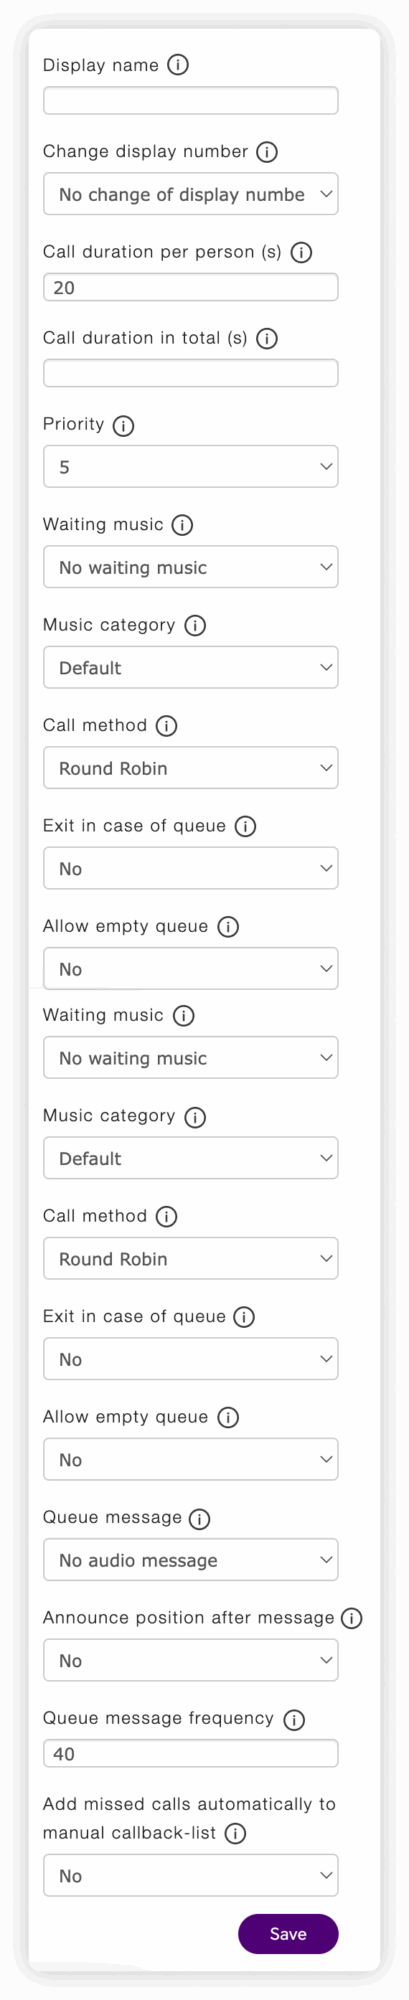
Configuration options
For each queue element in the call flow the following configurations are possible:
- Display name: The name that will be visible in the softphone and other SIP and IP recipients when receiving calls from this queue element.
- Change display number: Change the presentation number on calls to the queue’s member. You may choose one of the three options:
- Override presentation number: Display one of the company main numbers instead of the caller’s number.
- Add prefix: Add up to two digits that will be displayed in front of the caller’s number.
- Add suffix: Add up to two digits that will be displayed after the caller’s number.
- Call duration per person (in seconds): How long should the queue attempt to call a member before switching to the next member in the queue.
- Call duration in total (in seconds): How long should a caller stay in the queue before exiting and continuing in IVR (the call flow), to e.g. callback, sound file, another queue, etc.
- Priority: If you use the same queue in different spots or IVRs this can be used to prioritize calls from one queue-element over another. 9 being the highest priority, 0 being the lowest.
- Waiting music: Determine if the caller in the queue should hear music or a dial tone:
- With “No waiting music” selected only a normal dial tone is played for calls waiting in the queue.
- “Always waiting music”, only music is played.
- “Waiting for music in queue” caller get queue music in the queue, but a dial tone when trying to distribute the call to queue members.
- Music category: If waiting music is chosen, you can pick what genre of music should be played. You can choose between “Calm” or “Upbeat”.
- Call method: Define how calls should be assigned to agents in the current queue.
- Round Robin: Calls are assigned to the agent with longest idle time. If Agent 1 does not answer, the call will be assigned to the next available agent in the the queue. If agents have different priorities the call will always be assigned to agents with priority 0 first. If no agents with priority 0 are available the call will be assigned to agents with priority 1. So priority 0 being the highest, and 9 being the lowest.
- Ring all: Calls are assigned to all agents simultaneously, regardless of priority.
- Ring all priority #1: Calls are assigned to all agents with the same priority and will then be assigned to agents with next priority.
- Ring all priority #2: Escalating incoming calls. First all with priority 0, then 0 and 1, then 0,1 and 2 ending up with all available agents being called. So priority 0 being the highest, and 9 being the lowest.
- Ring all Call Waiting: Calls are assigned to all agents simultaneously, regardless of priority or if they are busy in another call. If devices do not have call waiting enabled they will silently ignore the assigned queue call.
- Exit in case of queue: If Yes; and if all queue agents are busy, new calls are forwarded to the next element in the IVR. If the next step in the IVR is not defined, new calls are hung up.
- Allow empty queue: If Yes, it will ring in the queue even if no agents are logged in. If no, calls will proceed to next defined element in the IVR.
- Queue message: Queue message that is played back for callers waiting in the queue.
- Announce position after message: If yes; a voice prompt announces the caller’s position in queue, only the number (e.g., “5”). It is intended to follow a custom pre-recorded message such as “We are currently busy, you are number…” to ensure a natural flow. This feature works only when used in combination with the standard queue message audio prompt.
- Queue message frequency: Define the number of seconds between each time the audio message defined above is played.
- Add missed calls automatically to manual callback: This will only happen when user hangs up in queue, not when an element times out and next element is activated
User Guides
Here you can find user guides connected to the feature topic. If you can’t find what you are looking for here you might find it in our main user guide archive.
User Guides