Telia Smart Connect is also available as an app on both the App Store and Google Play. This means that you can access your switchboard on your mobile devices with just a few taps, making it even more convenient to have full control.


Mobile App – Opening Hours
The Opening Hours feature in the Smart Connect mobile app allows administrators to manage the company’s opening hours directly from their phones. With this functionality, scheduling becomes faster and more flexible – no need to access the web interface for everyday updates.
Using the mobile app, administrators can:
- Set up weekly schedules that define standard open and closed hours.
- Add exceptions for specific dates, such as holidays or special events.
- Assign audio files to time slots so callers hear the right message at the right time.
- Copy days to quickly apply the same schedule across the week or an exception.
How to get started with opening hours in app
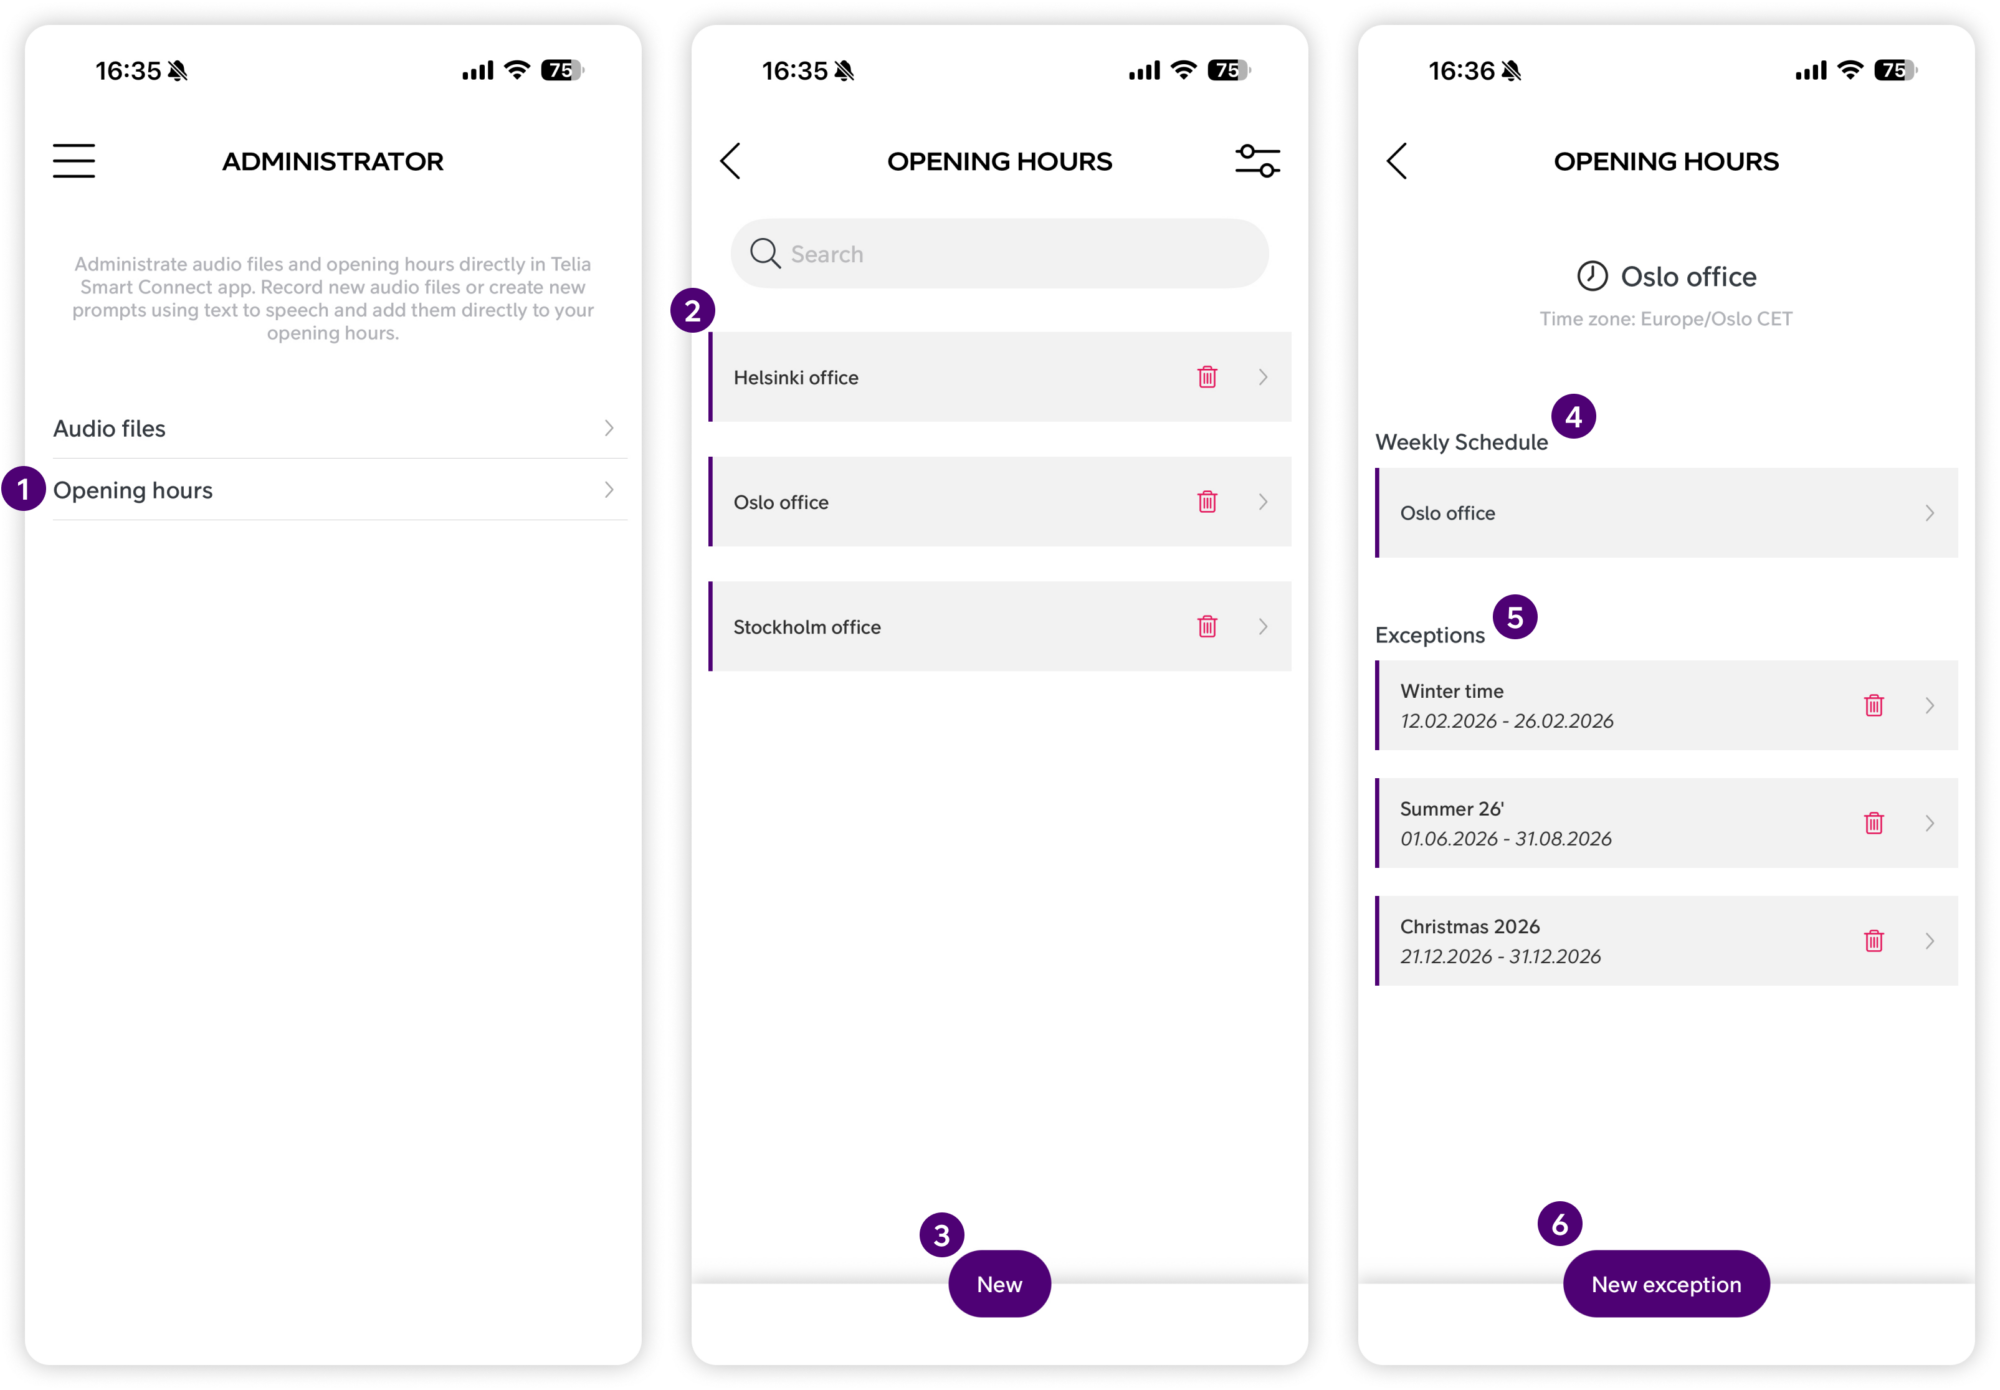
1
Opening hours
Navigate to the Opening Hours module in the app by tapping the Main menu > Administrator > Opening Hours.
2
List of the company's opening hours
All opening hours created for your company are listed here.
3
Create a new opening hour
Tap the New button at the bottom of the screen. Enter a name for the opening hour and tap Add. The new opening hour is created with a default weekly schedule: Monday–Friday, 08:00–16:00.
4
Weekly schedule
Tap an opening hour from the list to open it. You will see the weekly schedule listed here. The weekly schedule is static, repeating every week and not tied to specific dates.
5
Exceptions
Exceptions override the weekly schedule on specific dates. They are listed below the weekly schedule. Exceptions are dynamic and date-based, meaning they only apply on the dates you select.
6
Create a new exception
Tap the New exception button at the bottom of the screen. Enter a name for the exception, select the dates it should apply to, and tap Save. Dates can be added or removed after the exception has been created.
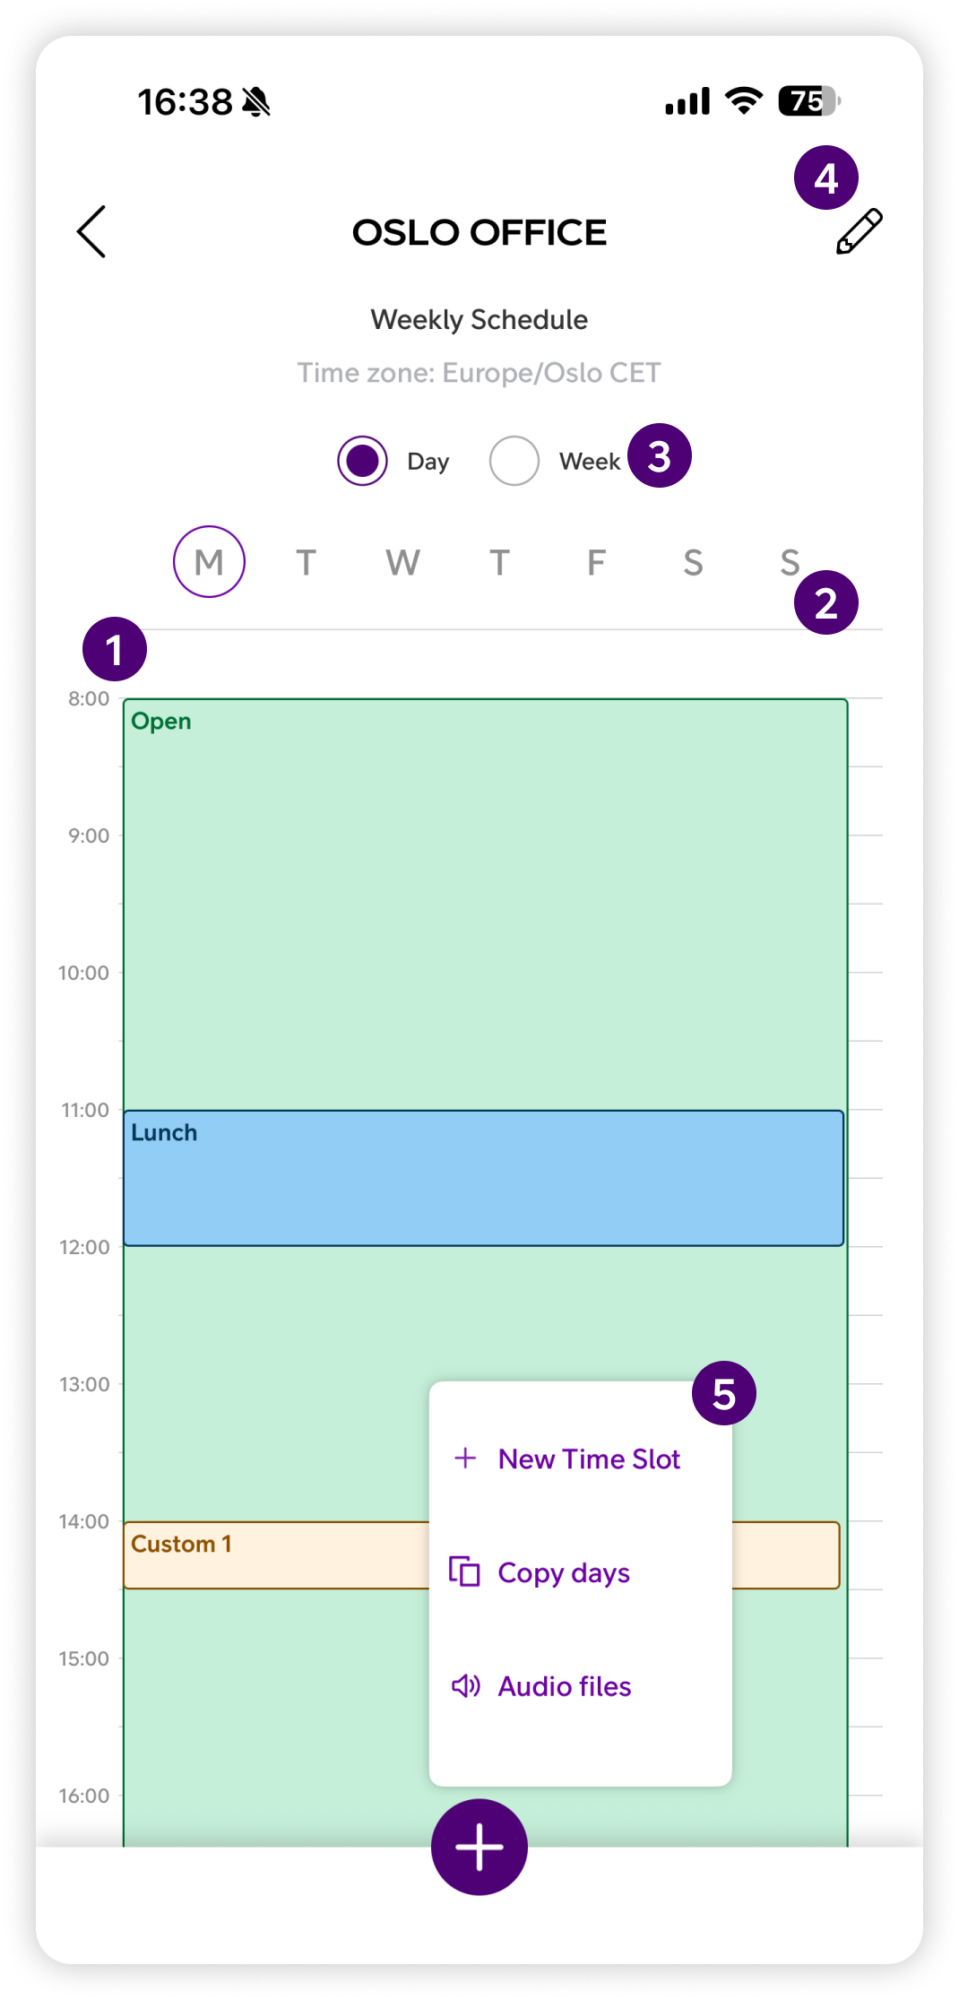
Managing an opening hour
Tap an opening hour from the list to open it. You will see a calendar view of the weekly schedule.
1. Calendar view
A visual overview of the opening hour, displaying all time slots for the week.
2. Days of the week
Tap or swipe through the days of the week to navigate between them.
3. Day and week view
Toggle between day-view, displaying one day at a time, and week-view, displaying the whole week at once.
4. Edit name
Tap the edit icon in the upper right corner to change the name of the opening hour.
5. Add new time slot, copy days or edit audio files
Tap the + button at the bottom of the screen to open the action menu. From here you can tap New time slot to add a new time slot, Copy days to copy the schedule from one day to other days, or Audio files to manage audio files for the opening hour.
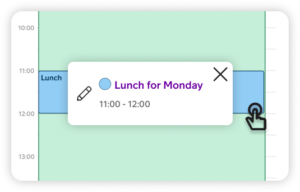
Editing existing time slots
Tap a time slot in the calendar view to open it, then tap the edit icon to make changes.
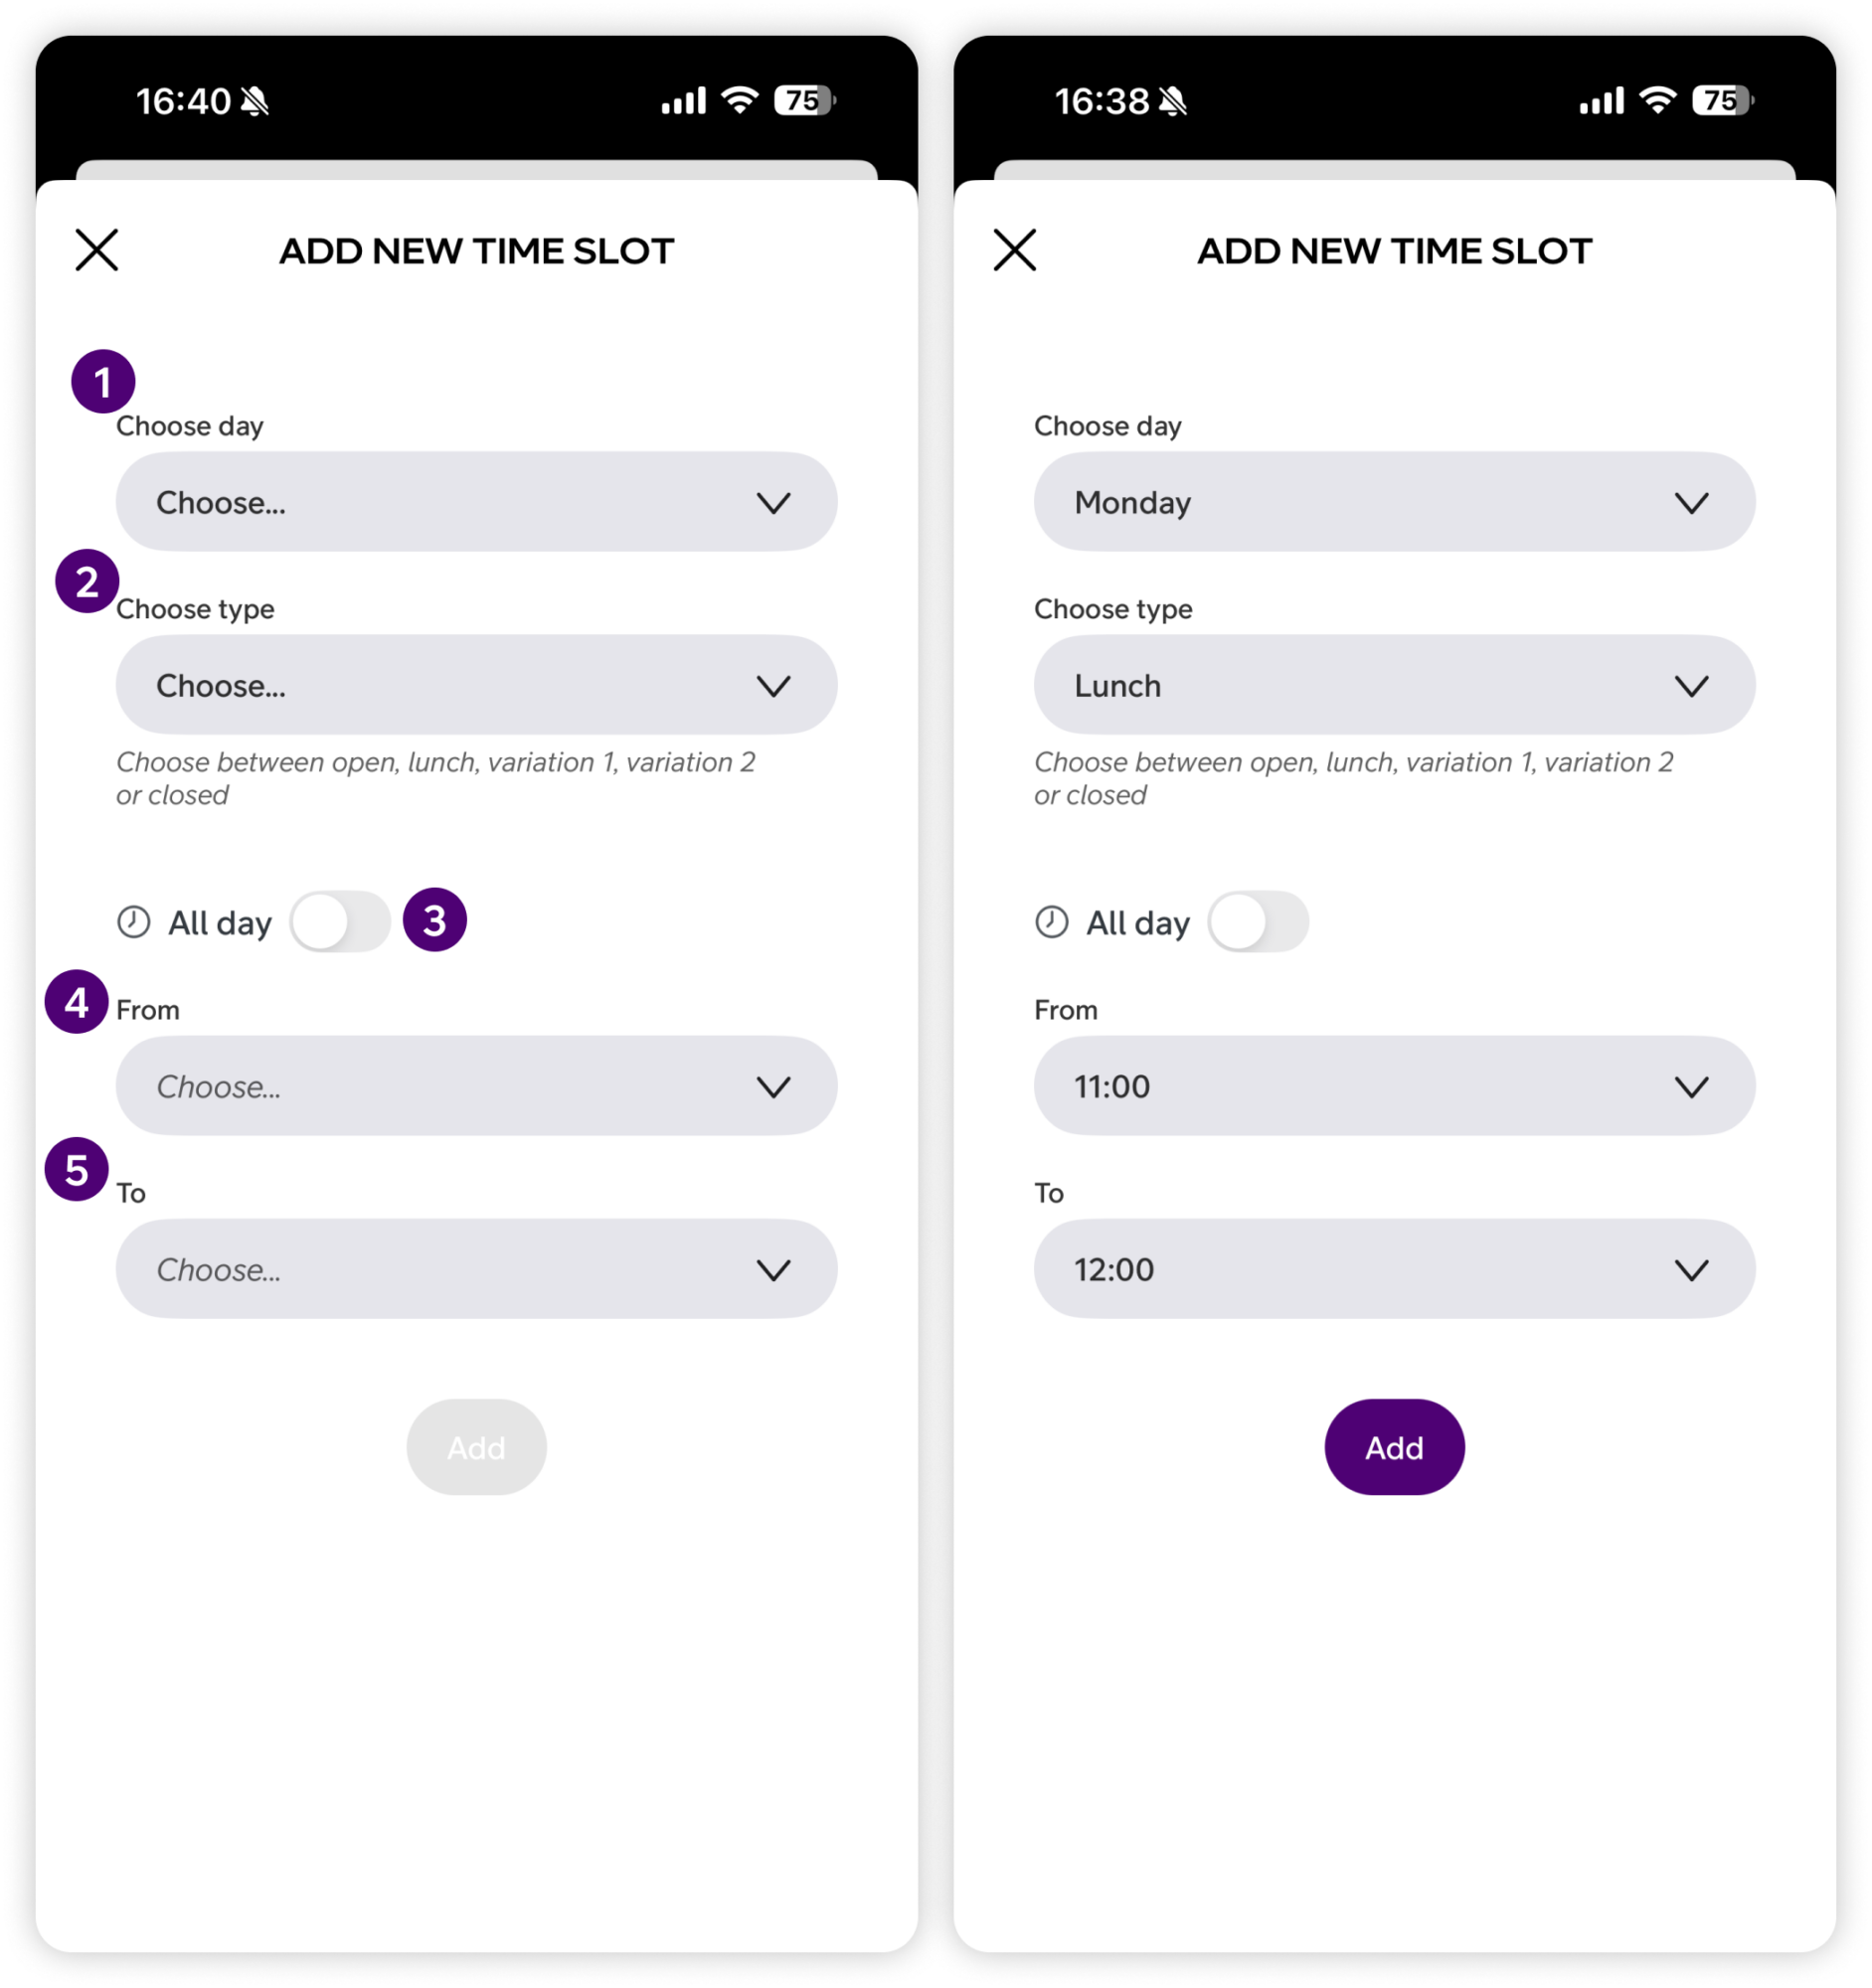
Add new time slot
Navigate to the Opening Hours module by tapping the main menu ☰ in the upper left corner, then tap Administrator, and then Opening Hours.
Select the opening hour you want to edit, enter the weekly schedule, then tap the + button at the bottom of the screen, and tap + New time slot.
1. Choose day
Select the day the time slot should apply to: Monday, Tuesday, Wednesday, Thursday, Friday, Saturday or Sunday.
2. Choose type
Select the type of time slot: Open, Closed, Lunch, Custom 1 or Custom 2.
3. All day
Toggle All day if the selected type should apply for the entire day. When enabled, no start or end time is needed.
4. From
Select the time the time slot should start.
5. To
Select the time the time slot should end.
When all fields are filled in, tap Add to save the time slot to the opening hour.
Manage exceptions
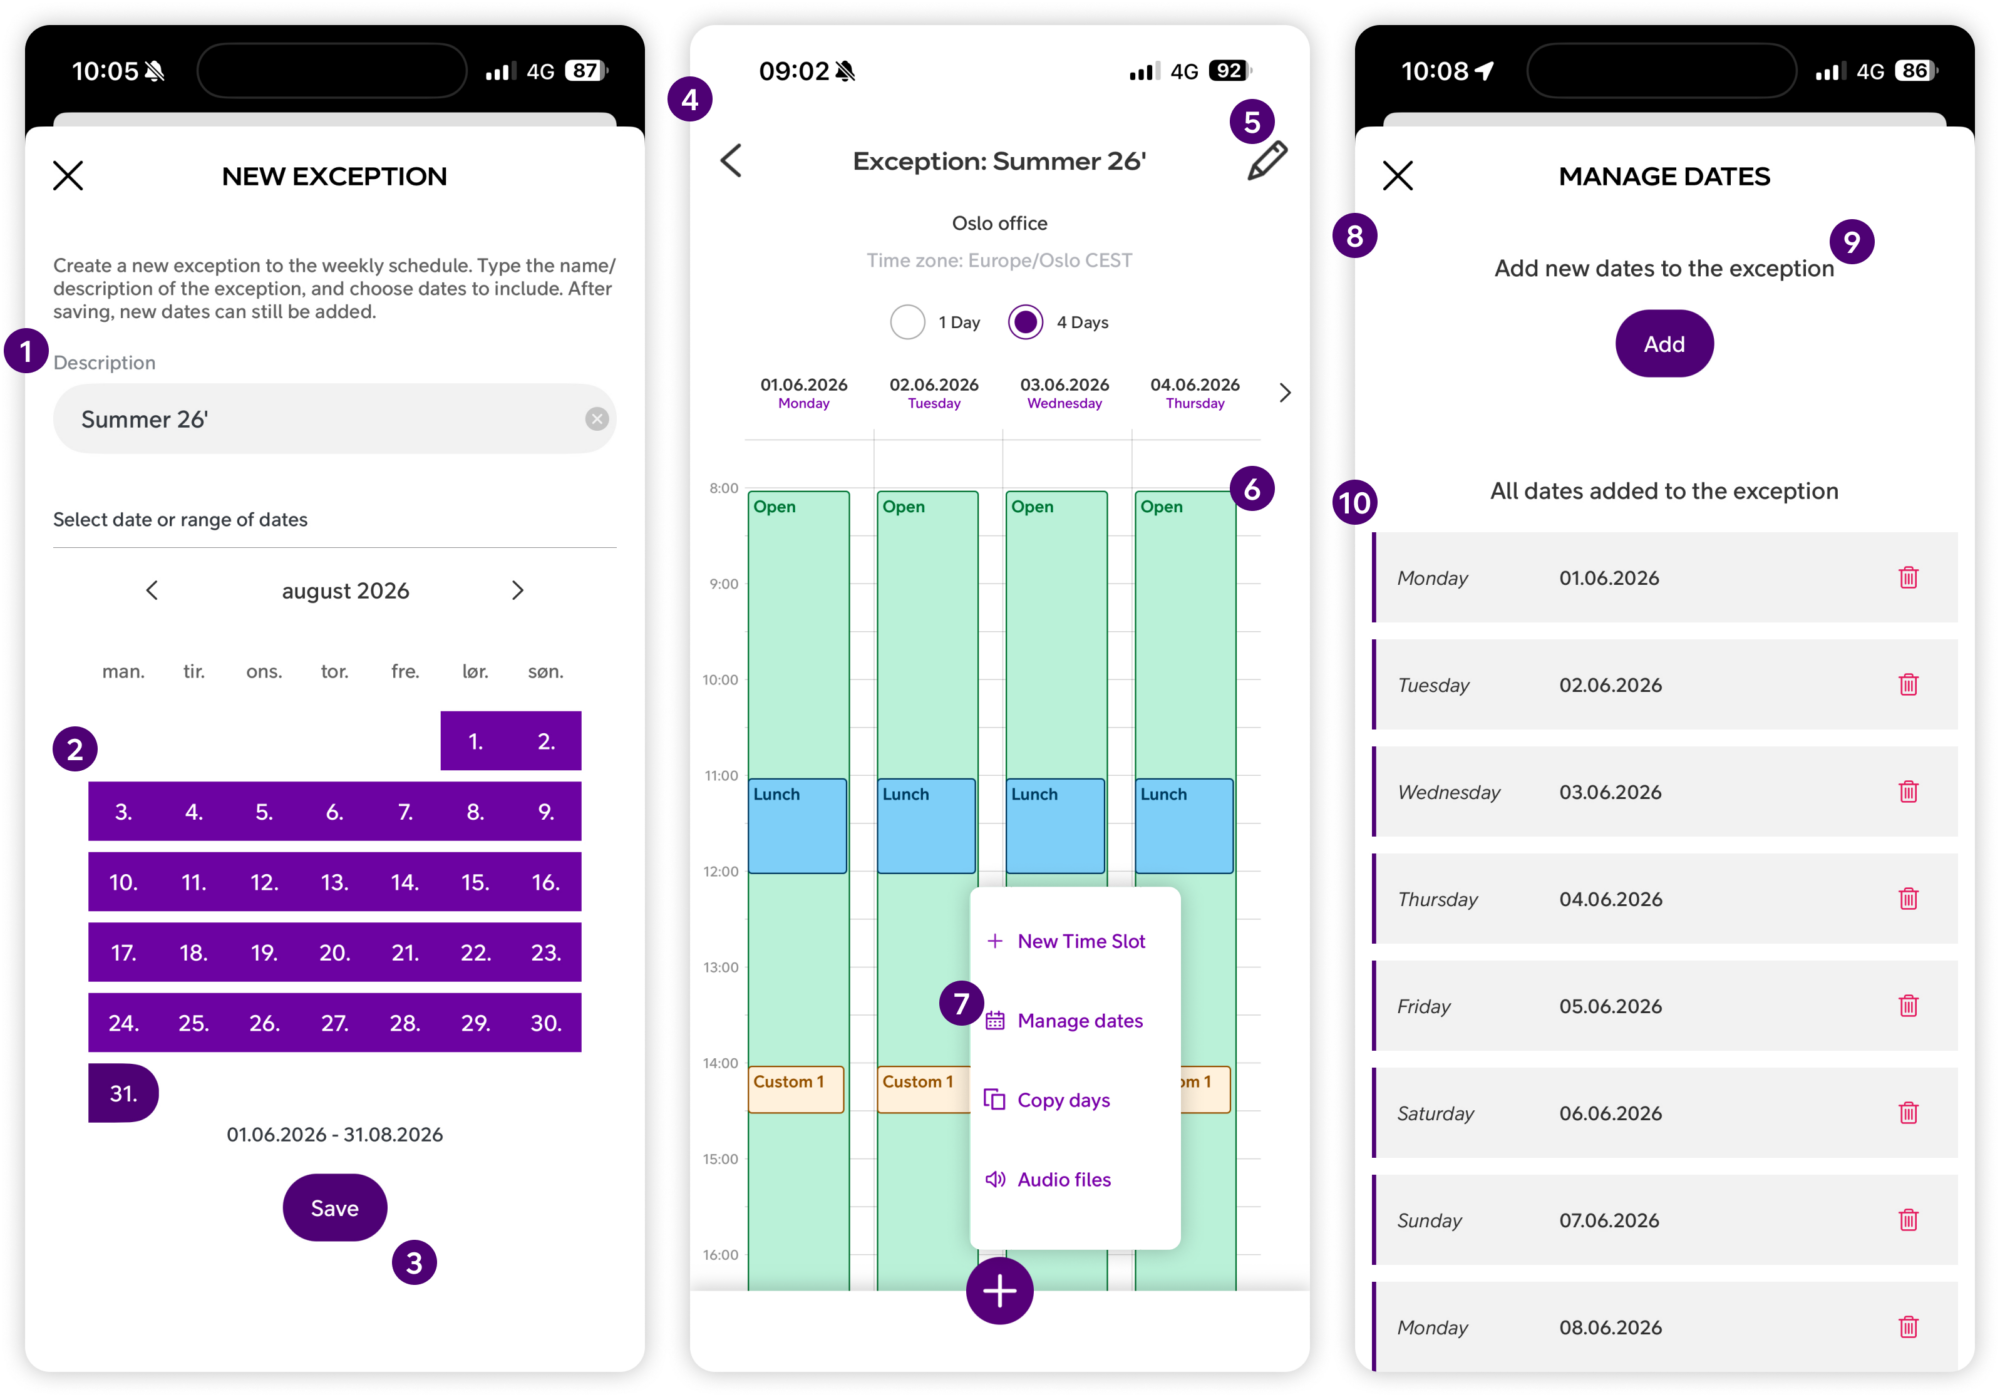
Navigate to the Opening Hours module by tapping the main menu ☰ in the upper left corner, then tap Administrator, and then Opening Hours.
Select the opening hour you want to edit, then tap New exception at the bottom of the screen.
Note: Exceptions are dynamic and override the static weekly schedule on the specific dates you select.
1
Create a new exception
Type a name for the exception in the description field.
2
Choose dates
Select a date or a range of dates the exception should apply to. Dates can be added and removed after the exception has been created.
3
Save
Tap Save to create the exception.
4
Exception view
The exception view works the same way as the weekly schedule view. You can swipe or tap through all the days and dates added to the exception.
5
Edit exception name
Tap the edit icon in the upper right corner to change the name of the exception.
6
Edit time slot
Tap a time slot in the calendar view to open it, then tap the edit icon to make changes.
7
Add new time slot, manage dates, copy days or edit audio files
Tap the + button at the bottom of the screen to open the action menu. From here you can add a New time slot, Manage dates, Copy days or manage Audio files.
8
Manage dates
Tap Manage dates to see a list of all dates added to the exception.
9
Add new dates
Tap Add to add new dates to the exception.
10
List of all dates
All dates added to the exception are listed here. Tap the delete icon next to a date to remove it from the exception.
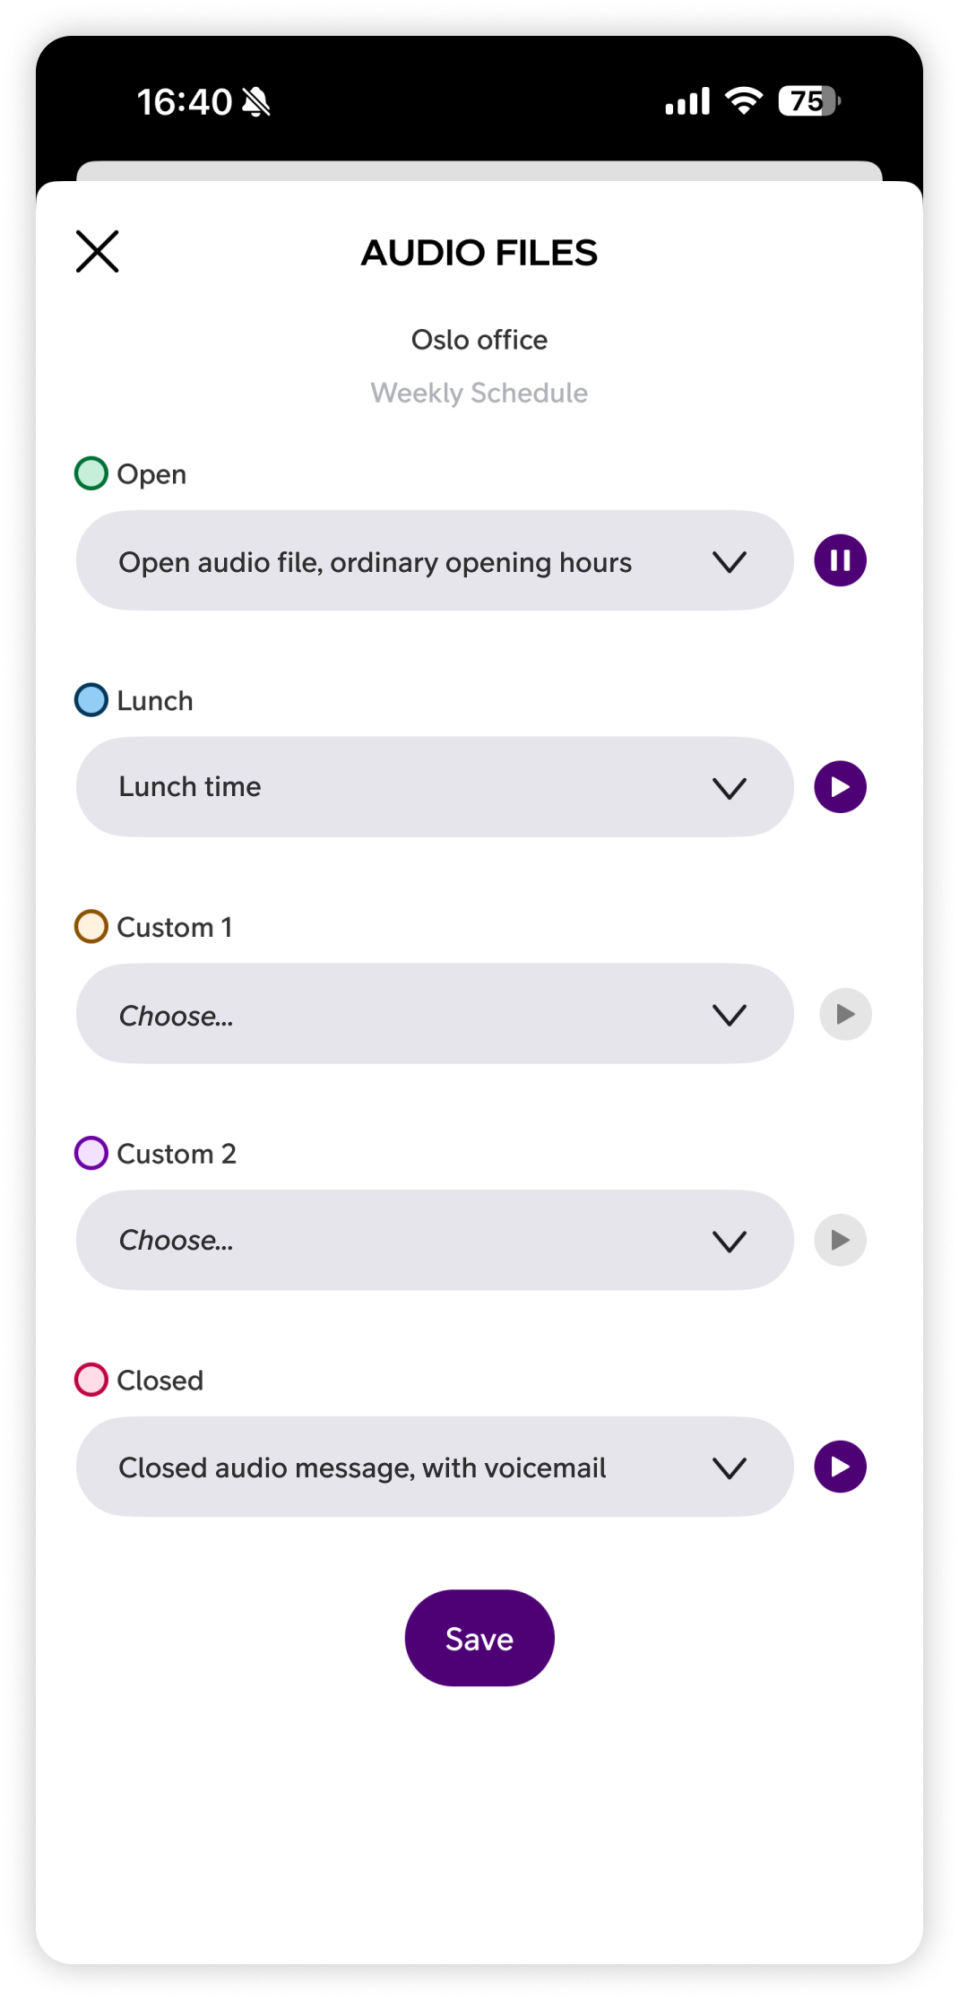
Manage audio files and copy days
Manage audio files
Navigate to the Opening Hours module by tapping the main menu ☰ in the upper left corner, then tap Administrator, and then Opening Hours.
Select the opening hour or exception you want to edit, tap the + button at the bottom of the screen, and tap Audio files.
Here you can assign an audio file to each time slot type: Open, Lunch, Custom 1, Custom 2 and Closed. Select the desired audio file for each time slot using the dropdown menu. Tap the Play button to listen to an audio file before selecting it. When you are done, tap Save to activate the selected audio files.
Note: Recording and managing audio files is done in the Audio files module (Main menu ☰ > Administrator > Audio files).
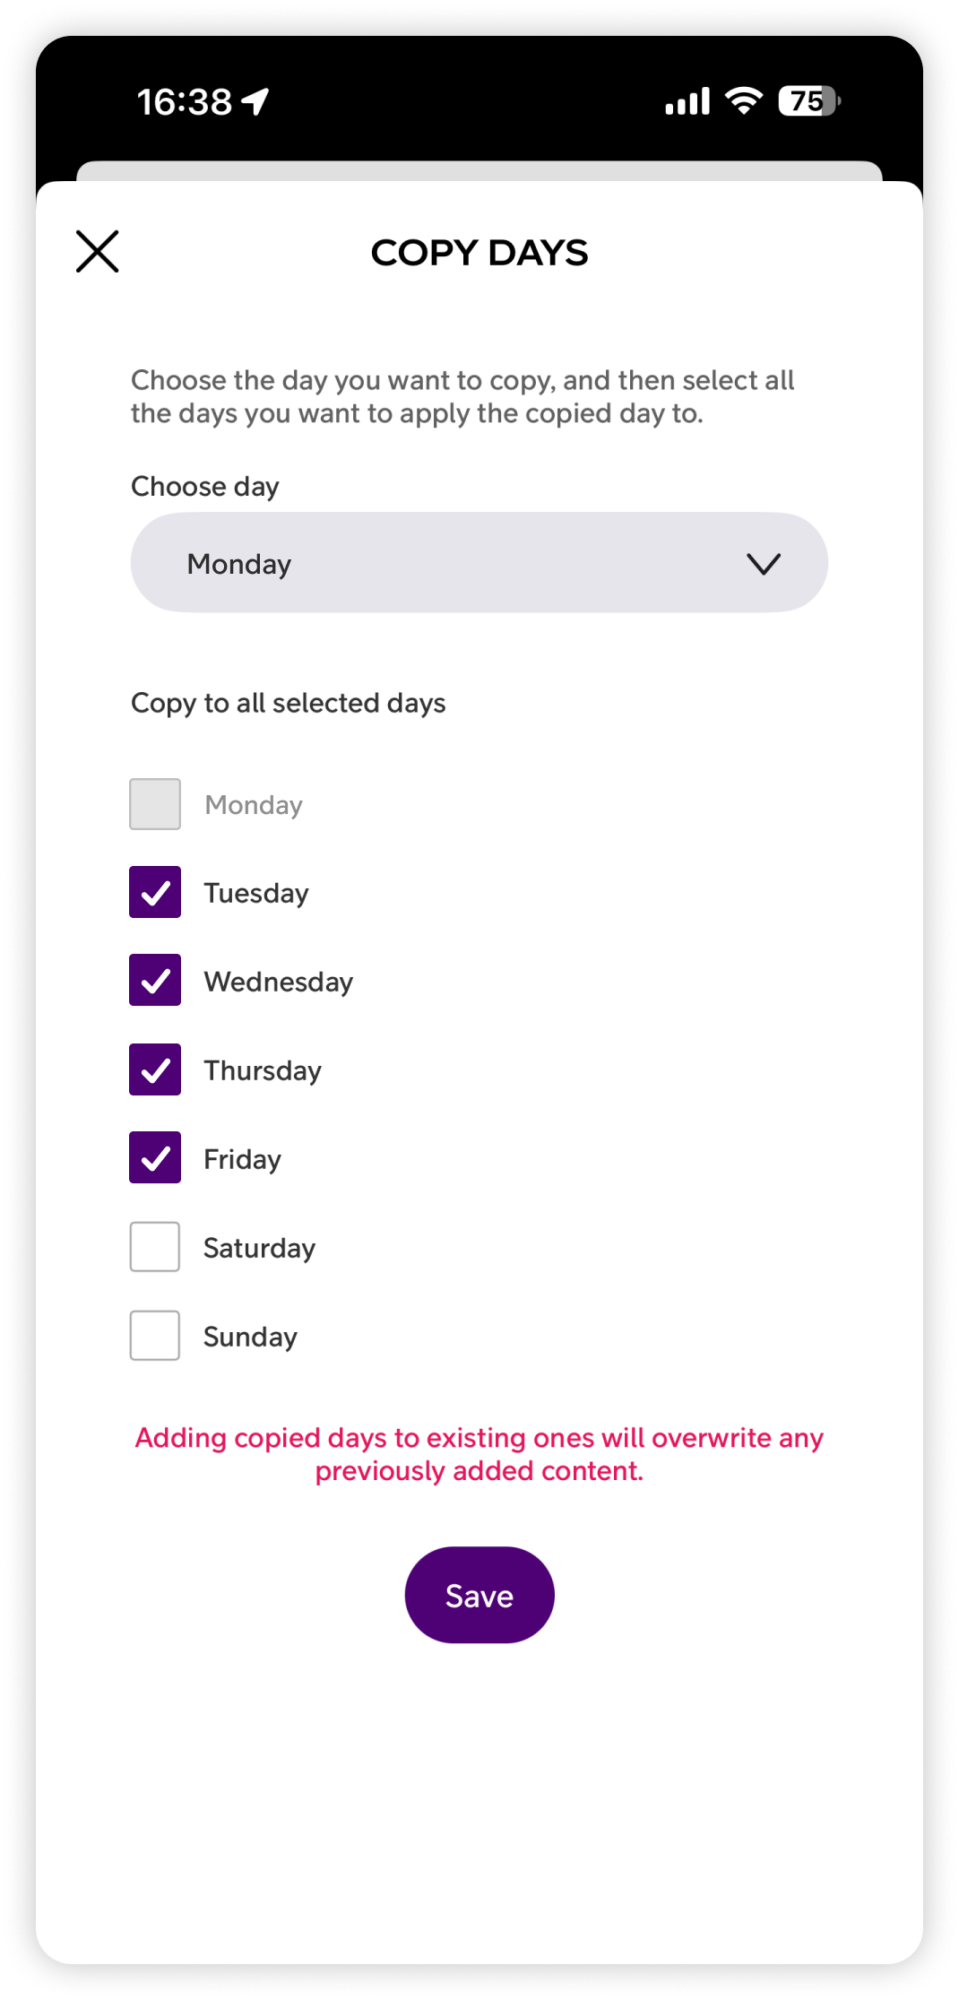
Copy days
Navigate to the Opening Hours module by tapping the main menu ☰ in the upper left corner, then tap Administrator, and then Opening Hours.
Select the opening hour or exception you want to edit, tap the + button at the bottom of the screen, and tap Copy days.
Select the day you want to copy from the Choose day dropdown. Then tick the days you want to apply the copied schedule to. Tap Save when done.
Note: Copying days to existing ones will overwrite any previously added content.
FAQ
Q: How do I create a new opening hour?
A: To create a new opening hour:
- Tap the main menu ☰ in the upper left corner.
- Tap Administrator.
- Tap Opening Hours.
- Tap the New button at the bottom of the screen.
- Enter a name for the opening hour.
- Tap Add. The opening hour is created with a default weekly schedule: Monday–Friday, 08:00–16:00.
Q: How do I add a time slot to an opening hour?
A: To add a new time slot:
- Tap the main menu ☰ in the upper left corner.
- Tap Administrator.
- Tap Opening Hours.
- Select the opening hour you want to edit.
- Tap the + button at the bottom of the screen.
- Tap New time slot.
- Select the day, type, and time for the time slot.
- Tap Add to save.
Q: How do I edit an existing time slot?
A: To edit a time slot:
- Tap the main menu ☰ in the upper left corner.
- Tap Administrator.
- Tap Opening Hours.
- Select the opening hour you want to edit.
- Tap the time slot you want to change.
- Tap the edit icon.
- Make your changes and tap Save.
Q: How do I create an exception?
A: To create an exception that overrides the weekly schedule on specific dates:
- Tap the main menu ☰ in the upper left corner.
- Tap Administrator.
- Tap Opening Hours.
- Select the opening hour you want to add an exception to.
- Tap the New exception button at the bottom of the screen.
- Enter a name for the exception.
- Select the dates the exception should apply to.
- Tap Save.
Q: How do I add or remove dates from an existing exception?
A: To manage dates on an existing exception:
- Tap the main menu ☰ in the upper left corner.
- Tap Administrator.
- Tap Opening Hours.
- Select the opening hour and then tap the exception you want to edit.
- Tap the + button at the bottom of the screen.
- Tap Manage dates.
- Tap Add to add new dates, or tap the delete icon next to a date to remove it.
Q: How do I assign audio files to an opening hour or exception?
A: To assign audio files to an opening hour or exception:
- Tap the main menu ☰ in the upper left corner.
- Tap Administrator.
- Tap Opening Hours.
- Select the opening hour (or exception) you want to edit.
- Tap the + button at the bottom of the screen.
- Tap Audio files.
- Select the desired audio file for each time slot type using the dropdown menu.
- Tap Save to activate the selected audio files.
Q: How do I copy a day’s schedule to other days?
A: To copy a day’s schedule to other days:
- Tap the main menu ☰ in the upper left corner.
- Tap Administrator.
- Tap Opening Hours.
- Select the opening hour you want to edit.
- Tap the + button at the bottom of the screen.
- Tap Copy days.
- Select the day you want to copy from the Choose day dropdown.
- Tick the days you want to apply the copied schedule to.
- Tap Save. Note that this will overwrite any previously added content on the selected days.
User Guides
Here you can find user guides connected to the feature topic. If you can’t find what you are looking for here you might find it in our main user guide archive.
User Guides