Telia Smart Connect is also available as an app on both the App Store and Google Play. This means that you can access your switchboard on your mobile devices with just a few taps, making it even more convenient to have full control.


Chat
The chat module in Telia Smart Connect allows administrators to set up and manage a fully integrated chat solution, providing customers with an additional way to reach out. Chats can be handled alongside calls, ensuring seamless communication across channels.
- Add and manage chat queues and agents
- Customize chat widgets to match your branding
- Set up operating hours and automated responses
- Route inquiries based on categories for efficient handling
- Monitor chat performance with real-time insights
For users
As a chat agent, you can easily manage and respond to chats sent to your company by picking chats assigned to your queue or queues.
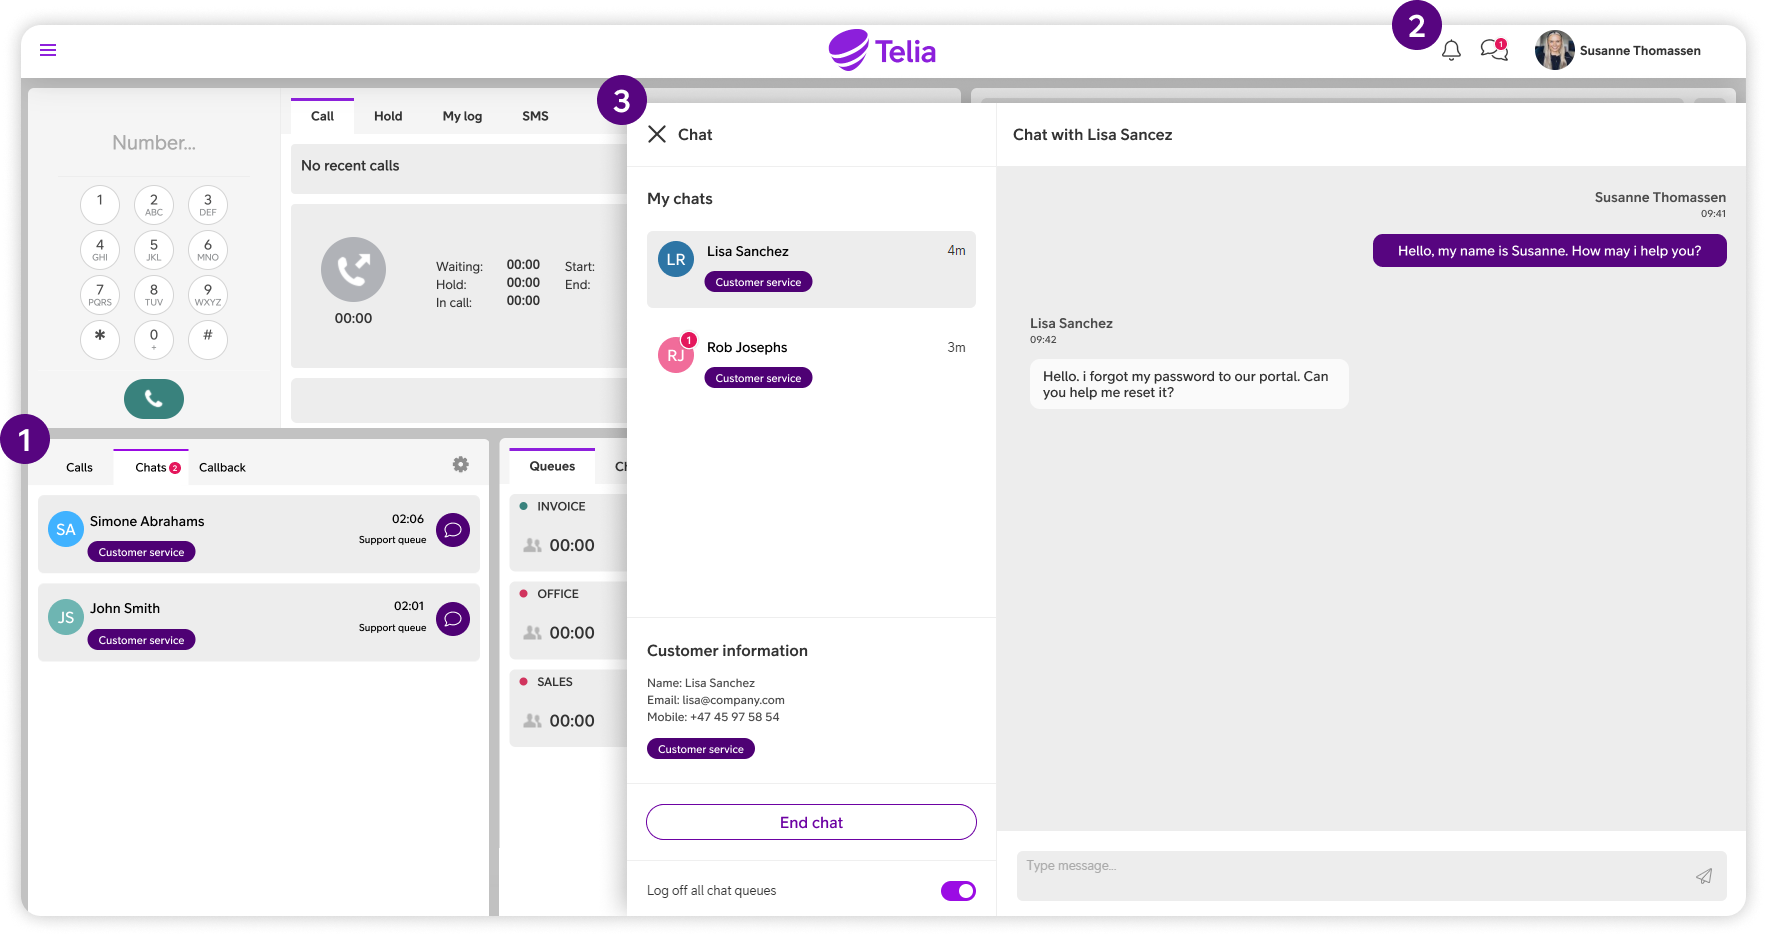
The incoming chats are available directly in the switchboard down to the left, under the tab “Chats”. If you cannot see this tab, it’s probably because your administrator has not activated it yet. Contact your administrator for more info.
Overview
1
Incoming chats
All incoming chats will be listed here under the tab “Chats”. Click the purple button on the relevant chat to pick it and thereby assign it to yourself. Only chats assigned to queues you are a member off will be displayed. Chats are assigned to different queues based on the category selected by your customer before the chat was initiated.
2
Chat button and notifications
The chat-button in the header allows agents to open the chat window, and also see real time notifications for unread chats. If there are unread messages, this will be displayed trough a red dot, stating the number of unread messages.
3
Chat window
The chat window will open when clicking the chat icon in the switchboard or in the header, and will close when clicking the close-button in the chat window.
Manage active chats
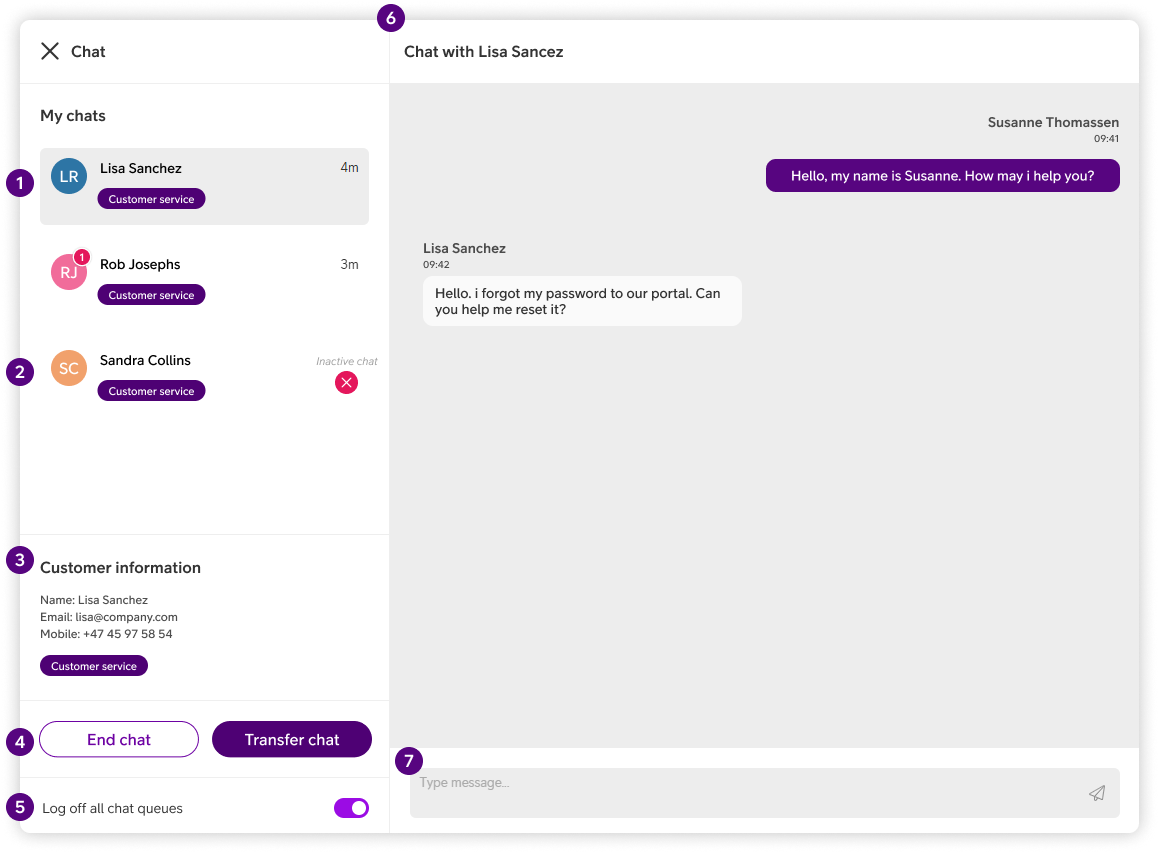
1
Active chats
A list of all chats that the chat agent has picked. The chat highlighted in gray is the current chat. If new messages has been sent in another active chat, this will be notified trough a little red notification, stating how many unread messages has been sent.
2
Ended chats
All ended chats, either by end user, or by chat agent, has to be manually removed from the chat agents list. All ended chats are marked with “Inactive chat” text, and a red close-button. Click the red close-button to remove the chat from the list.
3
Customer information
Customer information is information about the customer the agent is currently talking to.
4
End chat & transfer chat
To terminate the chat, click “End chat” and confirm in the pop-up asking you to confirm.
To transfer a chat, click the “Transfer chat” button. A pop-up will let you transfer the chat to a queue or a category. Select in the drop down, and confirm by clicking “Transfer chat”. The chat history will follow.
5
Log off all chat queues
Toggle that lets the chat agent log on/off all chat queues.
6
Chat
Overview over the chat that is currently active. Agent-messages are purple, and customer messages are white.
7
Send message
Type the message here, and click either the “send” icon, or enter on your keyboard.
For administrators
As an administrator you can easily transform how you connect with customers, by bringing seamless chat capabilities to your switchboard.
For all administration of the chat administrate the chat, click the main menu button ☰, and then click “Chat”.
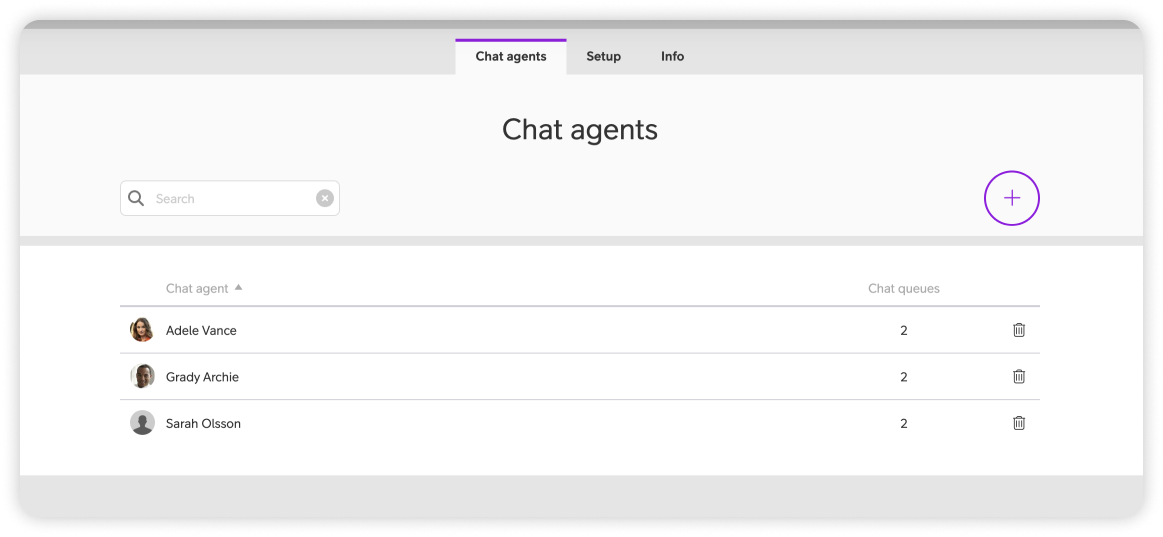
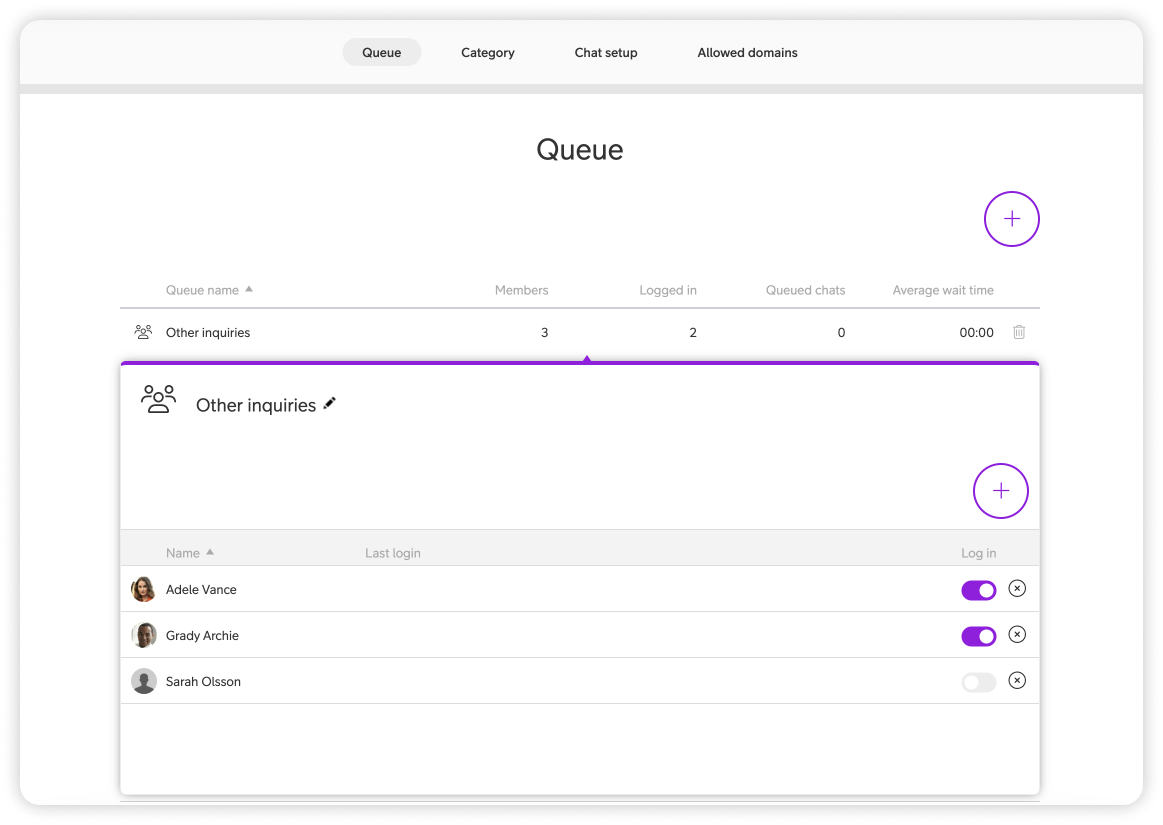
Queue
To create and edit chat queues, enter the main menu ☰, click “Chat”, then click “Setup” and then click “Queue”.
Create a new queue by clicking the plus sign in the top right corner, enter the name, and click “Save”.
Add members to the queue by clicking the queue in the list, then click the plus sign, select the user(s) you wish to add, and then click “Add member”.
To log agents on and off the queue, select the queue, click the toggle next to the agents name.
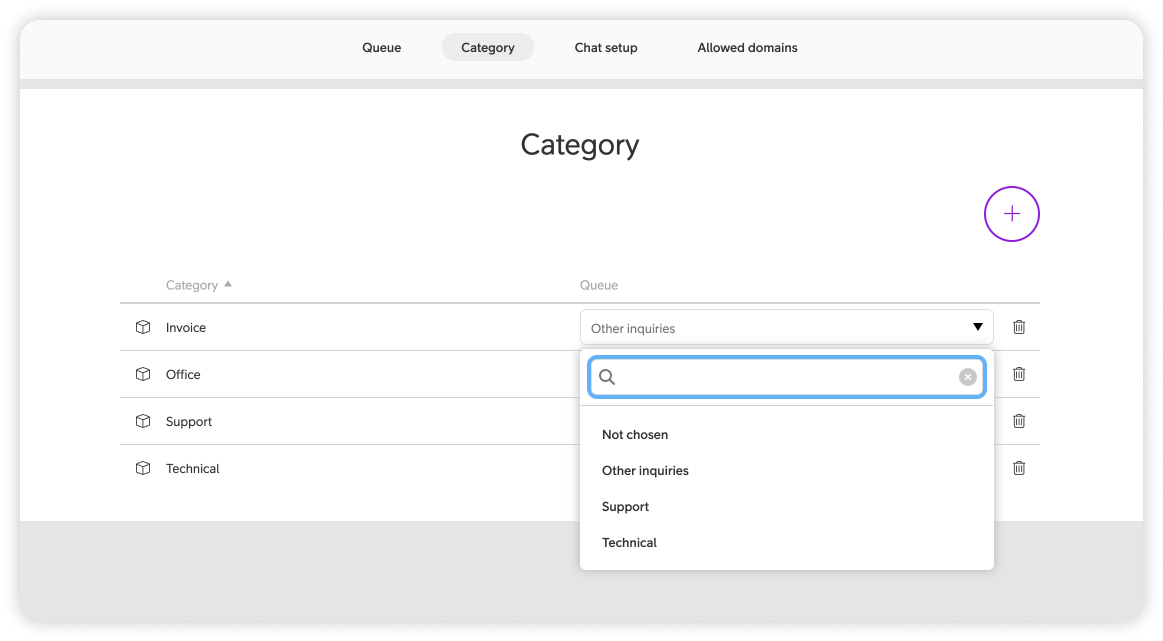
Category
Categories are used for two purposes. Reason 1: They allow users to easily select a category related to what their question is about. For example, the category “Invoice” for questions regarding billing and payments, or “Technical support” for product related questions.
Reason 2: Categories are used to route the incoming inquiries to the correct queue. For example, you can route all inquiries under the category “Invoice” to be forwarded to agents logged into the “Invoice” queue.
Under this “Category” tab you can create new categories, and you can select what queue each category should route to.
To create categories:
- Enter the main menu ☰
- Click “Chat”
- Click “Setup”
- Click “Category”
- Click the plus sign
- Enter the desired name
- Click “Create”
To select what queue a category should route to:
- Enter the main menu ☰
- Click “Chat”
- Click “Setup”
- Click the dropdown menu next to the category
- Select the queue you want the category to route to
Several categories can be routed to the same queue if desired.
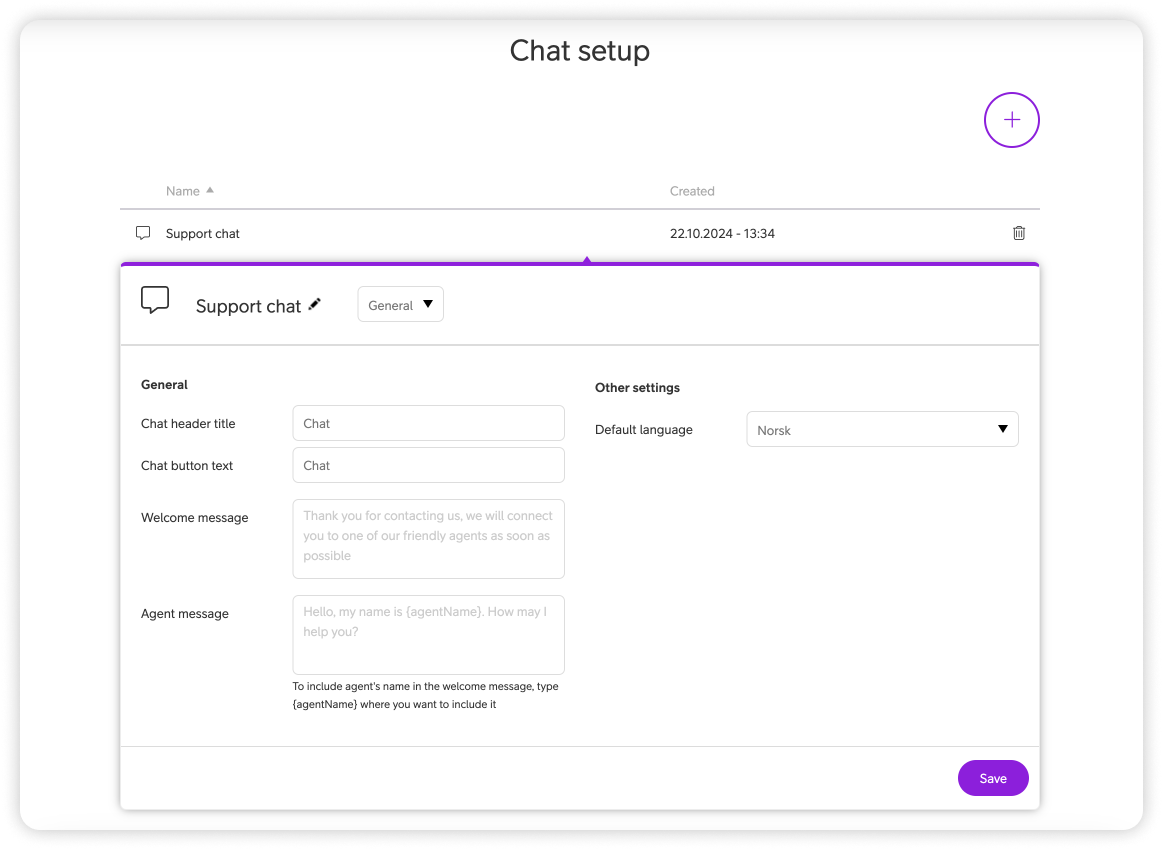
Chat setup
Create a chat setup to implement the chat feature on your website. In the chat setup, you configure general information such as a welcome message, automatic responses from the chat agent, operating hours for chat availability, and retrieve the script that needs to be embedded in all the HTML code where you want the chat to be displayed.
Chat header:
Header text in the chat implemented on your website. Example “Chat with [Company Name]”
Chat button text:
This is the button the end-user clicks on to start the chat.
Welcome message:
An automatic message sent to the end-user before the chat has been selected by an agent.
Agent message:
An automatic message sent from the agent when the chat has been selected. Type “{AgentName}” in the message to include the agents name.
Default language:
The language applies to all fixed texts that are generated by the system, like error-messages, help text and so on.
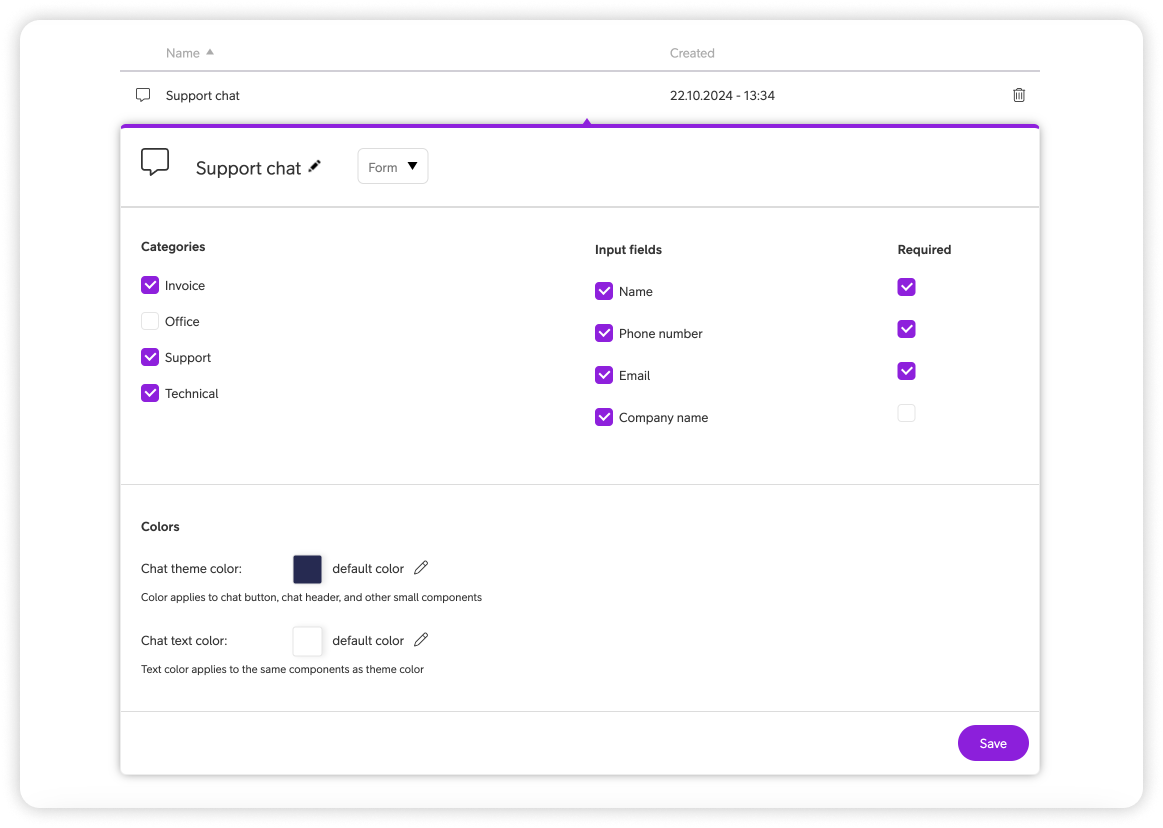
Form
Categories
Select which categories should be used in this form. The categories checked here will be visible in the dropdown menu in the chat widget implemented on your website.
Input fields
Choose what input fields should be included in this form, and what input fields should be required to fill out.
Colours
Choose what colours the chat widget should be.
Opening hours
Define what times the chat should be available on your website. The opening hours set here will apply to this chat setup. Check “select for all weekdays” to change all weekdays. Check if you want the entire current day to be closed.
If you want a closed message to be displayed outside opening hours, enter it here. An example could be informing users about the days and times the chat is available.

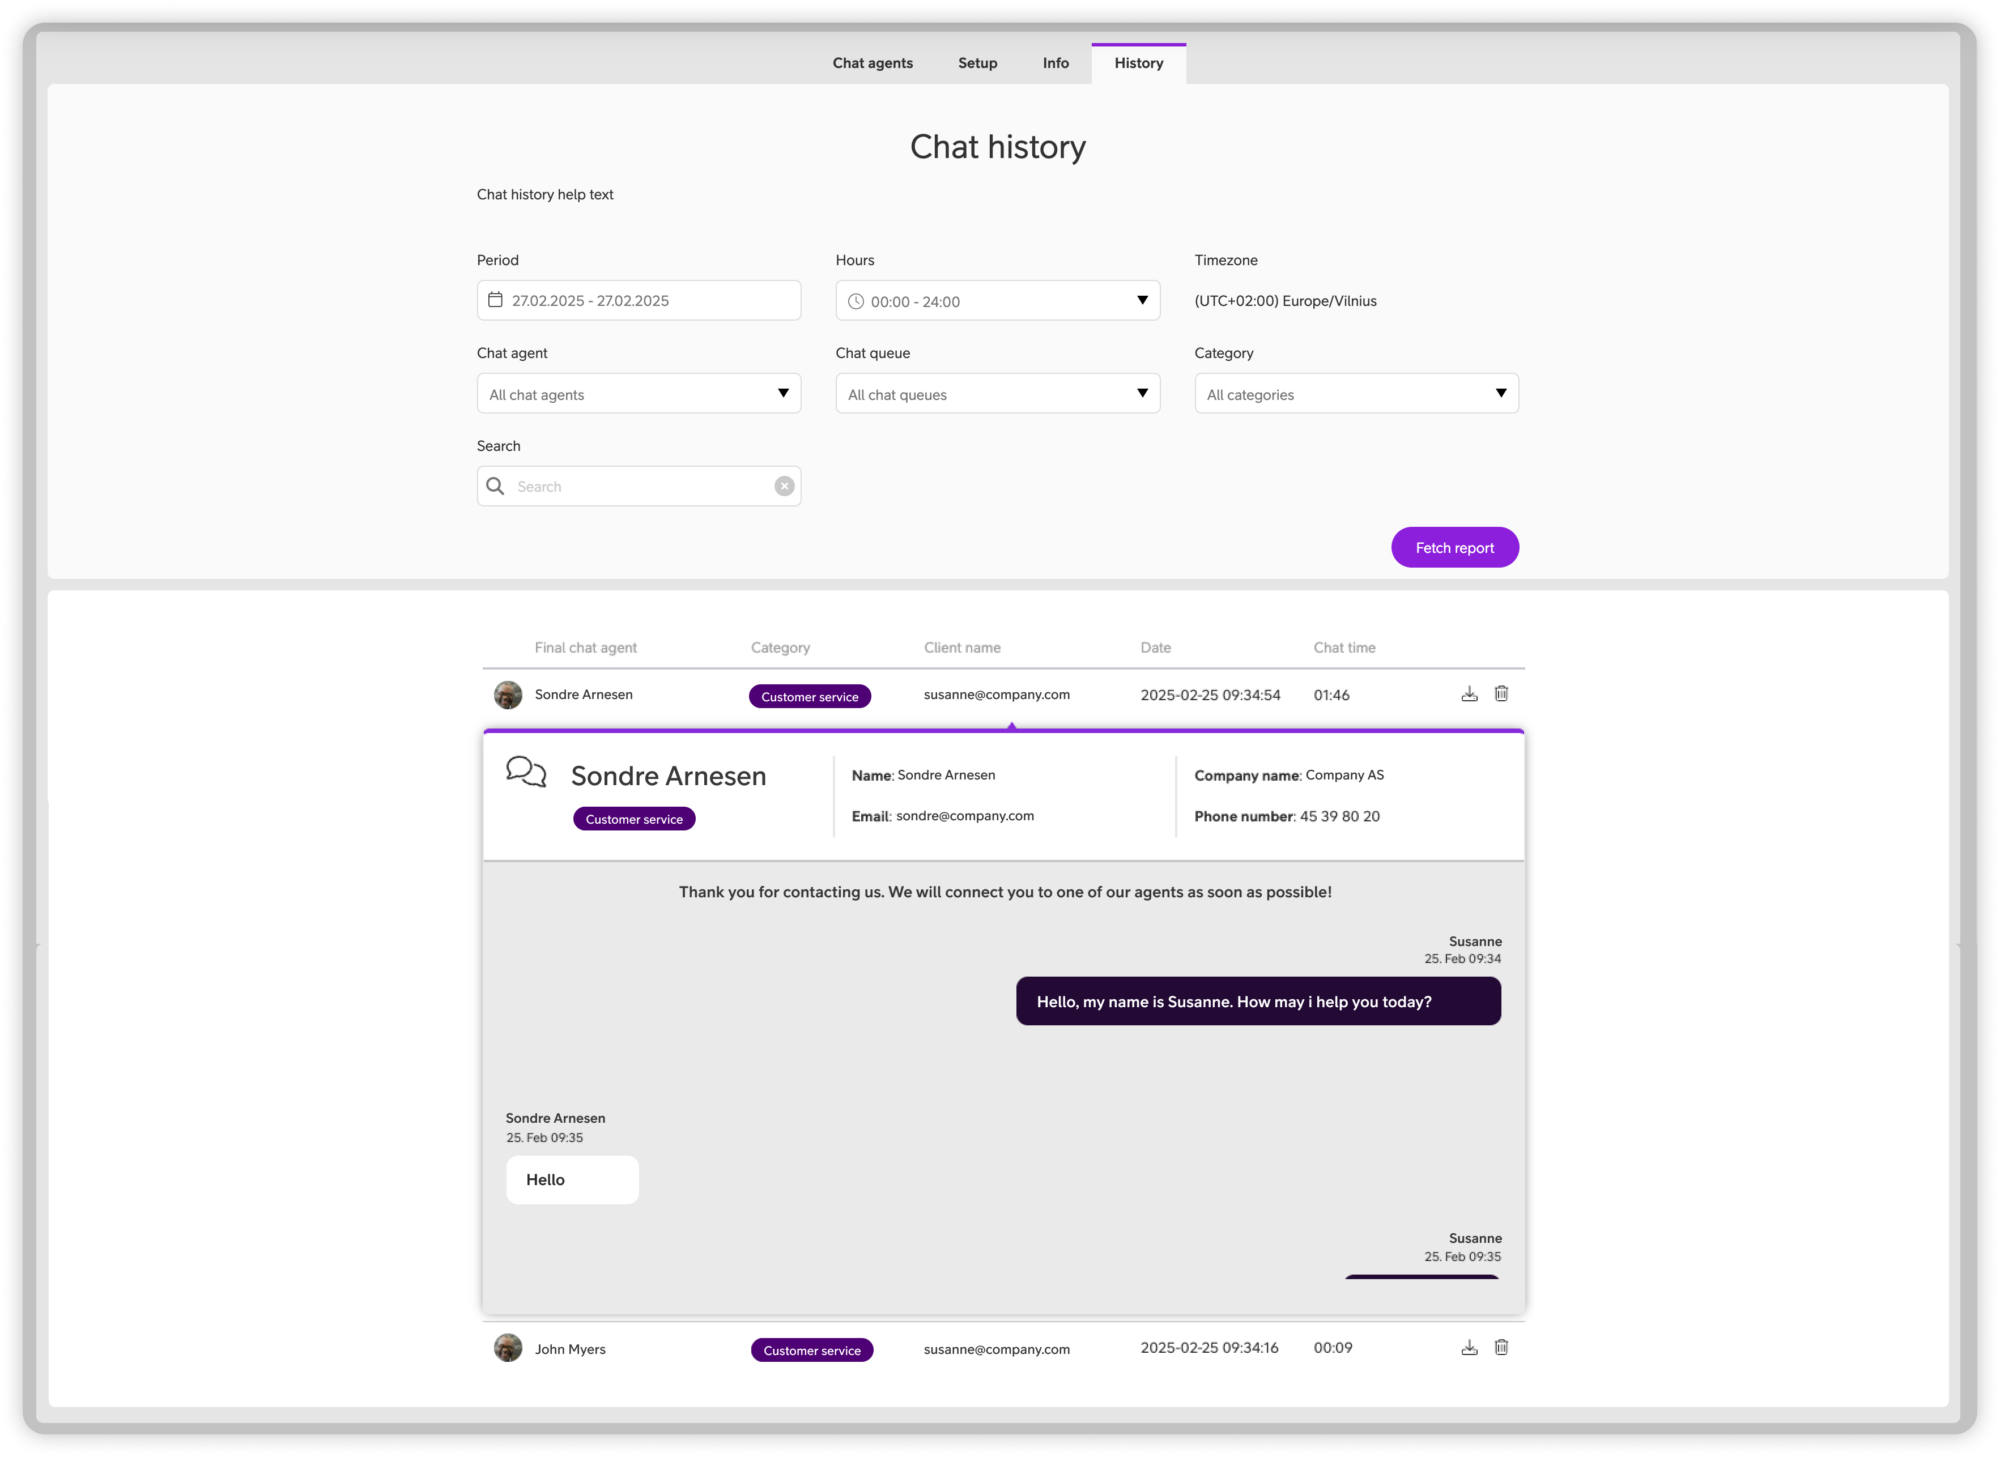
Chat history
In the chat history, you as an administrator have full overview of all completed chats. Each chat history contains information about the end user, chat agent, date and time, as well as details about the chat—for example, whether it has been transferred to another queue, whether it was ended by the end user or the agent, etc.
It is also possible to download or delete a chat. These actions are logged in the audit log.
FAQ
1. Q: How do I activate the chat function?
A:
To activate the chat widget, you may need to contact your local Telia office to agree on the billing (not needed in Norway). Then you can follow the steps below:
-
Click the main menu ☰.
-
Select Chat.
-
Click Setup, then choose Chat setup.
-
Click the plus sign to create a new chat instance.
-
Configure the appearance, messaging and opening hours under General, Form and Opening hours (via the dropdown menu).
-
Then follow the steps under Implementation (in the dropdown) to install it on your website.
2. Q: How can I customize the colors of the chat widget to match our branding?
A:
You can customize the theme color and the text color within the chat button, header, and other small components.
To do this:
-
Click the main menu ☰.
-
Go to Chat.
-
Click Setup, then Chat setup.
-
Select the chat instance you want to edit.
-
Open the dropdown menu and choose Form.
-
Click on the color fields to change both the theme color and text color.
-
Save your changes.
This helps your chat match your company’s branding and website style.
3. Q: How do I change the welcome message, chat button text, or header title?
A:
You can personalize the chat texts, including:
-
Chat header title
-
Chat button text
-
Welcome message
-
Agent message
To update these:
-
Click the main menu ☰.
-
Select Chat, then Setup, then Chat setup.
-
Click the chat instance you’d like to edit.
-
Open the dropdown menu and choose General.
-
Enter your custom text into each relevant field.
-
Click Save.
This helps tailor the chat tone and language to your audience.
4. Q: Can I preview the chat widget before it goes live?
A:
No, Telia Smart Connect does not currently support previewing the chat widget inside the admin interface. To see changes, you must install the widget on a live or staging website.
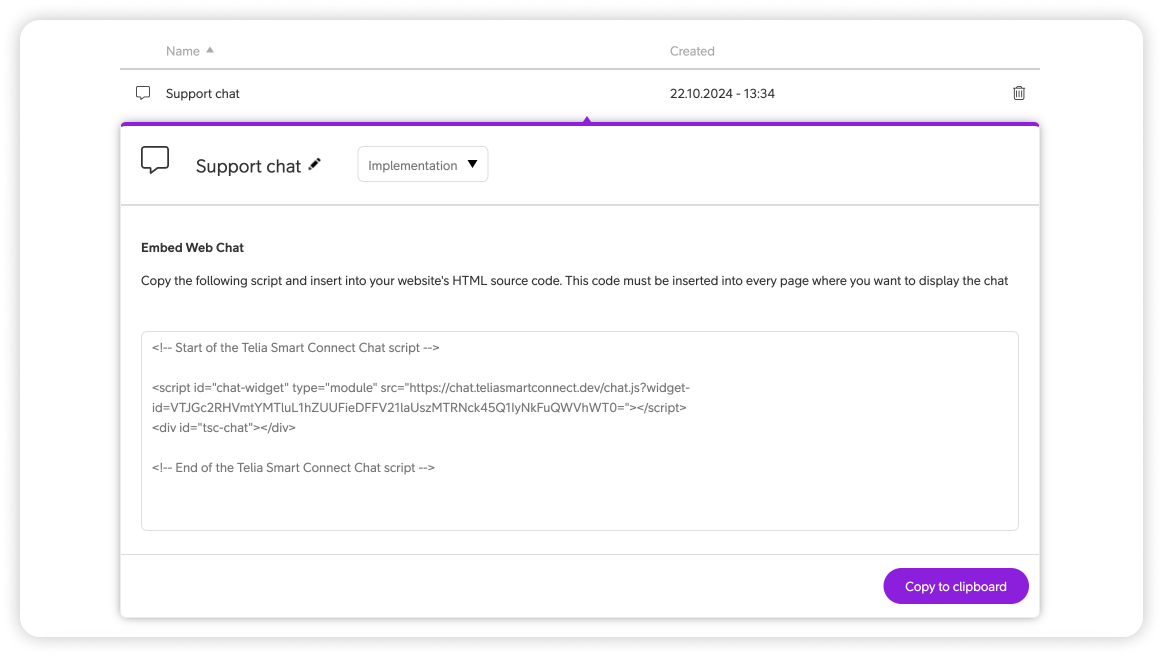
5. Q: How do I install the chat widget on my website?
A:
To install the widget:
-
Click the main menu ☰.
-
Select Chat, then Setup, then Chat setup.
-
Click the chat instance you’ve configured.
-
Open the dropdown menu and select Implementation.
-
Copy the provided HTML code.
-
Paste this code into the source code of every webpage where you want the chat to appear.
The chat widget will only show on pages that include this HTML snippet.
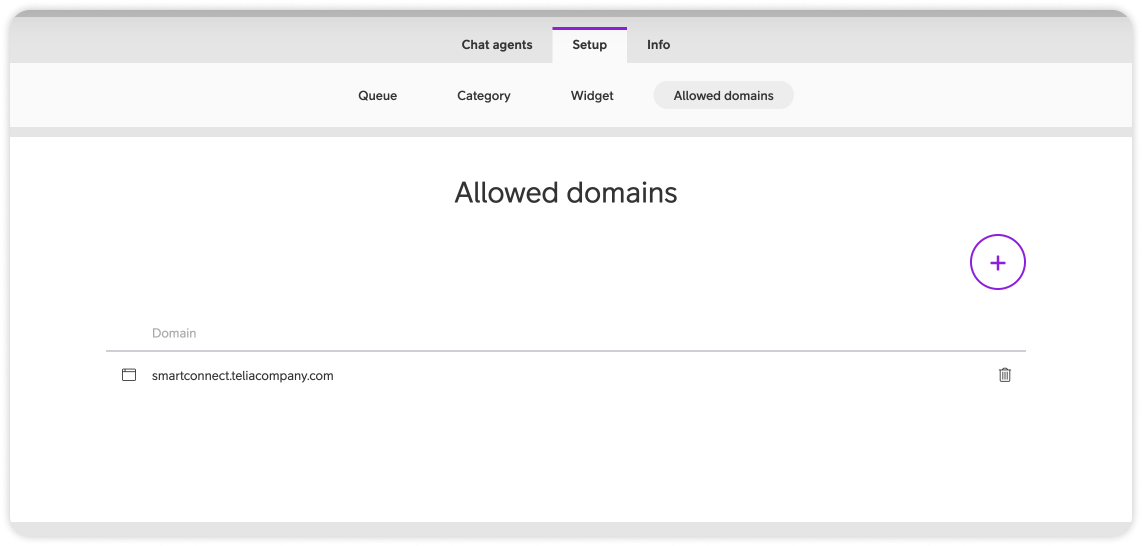
6. Q: Can I manage multiple chat widgets for different websites or sections?
A:
Yes. To manage multiple widgets:
-
Go to the main menu ☰.
-
Select Chat > Setup > Chat setup.
-
Create a new chat instance for each site or use case.
-
Customize each instance’s branding, text, and visibility.
-
Use the unique HTML snippet under Implementation to embed each widget where needed.
This allows for separate setups on different sites, sections, or languages.
7. Q: How do I change when the chat is available to visitors?
A:
You can define when the chat should be available by setting opening hours.
Here’s how:
-
Click the main menu ☰.
-
Select Chat, then Setup, then Chat setup.
-
Choose the chat instance you want to configure.
-
Open the dropdown menu, then select Opening hours.
-
Select the days and times when the chat should be active.
-
Click Save to apply the changes.
This ensures the chat is only available during your desired hours, such as business hours.
8. Q: How are incoming chats assigned to agents in Telia Smart Connect?
A:
Chats in Telia Smart Connect are not assigned automatically or in a traditional queue-based way. Instead, all incoming chats are visible to all users who are part of the relevant chat queue.
Here’s how it works:
-
When a customer initiates a chat, it appears in the shared inbox for that queue.
-
Any available user in the queue can pick up the chat by simply clicking on it.
-
Once a user clicks the chat, it becomes theirs to handle.
This self-assignment model gives teams flexibility and avoids automatic routing logic, making it easier to manage customer interactions based on availability and responsiveness.
User Guides
Here you can find user guides connected to the feature topic. If you can’t find what you are looking for here you might find it in our main user guide archive.
User Guides